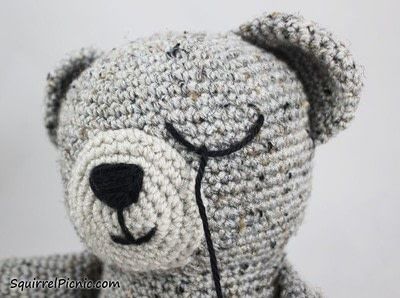
Learn how-to stitch a sleepy face for your amigurumi with Jennifer from Squirrel Picnic and then make her adorable sleepy bear.
-

Step 1
Thread your yarn needle and insert it into your amigurumi from the back and exit out the front where you want your eye to start. I find sewing the nose and mouth on first helps with the placement of the eyes.
-

Step 2
Leave a long tail at the back.
-

Step 3
Insert your needle where you want the back of your eye to be (on Sleepy Bear, I counted back 7 stitches) and exit on the front, down and to the right of where you began in Step 1 (on Sleepy Bear, this is down 2 rounds and over 3 stitches).
-

Step 4
Pull the yarn through, leaving a good amount of slack, so that the eye droops. Our next stitches will hold this part of the eye in place.
-

Step 5
Insert the needle below the last exit point where you want your first eyelash to end (on Sleepy Bear, this is 2 rounds down), and exit where you want your next eyelash to begin (on Sleepy Bear, this is 1 stitch over from the first eyelash). Make sure you exit above the drooping yarn.
-

Step 6
Repeat Step 5 for the next eyelash.
-

Step 7
Repeat Step 5 for another eyelash.
-

Step 8
Repeat Step 5 for a final eyelash, but this time you will exit on the opposite side of the face, next to the nose, where you want your next eye to begin.
-
-

Step 10
Insert your needle where you want the back of your eye to be (on Sleepy Bear, I counted back 7 stitches) and exit on the front, down and to the left of where you began in Step 1 (on Sleepy Bear, this is down 2 rounds and over 3 stitches). Continue to repeat the steps above to create the eye and lashes for this side.
-

Step 11
On your last eyelash, draw the needle through to the back of the head and exit through the same stitch that you used in Step 1.
-

Step 12
I like to tie these two ends together and push them into the amigurumi to hide them.
-

Step 13
And there you go. Now you have a friend who is always ready for bedtime.
Got the hang of this technique?
Put your new skill to the test with this tutorial:
Is there a certain technique you'd love to learn or one that you could teach us? Send us a message!

 Step 10


