


About
Turn some of those lovely buttons you've been hoarding into rings!
A button too pretty to throw away, but you're not sure what to do with it? With a little practice, you can turn them into rings.Be forwarned though; once you learn how to do this, those rings multiply like rabbits, and all your friends will want one! Button rings are my best sellers at shows and the #1 item people ask me to teach them!
-
 Shayna K. favorited Wire Wrapped Button Ring
21 Sep 00:55
Shayna K. favorited Wire Wrapped Button Ring
21 Sep 00:55
-
 Jem L. added Wire Wrapped Button Ring to Jewelry
07 Nov 19:09
Jem L. added Wire Wrapped Button Ring to Jewelry
07 Nov 19:09
-
Jem L. favorited Wire Wrapped Button Ring
07 Nov 19:09
-
 Rattiemama added Wire Wrapped Button Ring to Jewellery Tutorials
05 Oct 13:21
Rattiemama added Wire Wrapped Button Ring to Jewellery Tutorials
05 Oct 13:21
-
Rattiemama favorited Wire Wrapped Button Ring
05 Oct 13:21
-
 Werk.eht.bro favorited Wire Wrapped Button Ring
10 Jun 21:44
Werk.eht.bro favorited Wire Wrapped Button Ring
10 Jun 21:44
-
 Emma H. favorited Wire Wrapped Button Ring
29 Mar 12:04
Emma H. favorited Wire Wrapped Button Ring
29 Mar 12:04
-
 dorothy.brundagebell favorited Wire Wrapped Button Ring
24 Mar 22:10
dorothy.brundagebell favorited Wire Wrapped Button Ring
24 Mar 22:10
-
 Violet B. added Wire Wrapped Button Ring to try later
18 Mar 20:49
Violet B. added Wire Wrapped Button Ring to try later
18 Mar 20:49
-
 dana.hoaglandbyers favorited Wire Wrapped Button Ring
03 Jan 01:53
dana.hoaglandbyers favorited Wire Wrapped Button Ring
03 Jan 01:53
-
 Step 1
These are the tools you will need.
-
 Step 2
Find a pretty button. I use 20 gauge wire to make my rings.
-
 Step 3
Cut the wire 18" long. If you are making a ring over size 8, add an inch or 2 to the wire. Straighten your wire with the nylon jaw pliers.
-
 Step 4
Slide your button onto the wire and fold it slightly in the middle of the wire.
-
 Step 5
Holding the button in the grooved part of the mandrel, slide the wire to 1 size LARGER than you want the ring to be.
-
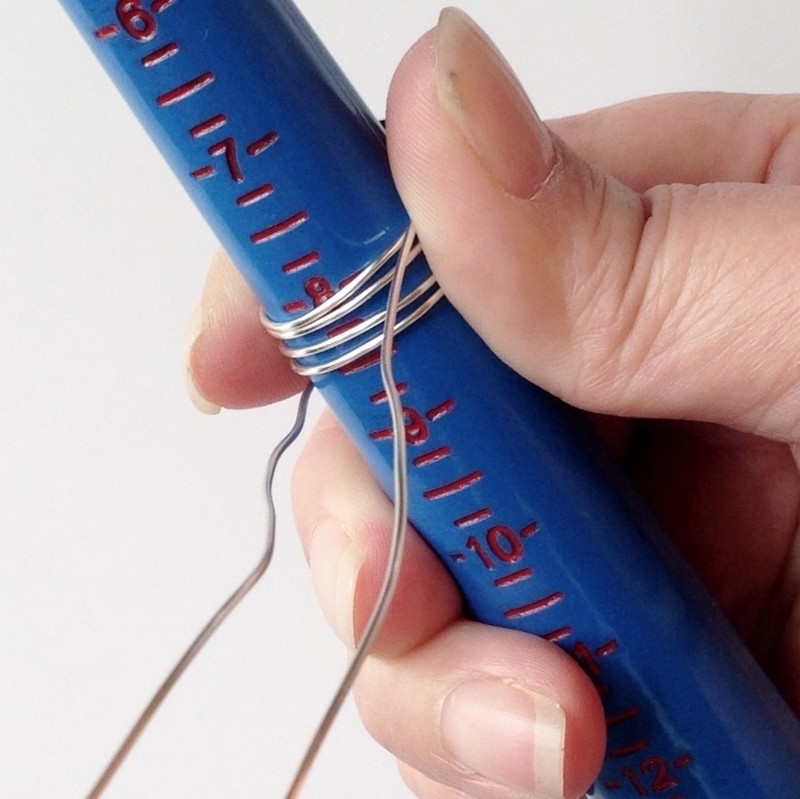
 Step 6
Wrap your wire a total of 4 times around the mandrel, twice above the button, twice below the button. I wrap the top wire left around the mandrel and the bottom wire to the right around the mandrel.
-
 Step 7
Push your wires together and pull them tightly at 1 size larger than you want the finished ring to be. Make sure your ends are even, more or less. Here I am tightening it at a size 8, but I'm going to slide it down to size 9, because I want it to be a size 8.
-
 Step 8
To secure that size, spiral your wire around the shank of the button. Because of the way I wrap the wire around the mandrel, I spiral in a counter clockwise direction. Do this until you have aprox. 3" of wire left on each end.
-
 Step 9
This shows how the wire looks around the shank. Make sure you spiral pretty tightly. That will make the button more stable.
-
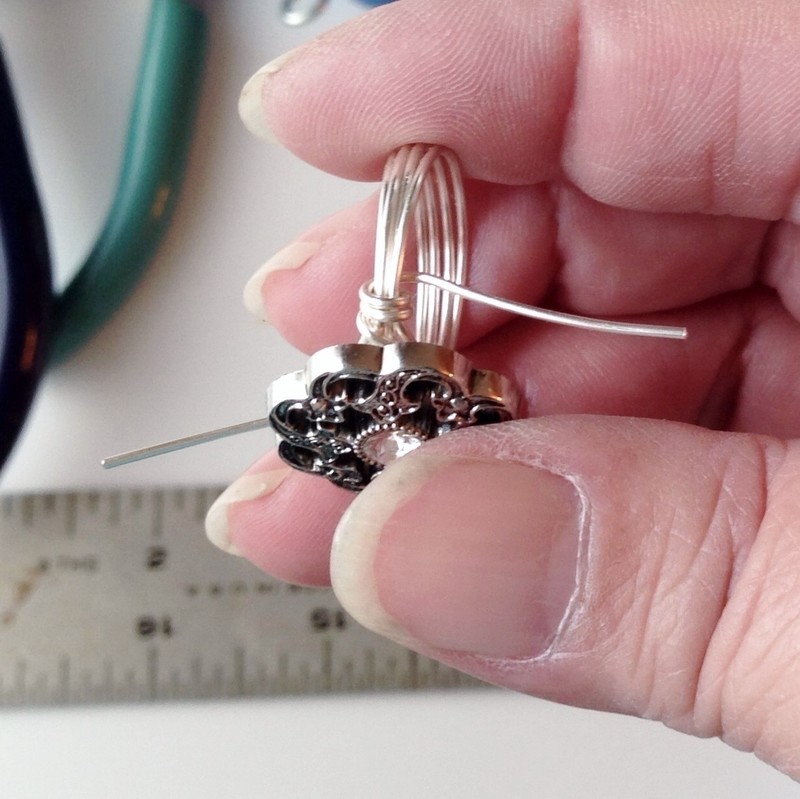
 Step 10
Take your ring off of the mandrel.Holding the ring by pinching the button, thread a wire up thru the band.
-
 Step 11
Pull it up tightly, so that it gathers up the band wires. You can use the flat nose pliers to help pull the wire.
-
 Step 12
Now pull that wire down. You've made a loop that secures your band. Do the same with the other wire on the other side of the button.
-
 Step 13
Now put your ring back on the mandrel, with the button in the groove. You will see that the ring has gotten smaller (it's magic). Continue to wrap the band, a loop at a time on each side until you get it to the size you want.
-
 Step 14
This pic shows how the band wrapping should look. I wrap my band at least twice, and sometimes up to 4 times.
-
 Step 15
Once you have reached the correct size, straighten your wires and have them pointing away from the band. Trim the wire to 3/4" long from the band.
-
 Step 16
With your round nose pliers, begin making a spiral, facing toward the ring and parallel with the button.
-
 Step 17
Use your flat nose pliers to finish your spiral, all the way to the top of the band. Do the same on the other side.
-
 Step 18
With the flat nose pliers, pull the spiral over the top of the band.
-
 Step 19
Now gently press the spiral flat to the band. (Sorry for the bad pic)!
-
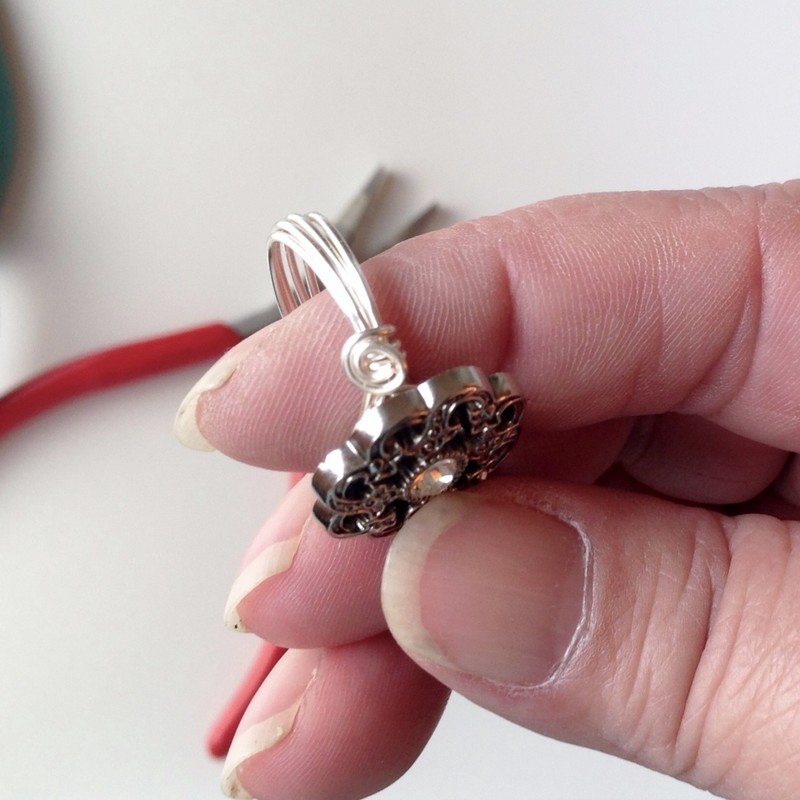
 Step 20
This is how the spiral should look. You can gently push the spiral closer to the button shank if you need to. Do the same on the other side of the button.
-
 Step 21
Return the ring to the mandrel and hammer gently, only on the center of the back of the band. This helps harden the wire and smooths out any little bumps.
-
 Step 22
Get yourself a manicure to go with your beautiful new ring!


 1
Stud Earrings »
Miraculous Ladybug Earrings
1
Stud Earrings »
Miraculous Ladybug Earrings
