


About
All tidied up.
I hate it.
HUNDREDS of remote controls are laying on the table, because each of our tech gadgets needs a separate one.
Yesterday (while cleaning up for the first time in six months) I decided something has to be done.
About an hour later the remotes were gone. All tidied up!
It doesn't matter if you sew up a remote control organiser for your sofa or a armchair, for the back- or the arm-rest of it, the steps are the same.
You'll need some sturdy fabric, a dowel rod [~ 2 cm diameter] and thread - no fancy materials are required! :)
The measurements are individual, the measurements for my own organiser are placed in [brackets] just for clarification.
Please click the pictures for a full-size view.
-
 Millie H. added Remote Control Wallet to To-make for myself list
25 Mar 23:37
Millie H. added Remote Control Wallet to To-make for myself list
25 Mar 23:37
-
 Raven B. added Remote Control Wallet to New ones
08 Feb 19:40
Raven B. added Remote Control Wallet to New ones
08 Feb 19:40
You Will Need
-
 Step 1
Take the measurement over the back-rest (green) or armrest (red), INCLUDING the parts where you can reach between the cushions (dashed lines). Measure to the point where you want the upper edge of the upmost pocket of your organiser to be (blue line). [90 cm]
Keep in mind that you want to reach it easily, but that you don't want the remotes to be seen from the front.
To this measurement, add the following to see how much fabric you'll need:
- hem to slide in a dowel rod [7 cm]
- depth of pocket [16 cm]
- 1/2 depth of second, overlapping pocket [8 cm]
- lower seam allowance [1 cm]
- 2 x depth of pocket PLUS seam-/hem allowances [36 cm]The WIDTH of your organizer depends on your need. Don't forget to add hem allowances to both sides of your width-measurement!
I was lucky to have some ready-hemmed fabric handy. Some of you may notice that it's from a swedish furniture company... It's sturdy, looks nice and had just the perfect width [44 cm] and length [~ 160 cm] for my projekt, so I used it.
-
 Step 2
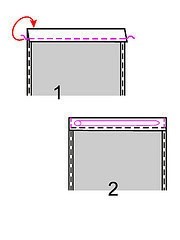
If you don't have pre-hemmed fabric, HEM SIDES FIRST.
Sew a hem (#1) to slide in the dowel rod (#2), sew sides of hem closed to keep dowel rod in place.
This part of the organizer will be squeezed between the cushions of your sofa/chair to keep it in place. -
 Step 3
Mark the upper edge of the upmost pocket (Remember the blue lines from the measurements picture? That's it!)
-
 Step 4
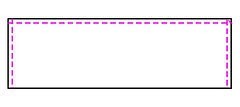
Cut as many pockets as you need and hem sides and upper edges.
-
 Step 5
Mark BOTTOMLINE of first pocket by measuring down from the marked upper edge (green arrow). This is you seamline (green). Overlap seam allowance of pocket bottom and with right sides facing, sew first pocket to organiser.
Fold up, press and baste in place along the sides.
Repeat this step with all other pockets except the last one. -
 Step 6
With RIGHT side of lowest pocket facing WRONG side of the organizer, sew pocket to organizer.
Fold pocket towards front, enclosing seam alowances. Press. -
 Step 7
Topstitch along both sides of your organizer about 3 mm away from the edge and fix pockets.
Remove basting threads.
Divide the width of your organizer [44 cm] equally, creating as many slide-ins as you need [4 per row = 11 cm wide].
Take care not to make the slide-ins too narrow!
Mark and topstitch to create the slide-ins, taking a few backstitches across the top edge of each pocket.
Finished! :) -
 Step 8
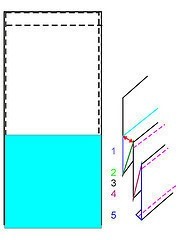
If you have a LOT of fabric and want the pockets to be lined, there's a nifty method to do this: Fold the pocket section like an accordeon!
It requires more fabric, but it looks good and makes the organizer even more sturdy.
From the top edge of your upper pocket (blue line) you'll additionally need the following length of fabric:
1 - pocket depth
2 - pocket depth
3 - pocket depth + overlap (in my case the overlap was 1/2 pocket depth)
4 - pocket depth
5 - pocket depth + hem allowanceFor each pocket added you'll need to add measurements #2 and 3.
Mark all lines, fold like an accordeon, eventually topstitch each pocket's upper edge (pink lines) and then continue to stitch down pockets as explained before.
-
 Step 9
So now the front of our sofa looks like this
-
 Step 10
while the back holds all the remotes.
Being organised feels so good!
Enjoy your sunday!


 1
Stud Earrings »
Miraculous Ladybug Earrings
1
Stud Earrings »
Miraculous Ladybug Earrings
