

About
Paint that rainbow!
Hello (:
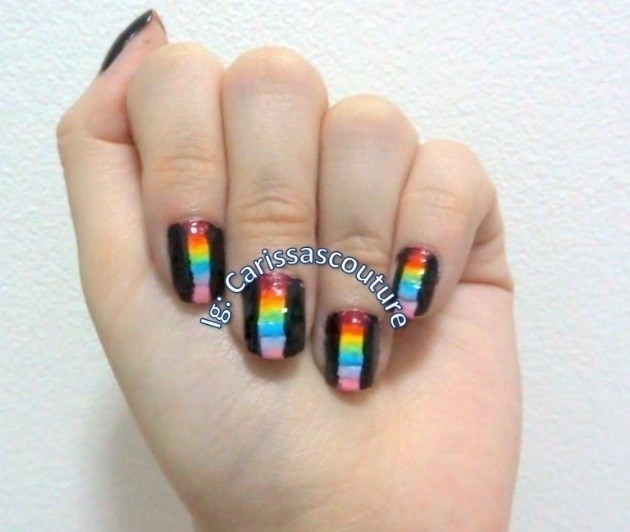
Here is a rainbow color block nail design I did. I added pink and replaced it with indigo. I like the contrast of the bright colors against black. It looks complicated but really, it isn't too difficult if you do it slowly step by step. The trick to this is to dab on the rainbow colors. Plus, it doesn't take long for your nails to dry since the amount of nail colors used is quite thin and little. The best thing about this is, no additional tools are needed. I hope you will be able to understand my explanation. If you have any questions, feel free to ask! Thank you! (:
-
 WerewolfCas favorited No Tool Rainbow Color Block Nail Art!
29 Mar 09:57
WerewolfCas favorited No Tool Rainbow Color Block Nail Art!
29 Mar 09:57
-
 tyler t. favorited No Tool Rainbow Color Block Nail Art!
15 Mar 09:53
tyler t. favorited No Tool Rainbow Color Block Nail Art!
15 Mar 09:53
-
 Carissa R. published her project No Tool Rainbow Color Block Nail Art!
24 Nov 11:20
Carissa R. published her project No Tool Rainbow Color Block Nail Art!
24 Nov 11:20
-
Step 1
Here is a video version of the design. I decided to post a picture version as well (: I hope it isn't too repetitive. You can choose either one you prefer.
-
 Step 2
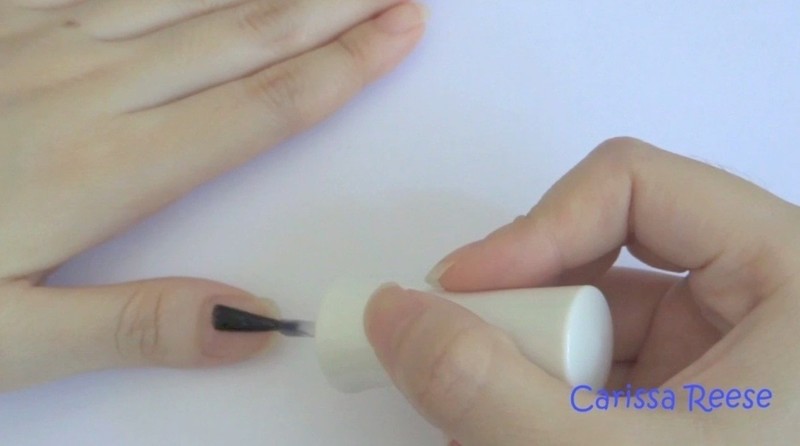
Start by applying a base coat to protect your natural nails.
-
 Step 3
This step is optional but I painted the base color white to make the rainbow colors appear brighter and more opaque.
Since this is for the base, you do not need to apply a very thick layer as the other colors will cover it up later on. A thin coat should do just fine.
-
 Step 4
Moving onto the rainbow colors, I start by painting my nails red. I paint the middle bit of my nail horizontally forming a line without touching the sides and nails cuticles. It doesn’t have to be very neat or perfect. This is because the black nail polish will cover it the ends later on. The trick to this is to dab the color on your nail. You do not need to take a lot of nail polish since you are only painting a line across. Once you are done with red, you can move onto the orange nail polish.
-
 Step 5
The same method as before, I dabbed on the orange polish. I know it can be tedious to slowly apply each color. The best part about this is since you only dabbed the colors on, there isn't much nail polish so it doesn’t take long for them to dry. Even if it isn't fully dry, its fine. You have 2 options, if it does overlap you can take it as a slight ombre effect. The second option is that are able to paint the next line so it doesn’t touch or overlap the previous color
-
 Step 6
Up next is yellow. It does take some time and practice. Whether you have a steady hand or not, it doesn’t matter. Mine wasn’t completely perfect either. This can be design itself. Its how you want and like it to be (: Continue applying the rest of the colors onto your nails forming little lines across.
-
 Step 7
I painted green, blue, purple and pink.
-
 Step 8
This is how mine turned out.
Then, wait for your nails to completely dry before moving onto the next step. This is just to prevent smudges from occurring.
-
 Step 9
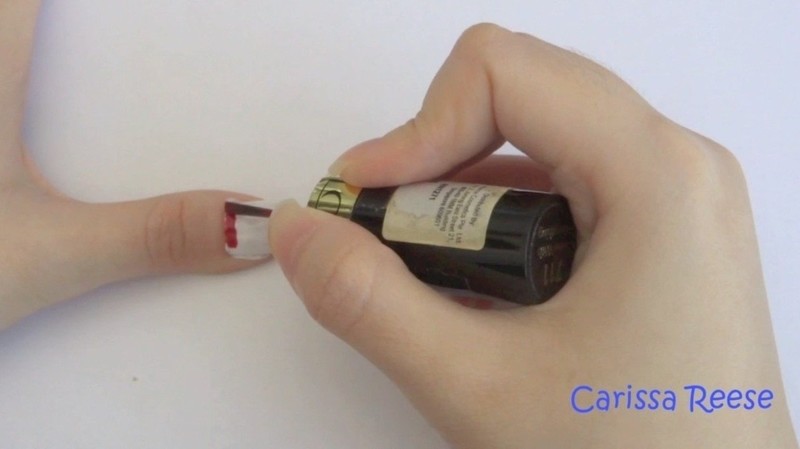
Next, I paint the black nail polish vertically at both sides of the nail.
The black nail polish will also help to cover up the messy parts of the colored ends if it wasn’t dabbed on neatly.
-
 Step 10
To end, apply a top coat on all your nails to seal in the design.
-
 Step 11
I also took a cotton bud and nail polish remover to remove any excess mess.
-
 Step 12
And that’s it for the this design, I hope you will like the it. I also hope that you will be able to understand my explanation. If you have any questions, feel free to ask! (:


 1
Stud Earrings »
Miraculous Ladybug Earrings
1
Stud Earrings »
Miraculous Ladybug Earrings
 2
Pouches, Purses & Wallets »
Water Bottle Pack
2
Pouches, Purses & Wallets »
Water Bottle Pack


