About
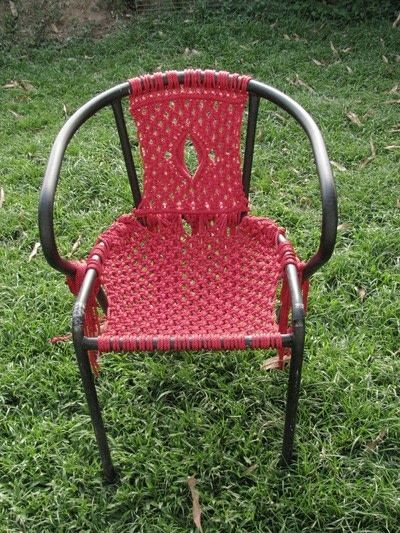
Basically a macramé chair.
Using an old chair frame to make a new chair, with some old crafting techniques. And some randomly donated rope you can try to make a chair too [for free].
Basically a macramé chair.
NOTE: The measurements for the rope are over estimates for the size frame i was working on. It is mostly guess work.
Links to the techniques used in [square brackets].
This project took about 3 days to complete,did not work on it constantly.
-
 Susana F. favorited Macramé Chair
18 Jan 18:36
-
 crochetmommie added Macramé Chair to Macrame
25 Mar 19:27
-
 Roxyandboys favorited Macramé Chair
13 Mar 06:34
-
 Kiven P. favorited Macramé Chair
14 Jan 08:17
-
 Marci F. favorited Macramé Chair
01 Mar 04:15
-
 Maria De Lurdes L. favorited Macramé Chair
05 Jun 14:26
-
 Victoria T. favorited Macramé Chair
14 Oct 09:27
-
 Brad M. favorited Macramé Chair
08 Oct 10:24
-
 Andre G. favorited Macramé Chair
22 Sep 12:44
-
 Darryl D. favorited Macramé Chair
21 Sep 10:29
You Will Need
-
 Step 1
Fist you get your self a chair frame.
And a lot of rope, i used nylon rope as it is not itchy and it was randomly donated.
Cut the rope in to 3 yard lengths. For this chair frame i needed to cut 16 pieces for the back of the chiar[each 3 yards].
[note that i over estimated the measurements]
To attach the rope: fold length in half and make an larks head knot [http://www.free-macrame-patterns.com/larks-head-knot.html]
Do this to all 16 pieces of rope.
-
 Step 2
After attaching you 16 strands, do a series of double half hitches [http://www.free-macrame-patterns.com/double-half-hitch.html] as close to the top bar of the chair.
That is the bar you looped the rope to. This is to give it some sort of structure and helps keep the rope even for knotting the rest of it later on.
After that you will have to do about 6 rows of alternating square knots [http://www.free-macrame-patterns.com/alternating-square-knots.html]
At this point you will most likely be getting a bit tangled with the rope. Also you will realize that nylon rope is rather slippery and not so great for staying in a knot.
After you 6 rows of alternating square knots, do three alternating square knots, and you are going to start doing a diagonal double half hitch to make the diamond pattern in the center. [http://www.free-macrame-patterns.com/diamonds.html]
Remember that you are knotting alternating square knots around the diamond pattern.Making sure that the diamond is in the center of the chair. So keep a count of how many knots you made on the left side of the diamond and make sure the knots in the right side match up.
-
 Step 3
After you have finished the section with the diamond pattern, continue doing the alternating square knots till you reach the end of the back of the chair.
Then do another line of double half hitches, try to make them as strait as possible.
Then attach the end to the bottom rung of the chair. You can secure it with either a normal overhand knot [http://www.free-macrame-patterns.com/overhand-knot.html] around the bar. Then do an over hand knot with two strands. Pulling it as tightly as possible.
Trim ends and use a lighter to singe the ends of the rope to prevent fraying
-
 Step 4
Now on the the bottom/base of the chair.
This part was tricky to fasten to frame, so do the same process as the top half.
Using approximately 20 pieces of rope each 4 yards in length. [Again overestimation of required length, as it is better to have more than less when knotting a chair]
Using the same Larks head knot to mount the strands to the part of the frame furtherest from the back of the chair. That is the part where your legs should be hanging off the chair. (hoping this makes sense)
After attaching your strands of rope [add as the chair needs, meaning that the strands when attached should be able to fill the entire bar it is attached to with only a finger space separating the attached rope]
Do a lot of rows of alternating square knots [http://www.free-macrame-patterns.com/alternating-square-knots.html] till you reach the back of the chair.
then attach it as you see fit, with an overhand knot around the surrounding frame.
Just remember to trim the ends and use a lighter to seal the ends so they do not fray.
I suggest you do that outside as the fumes from burning the nylon are not to be inhaled.


 1
Paper Art »
How To Fix A Smoking Toilet
 2
Bracelets »
Gifts From The Village Of Shadows Bracelet
 3
Charms »
Akuma No Otto Pendant
 4
Gadgets »
Kitchen Hook
 5
Trays »
Trays For Breakfast

Brenda
I love this! Very cool.