

Throwing Pottery
Extract from The Encyclopedia of Pottery Techniques • By Peter Cosentino • Published by Search Press

About
The Encyclopedia of Pottery Techniques
Throwing
Hand-forming a mass of soft plastic clay on a rotating wheel head is called throwing, and the technique can be traced back beyond 2000bc. Although both the technique and potters’ wheels have been refined over the years, the essential methods remain unaltered.
No other forming technique tests clay as much as throwing, so take particular care when preparing clay. It must be soft, pliable and sensitive enough to be shaped quickly, but firm enough to retain its shape when wet.
The key to successful throwing is the initial process of getting the clay into the centre of the wheel head before shaping commences. Once this has been successfully completed, a whole range of objects and shapes can be thrown, mostly stemming from simple shapes such as plate, bowl or cylinder forms.
-
 Crafterella featured Throwing Pottery
21 Jan 23:00
Crafterella featured Throwing Pottery
21 Jan 23:00
-
 Teffanie Lewis N. favorited Throwing Pottery
21 Jan 00:08
Teffanie Lewis N. favorited Throwing Pottery
21 Jan 00:08
-
 taylor t. favorited Throwing Pottery
18 Jan 08:45
taylor t. favorited Throwing Pottery
18 Jan 08:45
-
 Search Press published her project Throwing Pottery
16 Jan 09:00
Search Press published her project Throwing Pottery
16 Jan 09:00
You Will Need
-
 Step 1
Throwing a shallow open form
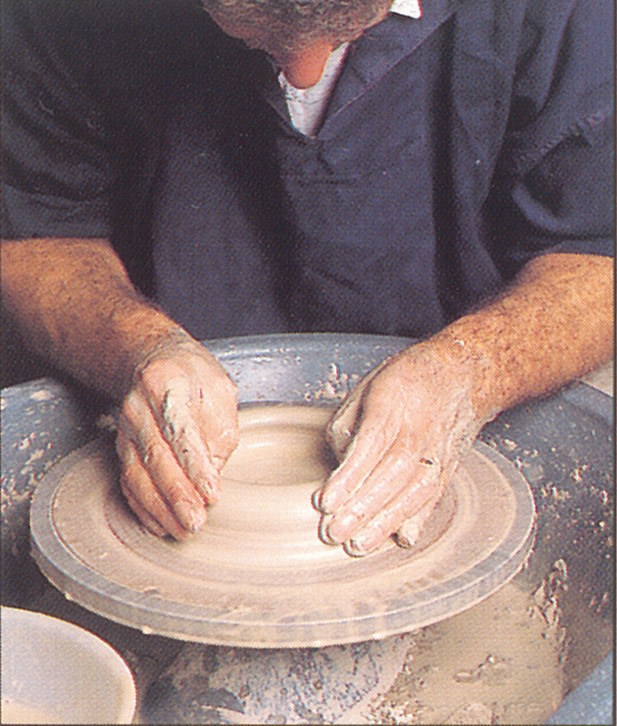
The base of any thrown form defines its maximum diameter. Apply downwards pressure with the palms of both hands to spread the centred clay mass over a larger area of the wheel head. -
 Step 2
Open out the clay by using both thumbs, pushing them outwards in opposite directions to form the inside base. Rest your arms on the wheel tray for stability.
-
 Step 3
Shallow Open Forms
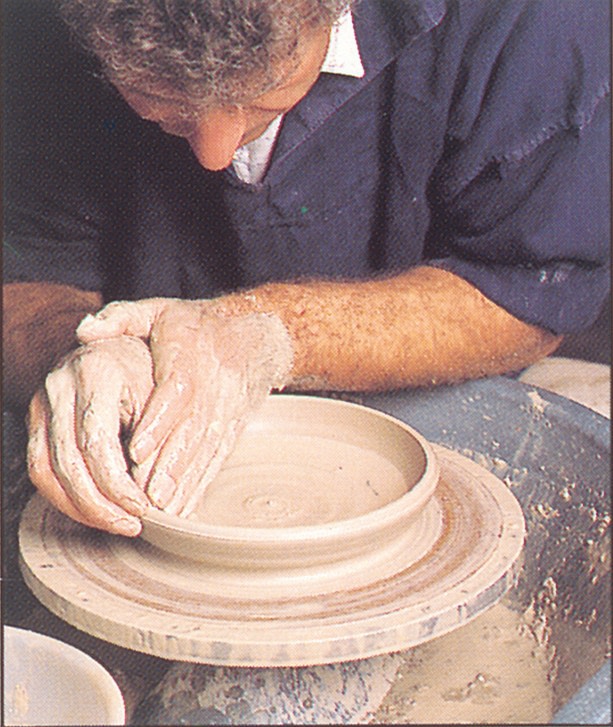
These are perhaps the easiest to throw since their low profile makes them very stable, and the centrifugal force of the rotating wheel head virtually wills the clay to spread outwards. The clay mass should be spread over the wheel head by applying downwards pressure with the palm of the hand. It can then be opened by using both thumbs moving in opposite directions, thus creating the inside base and leaving a generous thickness which can be removed during turning. The base of any thrown form defines its width: opening too far beyond the base will leave the weight of the wall unsupported and liable to collapse.
Wide forms are difficult to remove from the wheel head immediately after throwing, so if possible a removable throwing bat should be used, where the form can remain until it has stiffened slightly.The plate is a refinement of the basic process for making a shallow open form. This thrown plate by Seth Cardew employs sure brushstrokes sparingly to produce a deceptively simple surface design.
-
 Step 4
Once the shallow dish is opened out as far as the base will allow, the wall is thinned to give the form added height. This is done by taking a firm grip on the clay between thumb and first finger and moving steadily upwards, using the other hand as a means of support.
-
Step 5
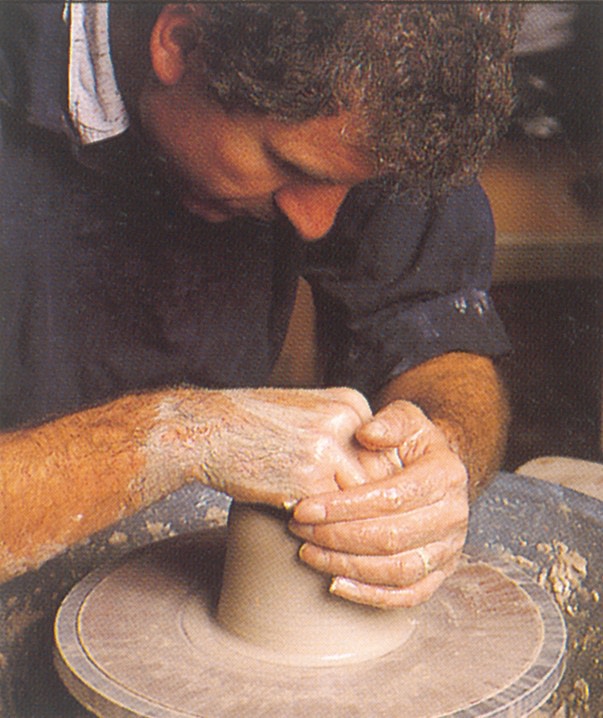
Cylinders
These can form the basis for many other thrown shapes. Once the base is formed, the wall is raised with pressure from the thumb and middle finger until it has become too tall for fingertips to reach the inside base. At this point the knuckle of one hand is used on the outside with the middle finger of the other hand assisting on the inside. If too much or uneven pressure is exerted, the cylinder wall may tear or weaken. Other common faults, such as the wall twisting, may occur if the clay is insufficiently lubricated or if the clay was not centred properly.
-
 Step 6
Form the inside base by moving the tip of your thumb from the centre of the clay mass outwards. Use your other hand as a support while throwing.
-
 Step 7
In order to add height once the inside base of the cylinder has been formed, grip the clay wall between thumb and middle finger and raise the hand upwards in a steady, gradual motion. The thickened section of clay immediately above the thumb tip will be absorbed as height increases.
-
 Step 8
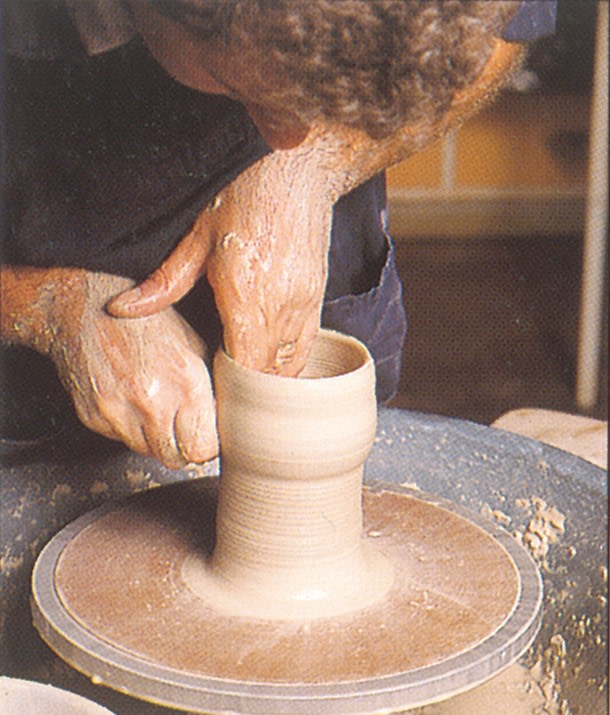
When the cylinder is too tall to grip between your thumb and middle finger, place the middle finger of the non-working hand inside the cylinder while supporting the outside with the working hand. Take a steady hold at the bottom of the cylinder wall and, maintaining steady pressure, raise your hand upwards.
-
 Step 9
The section shows the alignment of fingertip inside and knuckle during the lift. Notice the extra thickness of clay which will allow further height. The elbows are tucked into the side for maximum stability and the thumb forms a bridge between the two hands.
-
 Step 10
The raising action should be precisely vertical. There is a natural tendency to lean backwards slightly, but try to resist this, as it will cause the cylinder to flare outwards. The raising action is continued until the clay wall has taken up all excess.
-
 Step 11
This section shows how the clay has been economically used to add maximum height to the cylinder. The width of the base is slightly greater than that of the rim, which helps to give stability to the shape.
-
 Step 12
Any unevenness around rims can be removed with a needle. With the wheel head rotating slowly, steady the inside rim with the left index finger and push the needle steadily into the clay wall, approximately 5mm (1/4in) below the lowest point of the rim, until it meets your left index finger on the inside. Lift the cut section clear of the rim.
-
 Step 13
The rim can be smoothed and compressed by applying downwards pressure with the index finger while the rim is supported on the inside and out between the thumb and the other index finger.
-
 Step 14
Any water which has collected inside the cylinder should be removed with a sponge attached to a stick while the wheel head rotates.
-
 Step 15
Excess clay from around the outer base edge can be trimmed off with a turning tool. The cylinder is then removed from the wheel by cutting it off with a tautly held wire. The hands must be dry to give a good grip on the wet surface of the cylinder when lifting it off.
-
 Step 16
Throwing a pouring lip
Items such as jugs need some form of spout or pouring lip. On thrown pots, these can be formed while throwing. Ensure that the rim is thick enough to allow for the lip, and start by teasing a section of rim and the area immediately below it upwards.
-
 Step 17
When the teased area grows higher than the rim, smooth it by running your thumb and index finger back and forth along it.
-
 Step 18
Finally, use your fingertips to make a clear channel, supporting the lip from below.


 1
Mint & Trinket Tins »
Miniverse Trinket Boxes
1
Mint & Trinket Tins »
Miniverse Trinket Boxes
 2
Pouches, Purses & Wallets »
Water Bottle Pack
2
Pouches, Purses & Wallets »
Water Bottle Pack
 3
Christmas Decorations »
Christmas Table Centerpiece
3
Christmas Decorations »
Christmas Table Centerpiece

