About
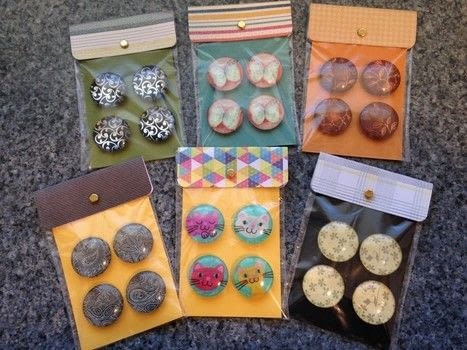
Here's a charming way to package refrigerator magnets for gift-giving.
Tags
-
 Sarah Sylvia S. favorited Refrigerator Magnet Gift Packets
19 Jul 23:31
You Will Need
-
 Step 1
I love making glass tile refrigerator magnets. It is a very easy craft and the magnets make charming gifts.
I have been making these for awhile, but wanted to come up with a way to package them for gift-giving and selling at craft shows.
This is NOT a tutorial explaining how to make glass tile refrigerator magnets as you can find many online tutorials with those instructions. This is simply a tutorial showing you a way to package them.
If you need a quick link to tutorials for making glass tile artwork, as well as a place where you can purchase all the supplies you would ever need, check out the Sun and Moon Craft Kit website at: www.sunandmooncraftkits.com
I credit this site for inspiring me to create beautiful things.
-
 Step 2
To get started, you'll need to select some card stock for making your gift packets.
I found these card stock tablets on sale at my local craft store. I picked one tablet that had textured sheets in an assortment of solid bright colors, and I picked another tablet that had sheets with an array of patterns.
-
 Step 3
You will also need some craft glue, clear plastic craft bags (or treat bags), scissors, small flat metal washers, brass paper fasteners, and a ruler or tape measure.
Note:
When purchasing the metal washers for this project, make sure you pick washers that will be attracted to a magnet. If you are uncertain, carry a small magnet with you to the hardware store.
Select craft bags or treat bags that are an appropriate width for displaying your magnets. The height can always be trimmed if the bag is too long, so focus more on the width of the bag when you make your purchase.
I usually package 4 refrigerator magnets together. I found a zip-lock craft bag measuring 4" x 6" (10.16 cm x 15.21 cm) worked well.
-
 Step 5
Using the dimensions of your craft/treat bag, measure out and trim an insert panel (solid color card stock) that is approximately 1/4" (0.635 cm) smaller than the width and height of the bag. You want the panel to be slightly smaller so you can easily insert it into the bag.
You also need to measure out a piece of patterned card stock that can be folded in half to be used later as a decorative flap over the finished refrigerator magnet packet. The width of the flap should equal the width of the craft/treat bag. The height can vary depending on your preference, but I usually create a slightly rectangular shape (see the center image in the photo). The image on the right is the folded flap.
Below are all the measurements (width x height) used for this project.
Ziplock Craft Bags: 4" x 6" (10.16 x 15.21 cm)
Insert Panel: 3 3/4" x 5 3/4" (9.525 x 14.605 cm)
Unfolded Flap: 4" x 3" (10.16 x 7.62 cm)
-
 Step 7
Decide how you want the refrigerator magnets arranged on the insert panel. You'll need to create a template panel, arrange the refrigerator magnets on the panel, then pencil a circle around each magnet. After drawing the circle, punch a tiny hole in the center of each circle. (See the middle image in the photo).
Using the template you just created as a guide, lay it on top of any insert panels you are using in your project, and pencil a dot through the holes you punched. This will show you the exact position for gluing the metal washers to the insert panel.
Using a multi-purpose craft glue, adhere the metal washers to the dots you penciled onto the insert panel.
Note: The metal washers usually have a smooth/shiny side and a rough/textured side. Glue the smooth/shiny side to the insert panel so the rough/textured side is exposed.
In the next step, you will be attaching your glass tile refrigerator magnets to the metal washers and they will stay fastened better to the rough/textured side of the metal washer.
-
 Step 8
Place your glass tile refrigerator magnets on top of the washers as shown in the photo.
A WORD OF ADVICE!
If you plan to make glass tile refrigerator magnets in the future and use this packaging idea, I highly advise that you purchase STRONG magnets to adhere to the back of your glass tile handiwork. The magnets you find in most craft stores really aren't that strong or are very bulky. Keep in mind that most people use refrigerator magnets not only to decorate their fridge, but to hold up notes, pictures, papers and other items. Strong magnets are really important, not only for the end use of the refrigerator magnets, but also so they will stay in place inside the package.
If you don't know where to buy strong magnets in your area, you can find them on the Sun and Moon Craft Kits website at:
www.sunandmooncraftkits.com
They have magnets in different sizes and believe me, they are powerful little rascals!!!
-
 Step 9
Insert the panels with the refrigerator magnets inside the plastic craft bag.
Center the patterned flap you made earlier over the top of the bag and punch a hole through the flap, bag, and insert panel. (If you don't have a hole punch, you can use a nail or other sharp object to create the hole).
Insert a brass fastener through the hole and open up the prongs on the back to hold the flap in place.


