


About
how to make a little monster book from the movie harry potter.
These little books are from the movie; harrie potter.
I have found these on the internet, so it isn't my work!
Tags
Downloads
- FY1M4X5GJQEBIYJ_MEDIUM.jpg 23.5 KB [ Download ]
-
 Fred K. added Make A Little Monster Book. to Harry Potter
21 Dec 10:58
Fred K. added Make A Little Monster Book. to Harry Potter
21 Dec 10:58
-
 samallamaa favorited Make A Little Monster Book.
07 Dec 10:14
samallamaa favorited Make A Little Monster Book.
07 Dec 10:14
-
 Markee R. favorited Make A Little Monster Book.
20 Jun 12:22
Markee R. favorited Make A Little Monster Book.
20 Jun 12:22
-
 Theruni S. added Make A Little Monster Book. to Craft Ideas
12 Jan 07:04
Theruni S. added Make A Little Monster Book. to Craft Ideas
12 Jan 07:04
-
 Meidhbhin N. favorited Make A Little Monster Book.
11 Dec 21:40
Meidhbhin N. favorited Make A Little Monster Book.
11 Dec 21:40
-
 Ninni added Make A Little Monster Book. to Harry Potter
24 Nov 12:08
Ninni added Make A Little Monster Book. to Harry Potter
24 Nov 12:08
-
 Ana favorited Make A Little Monster Book.
30 Oct 18:40
Ana favorited Make A Little Monster Book.
30 Oct 18:40
-
 kieeeera_ favorited Make A Little Monster Book.
18 Oct 11:43
kieeeera_ favorited Make A Little Monster Book.
18 Oct 11:43
-
 Linda K. favorited Make A Little Monster Book.
27 Sep 19:13
Linda K. favorited Make A Little Monster Book.
27 Sep 19:13
-
 DocDoolittle added Make A Little Monster Book. to Bookies
18 Sep 11:40
DocDoolittle added Make A Little Monster Book. to Bookies
18 Sep 11:40
You Will Need
-
 Step 1
What do you need?
•Bookboard, 2 pieces per monster( 31/4 x 3 3/4 inches)
•Fur, 1/4 yard was more than enough.
•Felt. 3 pieces of about 3 x 3 1/2 (red) and 1 piece of white for the teeth (3 x 2 inches)
•2 eyes (stuffed animal eyes)
•1/2 yard gross grain ribbon
•glue (elmers or PVA)
•scissors
•hole punch of some sort (and hammer)
•small saw (not pictured) -
 Step 2
Step 2; Cover the book-board.
•Cut the fur fabric, about and inch larger than the bookboard on all sides.
•Cut the red felt, just a bit smaller than the bookboard on all sides.
•Cut the ribbon about 3x the length of the bookboard (more will have to be cut off later)
Cutting corners
You will need to cut off the corrners off the fur fabric. You don't want to cut them off right up against the bookboard though, or it won't cover the corner of the bookboard. Cut your diagonal maybe a little over an 1/8of an inch away.Glue the Bookboard
Put some waxpaper down, or an old magazine, and "paint" glue all over one side of the bookboard.Put the Glue side down in the middle of your fur fabric piece (glue side down, back of fabric up)
Glue 2 sides of your fur, and the edges of the bookboard.
Fold over the Fabric to glue it down.
Let it dry a little, then you will want to cut off as much of the fur as possible to reduce bulk.Glue the other 2 sides
Fold over & glue down
Again once it's dry, cut off the excess fur.Rinse & Repeat
You'll need to make 2 of these for each monster, One for the top, where the face will go, the other is the bottom cover, that you will attach your post it notes to. -
 Step 3
Step 3: Add ribbon.
You can already add the ribbon to the bottom piece, you want to wait to add it to the top piece, until we can line everything up.
Glue ribbon
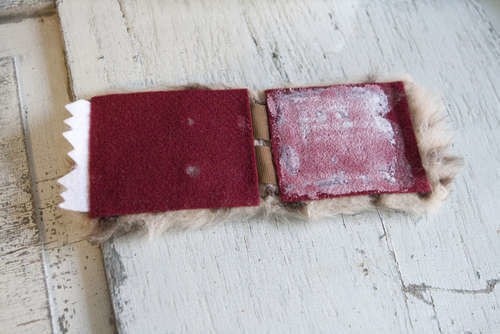
Glue the end of the ribbon and place it on the bookboard. You'll want to do this with 2 pieces, and spread them as far apart as possible.Glue on felt.
Glue all over one of the pieces of red felt, and glue that over top of the ribbons, and book board.Hint: you may want to put a piece of wax paper over top of this, and place it under a few books while it's drying. Let it dry overnight.
-
 Step 4
All monsters need fun eyes, and this is what gives your monster a lot of it's character, experiment with different shape, and color eyes. Put them close together, or far apart. I've noticed a lot of monster eyes are different sizes these days.. that can be fun.
Punch a hole
Using a hole punch tool, punch a hole through the bookboard, where you want your eyes to be. Bee sure the hole is big enough to let the back of the eye through. I also found it was easiest, when I pushed as much of the fur out of the way as possible.Cut away Fur
I would cut away the excess fur, so i could get my eye to sit a little more flush with the bookboard, making for a tighter fit.Poke eye through.
Fasten the washer on the back.
I tried to make sure I pushed the washer on the back as tight as I possibly could.Cut off the Shanks
Once both eyes, are securely fastened you want to cut off the excess shank at the back. A little saw made quick work of this, just don't cut so close that the fastening washer comes back off.Sand a little
To make the back smooth, and so it won't try and come through your felt, sand the back of the eyes a bit, with some sand paper. -
 Step 5
Step 5: Glue on extra Felt behind the eyes.
Because the eyes stick out a little, you're going to want to add some felt to fill in the back a bit.
•Trace out where you want the extra felt to go. (Around the eyes, and inside the fur)
•Cut out your template
•Use your template to cut out some felt
•Glue the felt down. -
 Step 6
Step 6: making teeth.
Before we glue it all together, you're going to want to make some teeth.
Making teeth
•Use you felt, as an indicator as to how wide you want your teeth, just a bit shy of the width of your red felt is a good idea.
•I drew it out on a scrap piece of paper.
•Using my cut out scrap piece of paper, I cut teeth out of the white felt, I added about 1/4 - 1/2 an inch of felt behind the teeth, so I could glue my teeth on to my book.
Assemble
Gather all your pieces, and some glue together to do the assembly.
•Place the post-it notes on the bottom pf your book (don't stick it down yet, we just need it to measure our ribbons.
•On top of th post it notes place the red felt for the top part of the monster book
•Wrap the ribbons, over the top and cut them about 1/2 an inch shy of the front edge.
•Glue the ribbons to the top of the red felt.
•Glue your teeth on to the front edge of the felt, leaving the jagged part hang over.
•Glue the back of the eye part of the book.
•Place it on top of your assembly, gluing it to the ribbon, and felt and teeth.
•Open your book gently to let it dry overnight.
•Tip: place wax paper over the book, and load books on top while it's drying -
 Step 7
Step 7: Add The Post it Notes.
The post-it notes didn't really want to stick to the felt, so I added some glue to the felt to make it a little harder...
•Paint glue on the felt, on the bottom cover of your monster book.
•Let it sit & dry
•Put double stick tape, on the back of your post it notes (I also added a little more glue for security)
•Put your post it notes, on the bottom, and let dry. -
 Step 8
Step 8: And a tongue.
Again this is a fun place to change it up a bit, and make your tongue unique.
•Cut out tongue shape from scrap felt.
•I then stitched around the edge with a contrasting color thread.
•Zig zag stitch up and down the middle
•Cut off the excess thread, and then glue it down to the felt on the bottom.


 1
Wire Charms »
Time Turner Inspired Fidget Necklace
1
Wire Charms »
Time Turner Inspired Fidget Necklace

That's the problem.
I can't find that link anymore. :S
but any how like it.;-D
SO AWESOME