


About
How to Make Your Own Circle Skirt from Your Pattern Pieces
This tutorial/project follows on from my first tutorial on how to draft your own circle skirt using maths magic. I'll refer to that tutorial throughout this one, so this is essentially step 2!
Tags
-
 Sam T. favorited How To Make A Circle Skirt
14 Aug 09:09
Sam T. favorited How To Make A Circle Skirt
14 Aug 09:09
-
 K2 favorited How To Make A Circle Skirt
08 Oct 04:19
K2 favorited How To Make A Circle Skirt
08 Oct 04:19
-
 RareJewel favorited How To Make A Circle Skirt
02 Jun 08:52
RareJewel favorited How To Make A Circle Skirt
02 Jun 08:52
-
 Emma H. favorited How To Make A Circle Skirt
01 Mar 21:34
Emma H. favorited How To Make A Circle Skirt
01 Mar 21:34
-
 Nicole S. favorited How To Make A Circle Skirt
19 Feb 17:53
Nicole S. favorited How To Make A Circle Skirt
19 Feb 17:53
-
 Charlotte S. added How To Make A Circle Skirt to Spring tutorials
24 Jan 13:43
Charlotte S. added How To Make A Circle Skirt to Spring tutorials
24 Jan 13:43
-
Ghost C. favorited How To Make A Circle Skirt
23 Jan 19:23
-
mapachita favorited How To Make A Circle Skirt
20 Aug 23:29
-
 le.yla.5492 favorited How To Make A Circle Skirt
20 Jul 19:26
le.yla.5492 favorited How To Make A Circle Skirt
20 Jul 19:26
-
 Linda of Nice dress! Thanks, I made it!! favorited How To Make A Circle Skirt
03 Jul 14:00
Linda of Nice dress! Thanks, I made it!! favorited How To Make A Circle Skirt
03 Jul 14:00
-
 Step 1
Let's just remind ourselves what we ended up with after we made our pattern pieces:
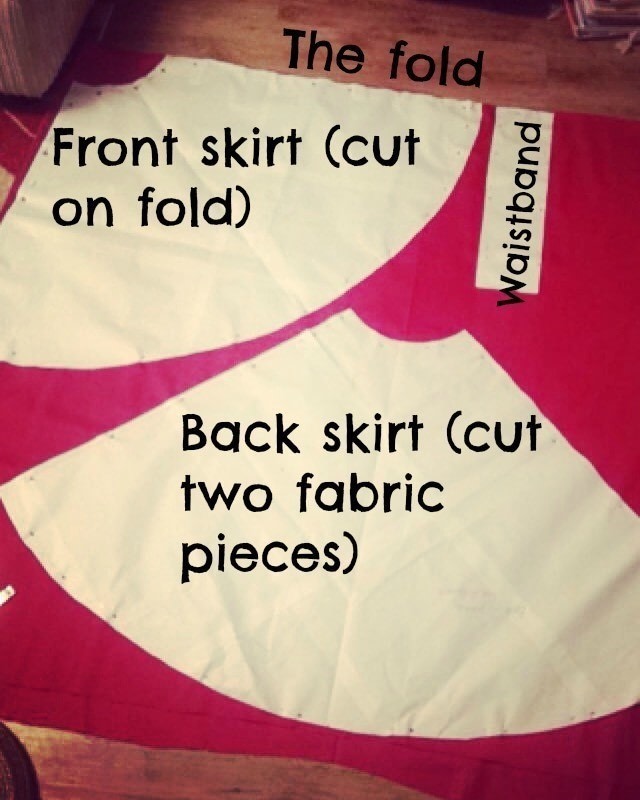
We have piece 1, which needs to be cut on the fold; pieces 2 and 3 which are cut from the same pattern piece, and the waistband which is also cut on the fold. -
 Step 2
Layplan:
How you devise your layplan depends on what the width of the fabric is. My sister's circle skirt was 45" width, and so the layplan looked like this. 45" width fabric is more common when it's the pretty patterns you're likely to want to use for a circle skirt, so hopefully this helps!
The waistband got cut from a length of scrap after this. Whether or not this works for you depends on your waist size and the length of the skirt, so you may have to alter things if it's not fitting. -
 Step 3
However, the one I made for this tutorial was 60" width and I had 2.5m of it, which actually made life less complicated (and more economical).I folded it in half length ways so that piece one could be cut on the fold, and piece two could be pinned and cut to produce two pieces of fabric.
Cut all the pieces out (my favourite bit!) and you're ready to sew! -
 Step 4
Sew the front skirt to the back skirt pieces at the side seams. I sewed my skirt and my sister's using French seams, which gives it a nicer finish but it isn't necessary! Leave the centre back seam unstitched at this point.
Press open the seams on each side. -
Step 5
Affix the fusible interfacing to your waistband. My mum calls this iron on Vilene.
-
 Step 6
Along the length of your waistband, fold up and press 1cm from the edges, like you're hemming it. Do the same on the other side. Now fold the waistband in half along the width and press, so each hem is meeting.
-
 Step 7
Fold the waistband again gently lengthways and give it a wee press to find the centre. Match the centre of the waistband up with the centre fold of the front skirt, right sides together, and pin from the centre to each end of the waist of the skirt.
-
 Step 8
Now, stitch the waistband onto the skirt right sides together along the pressed fold line. Take this slowly and steadily, as waistbands are a pain to take out and redo if they're wobbly.
-
 Step 9
Press the seam up towards the rest of the waistband.
-
 Step 10
Don't finish off the waistband yet, insert the zip first.
Place the zip where you want it and then mark where the end of the zip is onto the centre back seam. Once this is done you want to sew the centre back seam from the hem up to this mark using a 1.5cm seam allowance. Once this seam is stitched you can start inserting your zip.
Insert the zip with the top of the zipper tape just going past the fold of the waistband. This way it'll be sewn to the very top of the waistband and you won't actually need the hook and eye. If you find you've done it too low though and there's a gap at the top then just pop a hook and eye on and it won't make a great deal of difference.
My only tip for zips is to tack them first, for all other advice with them go to YouTube or give it a Google, as they rarely go so well for me!
-
 Step 11
Now, with the zip in fold the waistband over so that it meets your first waistband seam and hides it. Pin it in place.
-
 Step 12
Now, top stitch the waistband in place, either along the first seam so no stitches are visible or as a neat top stitch about half a centimetre from the bottom of the waistband. I did the latter on this skirt and as it's level all the way along it has a nice effect!
-
 Step 13
Hemming a circle skirt is notoriously difficult as the whole hem is on a curve and tricky to make the same length all the way around. In order to do this correctly I have tried many things, I've put it on Matilda the mannequin and measured and pinned meticulously for hours all the way around; my mum and I have fashioned together a sewing plumb line out of a box of staples and a scrap of fabric (doesn't work); I've laid down on the floor and looked right up the skirt with a spirit level. Finally, the most simple technique worked. I make life difficult for myself.
Get out your ironing board and rotate the skirt around, measuring the desired length from the waistband to the hem all the way round, plus 1cm for the hem. Work round, marking as you go, then go round again folding, pressing and pinning the hem in place, making tiny snips into the hemming allowance to reduce the bulk.
-
 Step 14
THEN! GET A HEMMING FOOT! This was the first time I'd ever used mine and it made a beautifully level hem that didn't gather or anything. Seriously, I was blown away! Keep to a 1-1.5cm hem, as too thick a hem will affect the way it hangs.
-
 Step 15
And voile! Your circle skirt is complete :) well done you!


 1
Wire Charms »
Time Turner Inspired Fidget Necklace
1
Wire Charms »
Time Turner Inspired Fidget Necklace
