Have It Your Way Dress
Extract from Learn to Sew with Lauren • By Lauren Guthrie • Published by Mitchell Beazley


About
Learn to Sew with Lauren
The beauty of making your own clothes is that there are so many ways to modify and alter the pattern to suit your own style. It may be as simple
as changing the shape of a collar or more involved, such as changing the shape of a sleeve. Don’t stop there, though – add pockets, alter the length, bind the hem, put piping around the collar edge . . . The possibilities are endless, so don’t be scared to try!
This dress offers two collar and sleeve options. The one shown here has a rounded collar with halfway sleeves and the variation has
a pointed collar with puff sleeves. It is quite fitted around the bust and waist and then flares out slightly with a gathered skirt. It looks great worn
with a narrow belt.
-
 Luna D. favorited Have It Your Way Dress
25 Apr 05:47
Luna D. favorited Have It Your Way Dress
25 Apr 05:47
-
Melissa S. favorited Have It Your Way Dress
10 Jun 03:34
-
 Kara S. added Have It Your Way Dress to Coco Chanel
19 Mar 23:34
Kara S. added Have It Your Way Dress to Coco Chanel
19 Mar 23:34
-
 The Sassy Sparrow added Have It Your Way Dress to Kate Winslet
07 Feb 23:02
The Sassy Sparrow added Have It Your Way Dress to Kate Winslet
07 Feb 23:02
-
 Jami H. favorited Have It Your Way Dress
12 Nov 12:05
Jami H. favorited Have It Your Way Dress
12 Nov 12:05
-
 PineconePrincess favorited Have It Your Way Dress
22 May 04:10
PineconePrincess favorited Have It Your Way Dress
22 May 04:10
-
 Babsi's Bean Burgers favorited Have It Your Way Dress
29 Apr 10:50
Babsi's Bean Burgers favorited Have It Your Way Dress
29 Apr 10:50
- Kate A. favorited Have It Your Way Dress 09 Jan 05:15
-
 Antonella M. favorited Have It Your Way Dress
06 Oct 05:01
Antonella M. favorited Have It Your Way Dress
06 Oct 05:01
-
 Johana99 favorited Have It Your Way Dress
30 Aug 02:11
Johana99 favorited Have It Your Way Dress
30 Aug 02:11
You Will Need
-
Step 1
Cut out and prepare fabric pieces
Cut out the appropriate fabric pieces. Transfer the notches and other pattern markings, using tailors’ tacks to mark the darts. Iron interfacing onto two of the four collar pieces, the front and back neck facing pieces, and the sleeve facing. -
 Step 2
Stay-stitch the neckline
Machine-stitch along the neckline of all three bodice pieces 1.2cm from the edge, starting at the shoulder seam and sewing towards the centre point. -
Step 3
Make the darts
Sew the darts. Start with the bust darts and then make the front and back waistline darts. Press the bust darts downwards and
the waist darts towards the centre. -
 Step 4
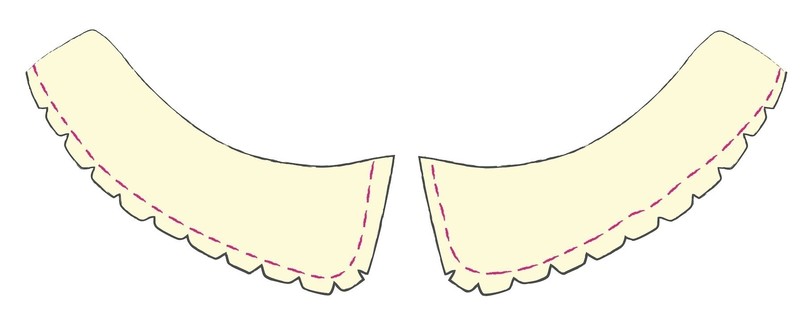
Make the collar
Place each inner collar and outer collar together with
right sides facing. Pin (tack if you wish) and stitch
the outside edges of collar sections from the shoulder
edge to the centre front, taking 1cm (⅜in) seam
allowance. Notch the seam allowances to reduce bulk.
Turn both collars right side out and press them flat. -
 Step 5
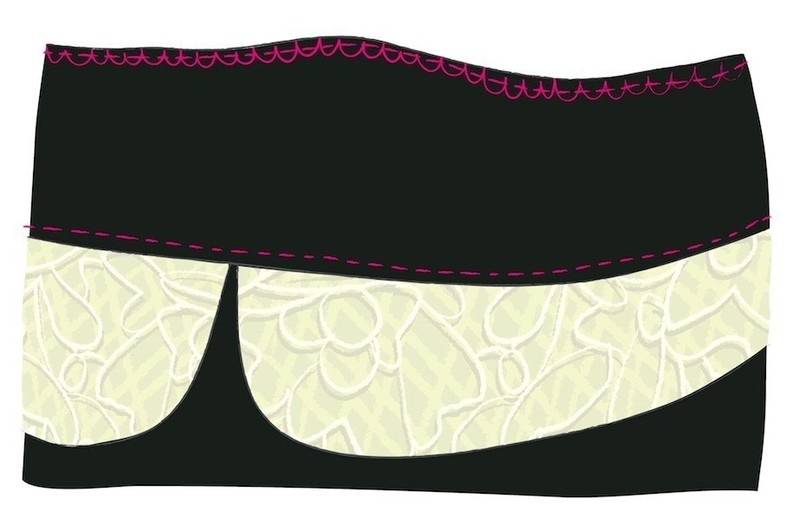
Attach collar to bodice front
Pin both collar sections to the bodice front with the
wrong side of the collar facing the right side of the
bodice. The centre edges of the collar will overlap
slightly at the centre point. Tack the collars in place
1cm (⅜in) from the neck edge. -
Step 6
Join front and back bodice sections
With right sides facing, pin one back bodice to the front bodice at the shoulder. Stitch the shoulder seam, enclosing the edge of the collar. Repeat to join the other back bodice at the shoulder. Now join the side seams. Finish off the seam allowances. Press the side seams open and shoulder seams towards the back – this reduces excess bulk caused by
the collar. It is a good idea to try the bodice on at this point to check the fit, but you need to get someone to pin the back opening closed. Places where the dress is too large can then be taken in and re-stitched. -
 Step 7
Construct the sleeve
On each sleeve stitch two lines of gathering along the sleeve head
between the two dots, 1cm and 1.5cm (⅜ and ⅝in) from the edge; these will be used to ease the sleeve into the armhole.
On the top edge of each sleeve facing, press under 1.5cm (⅝in). Open out this fold, then join the underarm seam of the facing; press the seam allowances open and finish them off.
Join the underarm seam of each sleeve; press them and finish them
off as for the facing.
Pin the sleeve facing to the sleeve, right sides together, along the
bottom, curved edge. Tack if you wish and stitch with a 1cm (⅜in)
seam allowance, pivoting at the dot. Notch the curved edges and press the seam flat, then turn the facing to the inside and press it flat. Turn the sleeve wrong side out again and catch-stitch the folded edge of the facing to the wrong
side of the sleeve. -
Step 8
Insert sleeve into armhole
Insert each sleeve into the bodice armhole, with right sides facing. -
Step 9
Join side seams of skirt
With right sides facing, join the skirt front and back side seams. Finish off the raw edges, then press the seam allowances open. Alternatively you could use a French seam here. -
Step 10
Gather skirt and attach to bodice
Sew three rows of gathering stitches along the top edge of the skirt
section, 1, 1.5 and 2cm from the raw edge, leaving long thread tails at each end.Pull on the threads to gather up the skirt. Pin the skirt to the
bodice at the centre notches and side seams and distribute
the gathers evenly. Pin the bodice and skirt together at the
centre back edges. Tack if you wish and stitch the seam.
Finish off the seam allowances together and press them
towards the bodice. -
Step 11
Insert invisible zip
Insert the invisible zip. Pin and stitch the remaining centre back seam of the skirt. Finish off the raw edges, then press them open. -
Step 12
Join facing sections
With right sides together, join the front and back facing sections at the shoulders. Press the seam allowances open. Finish off the bottom edge of the facing.Lauren’s Tip
Don’t worry about getting the
gathers even when you first pull up
the threads; just get some gathers
to work with. After dividing the skirt
into four sections by pinning at side
seams and centre front, start at the
centre and even out the gathers one
section at a time, pushing them out
to the side if there are too many
or pulling on the threads if
there are too few. -
 Step 13
Attach facing to bodice
Turn the dress right side out, with the back on top.
Open the zip about 13cm (5in). Turn the inside
edges of the zip towards the opening so that you
can see them. Using the ordinary zip foot on your
machine, sew the right side of the facing to this part
of the zip, taking a 1cm (⅜in) seam allowance, and
with a regular zip foot on your machine.
Turn the zip edge again away from the opening and
pin in place. This might seem a bit strange but it
will make the top of the zip really neat on the inside.
Pin the rest of the facing to the neckline, matching
up shoulder seams and notches. Tack if you wish
and stitch the neckline seam. -
 Step 14
Complete neckline facing
Trim the seam allowances of the neck seam and clip
them to enable them to lie flat when you turn the
facing to the inside. Understitch the seam allowances
to the facing 2mm (scant ⅛in) from the seamline.
Try to get as close as you can to the zip, but you will
have to end the stitching about 4–5cm (2in) away
from it. -
Step 15
Hem the dress
Turn up and press 1.2cm (.in) along the bottom
edge of the dress, then turn up the same amount
again. Pin or tack the hem in place, then finish it with
topstitching or catch stitch.Lauren’s Tip
If your fabric is slippery it’s a
good idea to wind one end of
the bobbin threads around a
pin while you’re pulling on the
threads at the other end
to make sure the stitches
don’t come loose -
Step 16
Variation dress with pointed collar and puff sleeves
Cut out and assemble the dress as for the main version, steps 1–6, applying interfacing alsoto the cuff pieces.pointed collar
Using the pointed collar pattern pieces, make
and attach the pointed collar as for the main
version, Steps 4 and 5. Before turning the
collar right side out, cut diagonally across the
corners to help reduce bulk.