
About
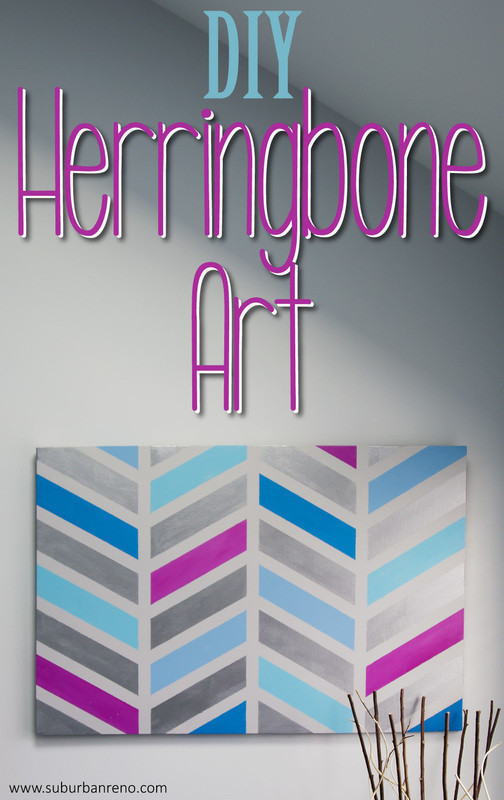
DIY Herringbone Art
Check out this awesome painting tutorial to dress up your home!!
Tags
- Xx13.CrowsxX added Diy Herringbone Art to Idea 08 Jun 22:38


You Will Need
-
 Step 1
My first stop was Home Depot, where I picked up a quart of paint (Behr Silver Bullet). I actually picked this up for another upcoming project and decided to use it as the base coat for this painting as well.
Tip: Using the same paint for multiple projects is a great way to save money on DIY projects
-
 Step 2
I also picked up a 24"x36" canvas from JoAnn's for about $15 (with a 50% off coupon).
-
 Step 3
I covered the entire canvas with the base coat, making sure that I fully covered everything, including the sides. Once the canvas was sufficiently covered, I let it dry for a few hours.
Tip: Cover the edges of your canvas with paint for a more finished look without the need for an expensive frame
-
 Step 4
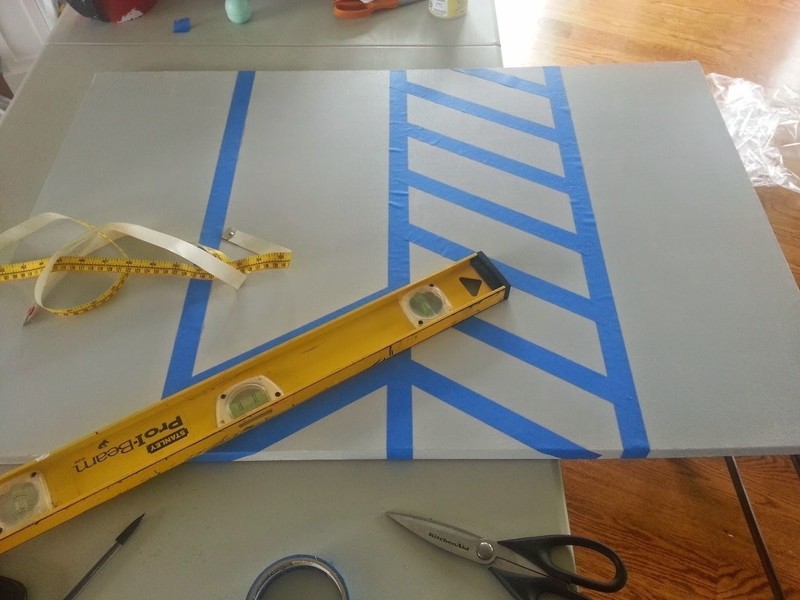
The next order of business was coming up with my herringbone design. This actually looks way more complicated than it was. I first divided the canvas into three equal sections with painters tape. I then used a level to pattern out equal sections for the herringbone design. This is the trickiest part because you have to be careful to make sure that the top and bottom of the diagonal sections match the top and bottom of the adjoining section. Once you get the first one right, the rest of the diagonal sections in that row will be perfect.
Tip: Make sure you stick that painters tape down nice and flat to ensure that no paint gets under the tape. The idea is to get nice, clean lines using the tape
-
 Step 5
Once I got all of the tape down, I used my same base coat to "lock in" my edges. This will also help to make sure your lines stay clean when you paint your sections.
-
 Step 6
As you may know from some of my other posts, I have an obsession with all things metallic. I wanted this painting to have a silver metallic look, so using my Modern Masters Silver Metallic Paint, I painted alternating sections.
-
 Step 7
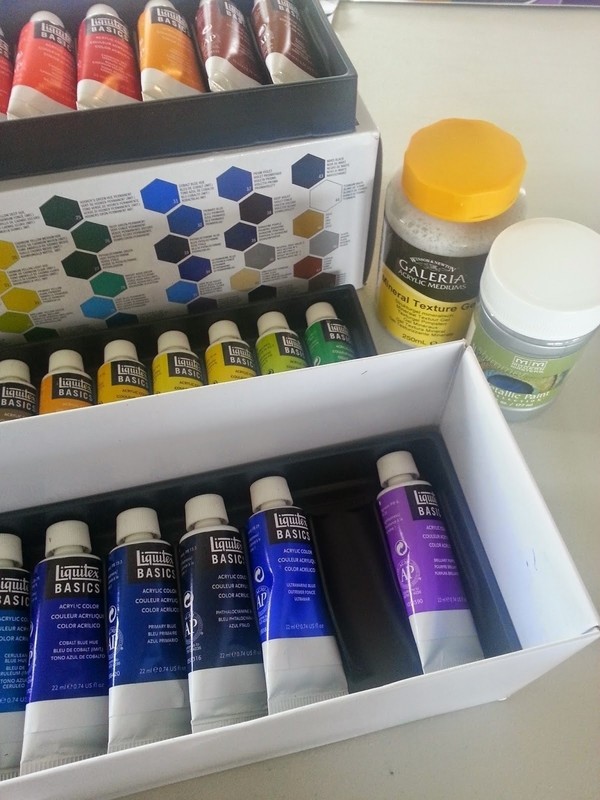
Since our whole house is done in neutral grays, I wanted to stay in keeping with that color scheme, but also add a pop of color. Eric bought me this great paint kit from JoAnn's (also using a 50% off coupon). I chose three colors in varying shades of blues and then a pop of hot pink.
More attempts by Eric to make me paint more!
-
 Step 8
I also added some Galeria Mineral Texture Gel to give my paint some texture.
-
 Step 9
For the remaining sections, I just randomely filled in the colors where I thought they looked best. After looking at my final product, I realize it looks like I had a method to my madness, but I really didn't. In total, I used 5 different colors: 1 metallic, 3 blues and 1 pink, but you can use more or less colors depending on the look you are going for!!
Tip: Similar to the base coat, I also painted the sides of the canvas with my herrinbone pattern colors to give the canvas a more finished look
-
 Step 10
While your paint is still tacky, peel off the painters tape slowly. Pulling off the tape while the paint is still wet will ensure that you don't pull off the paint and ruin your design.
Tip: Even with all of the steps that I took to ensure that my paint wouldn't bleed under the painters tape, I still had to touch up a few of the sections that did with my base coat
-
 Step 11
I bought a picture hanging kit from Home Depot for $3 since most canvas frames don't come with one. And that's it!!
-
 Step 12
We hung this in our bathroom and I think it looks pretty cool! Stay tuned for the full bathroom reveal, coming soon!
-
 Step 13
I hope you enjoyed this tutorial!! Check back for more of my attempts at decorating this crazy house!


 1
Wire Charms »
Time Turner Inspired Fidget Necklace
1
Wire Charms »
Time Turner Inspired Fidget Necklace