


About
Create stunning butterfly cookies using the marbling technique by following this simple tutorial!
This step-by-step tutorial makes stunning butterfly cookies simple. The icing marbling technique is easy to do and is useful in a variety of designs. I’ve used it myself on heart cookies, sock cookies, and now butterfly cookies. If you’ve ever wondered how to create a marbling effect with icing, today’s the day for you to learn!
Tags
-
 mmotse03 favorited Create Butterfly Cookies Using The Marbling Technique
07 Mar 19:40
mmotse03 favorited Create Butterfly Cookies Using The Marbling Technique
07 Mar 19:40


You Will Need
-
Step 1
You will need:
Cookies made from your favorite sugar cookie recipe, cut using a butterfly cookie cutter
Royal icing in black and any other three or four colors you choose (I used white, green, yellow and pink.)
Icing bags or bottles, couplers, and tips (I used a #2 tip for all the steps in this tutorial.)
A food coloring marker in any color (optional)
-
 Step 2
Before beginning, you may want to use a food coloring marker to sketch the outline of the shapes you want to create on your butterfly cookies. I did this with my first few cookies and then got comfortable with just free handing the shapes. The fact that butterflies are not perfectly symmetrical in natural is the perfect excuse to not make your cookies perfect either!
The first step is to use black icing to outline and immediately fill in the body of the butterfly and the shapes on the outer edges of the wings. Then, use two other colors to add dots to the wings. This is a wet-on-wet technique, so do it quickly before the black icing starts to dry. Continue decorating cookies this way, letting at least 20 minutes pass before going on to the next step so that your black icing is dry. -
 Step 3
The next step involves a technique called marbling. It’s a really easy way to create a beautiful design that will give your cookies that “wow” factor. Start by outlining and immediately filling in the bottom section of one of the wings using one of your background colors. Then, while the background icing is still wet, draw a few contrasting squiggly lines and drag a toothpick through the lines at multiple points, creating a marbling effect. After completing the bottom section of one wing, do the same on the bottom section of the other wing. Continue decorating each of the butterfly cookies this way, letting at least 20 minutes pass before going on to the next step so that your bottom sections are dry.
-
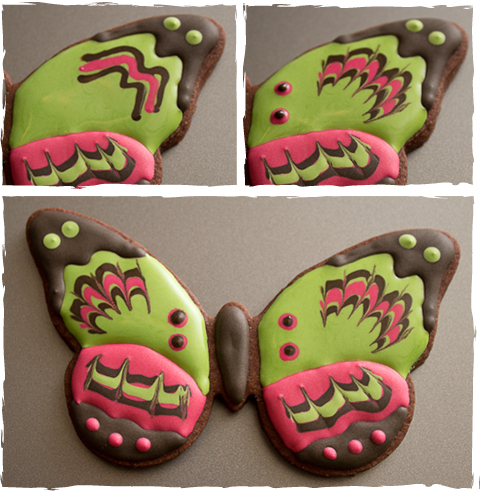
 Step 4
To decorate the top sections of the wings on your butterfly cookies, use the same technique you used to decorate the bottom sections. Outline and immediate fill the top section of one wing, draw squiggly lines in the wet icing using a contrasting color (change the arch of the lines to match the shape of the area), and drag a toothpick through the lines to create a marbling effect. You may also want to use the wet-on-wet technique from step #1 to add dots to fill in any blank areas on the wings.
Simply set the cookies aside to dry for 24 hours and then they are ready for packing, shipping, or just for you to enjoy!


 1
Books & Journals »
Red Like Roses, Blue Like Lilies
1
Books & Journals »
Red Like Roses, Blue Like Lilies
 2
Branch & Twig Wreaths »
A Pretty Easter Wreath
2
Branch & Twig Wreaths »
A Pretty Easter Wreath
