

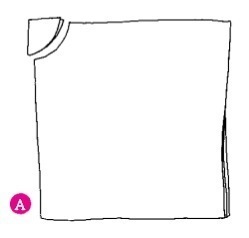
Christmas Pudding Cape
Extract from State of Craft • By Victoria Woodcock • Published by Cicada Books

About
Lou Clarke’s Christmas Pudding Cape
This seasonal shoulder decoration is proper tasty!
Lou Clarke is a stylist who can be found at the seaside during the week, making toiles
and thinking up film and photo-shoot ideas. At the weekends she’s in London chatting to customers from behind the counter of the Tatty Devine Brick Lane shop. www.louclarke.com, loubyswardrobe.blogspot.com.
Tags
© 2025 Victoria Woodcock / Cicada Books · Reproduced with permission.
-
 Luna D. favorited Christmas Pudding Cape
24 Apr 15:54
Luna D. favorited Christmas Pudding Cape
24 Apr 15:54
-
Kellyton K. favorited Christmas Pudding Cape
18 Mar 17:25
-
 Bette C. favorited Christmas Pudding Cape
09 Nov 23:34
Bette C. favorited Christmas Pudding Cape
09 Nov 23:34
-
 Mikeria W. added Christmas Pudding Cape to Things to make
26 Apr 21:36
Mikeria W. added Christmas Pudding Cape to Things to make
26 Apr 21:36
-
 Xfluffy_unitatoX favorited Christmas Pudding Cape
17 Nov 19:53
Xfluffy_unitatoX favorited Christmas Pudding Cape
17 Nov 19:53
-
Alecia B. favorited Christmas Pudding Cape
01 Aug 16:22
-
 Michaela K. favorited Christmas Pudding Cape
10 Jul 16:53
Michaela K. favorited Christmas Pudding Cape
10 Jul 16:53
-
 Dona Monstra favorited Christmas Pudding Cape
08 Jul 17:47
Dona Monstra favorited Christmas Pudding Cape
08 Jul 17:47
-
colourChemist favorited Christmas Pudding Cape
09 Jun 08:31
-
 HantuPenanggal favorited Christmas Pudding Cape
20 Dec 10:32
HantuPenanggal favorited Christmas Pudding Cape
20 Dec 10:32
-
Step 1
Begin with a square of paper measuring 70cm x 70cm and fold in half, then in half again – you have a square a quarter of the size of your original square.
-
 Step 2
Find the corner that has no open edges. Mark out several points that are 6cm from this main corner, and join together to create a curved line (you can use a set of compasses). Cut this corner out. When opened out, this will make the hole for your head to go through. (This cape fastens with a ribbon to allow for size variation and fits most necks, if you have a very thin or wide neck, however, you can alter this measurement. For a snug fit, measure the circumference of your neck and divide by 6.28 to work out the radius. Use this number to mark out the curve. The actual neck hole will be comfortably 1cm bigger all around, as the pattern includes a 1cm seam allowance.)
-
 Step 3
From the edge of the cut-out curve, measure 28cm all the way round, and cut along this curve.
-
Step 4
Unfold to reveal a circular shape with a neck hole in the centre. Cut down one of the folded lines to give you an opening to the cape.
-
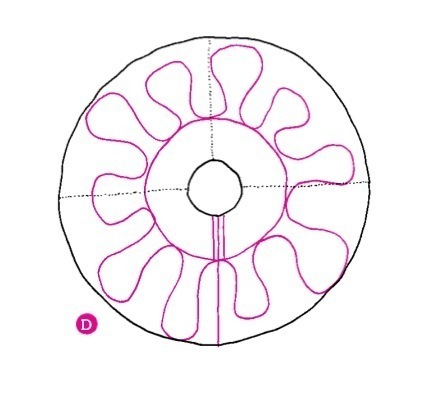
 Step 5
Measure 9cm from the neckline at several points, and join to draw out a circle . This is a guideline for the drip shapes.
-
 Step 6
Now’s the fun part where you get to go freestyle with your drip drawing! Starting the drips from the circle you have just drawn, make shapes of varying lengths. Take into consideration that you will need 1cm seam allowance around all the edges and draw the drips slightly larger than you want them to look on the final cape. Cut out your final shape.
-
Step 7
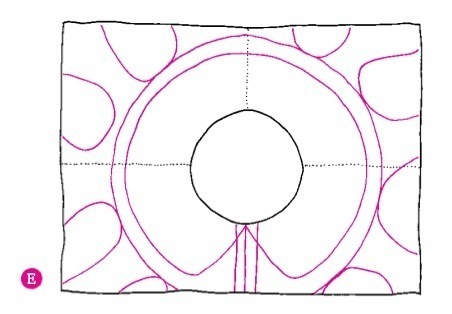
Fold the fabric in half, so that the right sides are facing. Pin the cape pattern onto the fabric 1cm from two edges (you still need some fabric left to make a collar) and cut around next to the pattern.
-
Step 8
Remove the pins and pattern, so you are left with you two matching fabric pieces on top of each other. Pin together at this point, making sure the edges all line up. Sew around all the drips 1cm from the fabric edge on a sewing machine – or you can hand sew it with a running stitch – leaving the neck line open. If you have a free machine embroidery foot for your machine, use this to make the curved lines smoother.
-
Step 9
Snip small V-shapes into the curves of the drips, cutting close to the sewn line but taking care not to cut into the stitches. Turn right side out and iron.
-
 Step 10
Now for the collar. You can cut the collar from your original pattern or trace over if it if you wanted to use your pattern again. Mark 7cm all around neckline. At the opening of the cape draw an upside down V-shape, the centre of the V being at the opening.
-
 Step 11
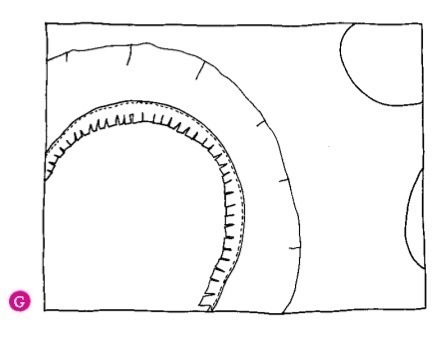
Cut out the collar shape (fig F) and pin to doubled- over fabric (right sides together). Cut out next to the pattern to create two pieces exactly the same.
-
Step 12
Remove the pattern, and pin the two shapes together on top of one another. Sew around the outside, 1cm from the fabric edge, again leaving the neckline open. Turn right side out to hide the seams and iron.
-
 Step 13
Lay the collar on top of the cape, matching the necklines together, and pin. Sew around the neckline 1cm from the fabric edge. Snip into the seam allowance at 1cm intervals, taking care not to cut into the stitches.
-
Step 14
Turn the collar back on itself, folding it over to the other side of the cape, so you are hiding the seams. Iron flat.
-
 Step 15
Cut the ribbon in half. Measure 4cm from the end of one ribbon strip and simply sew this 4cm section underneath the collar at the cape opening. Repeat this on the other side: you’re a Christmas pudding!
TIP You can make the cape in different colours, depending on which cake you fancy being for the evening.


Comments

