


About
Step by step make up tutorial from Vanity Kills.
Classy girls like you wear nothing but the best. It's hard not to get noticed when your lids are all decked out in shades inspired by precious metals. Copper, golds, and pearls might make you the belle of the ball, but all the jealous girls will see is a trashy tart who stole the show. Not to mention their boyfriend's glance. Hey not your fault you're hotter.
Prep work:
Prior to beginning your face painting ritual don't forget to cleanse your skin in order to make it free of dirt and oil. Then apply moisturizer approximately 10 minutes before you even think of slathering on that foundation.
This helps everything go on smoother, so I must stress how important it is.
After you've cleansed and moisturized, feel free to prep your skin with a primer (I personally favor Smashbox Photofinish), which functions as a base for smoother and longer lasting makeup. Now it's time to make those offensive pimples and icky under eye circles go bye bye by spot treating them with concealer (Clinique's Line Smoothing Concealer in Light always seems to do the job for me).
Apply a liquid fondation that best matches your skin tone to your face an neck with a sponge or a foundation brush. Start by applying small dots in the center of your face and then moving outward (I used Clinique's Superbalanced Makeup in Breeze).
Set everything in place by finishing off with a thin coat of translucent powder (Clinique's Blended Face Powder in Transparency is a staple in my makeup bag). You can use either a powder puff or a powder brush to get the job done.)
Tags
© 2024 · Reproduced with permission.
-
 breanna w. favorited 50% Class, 50% Trash Make Up
23 Jun 04:30
breanna w. favorited 50% Class, 50% Trash Make Up
23 Jun 04:30
-
 Little MAMA favorited 50% Class, 50% Trash Make Up
09 Nov 20:38
Little MAMA favorited 50% Class, 50% Trash Make Up
09 Nov 20:38
-
Little MAMA commented on 50% Class, 50% Trash Make Up
09 Nov 20:38
You Will Need
-
 Step 1
Prep your brows by filling them in with a pencil and softening the lines with a small brush or drawing them in if you don't have them. If you're eyebrowless like me, be sure to use a pencil that matches your hair color. I used a run of the mill regular black kohl eyeliner that you can find at any cosmetic counter to match my hair which is currently jet black.
Remember kids: It is always a good idea to use an eyeshadow primer, since it helps to neutralize the color of your lids and helps the pigments and shadows stand out more. Urban Decay's Eyeshadow Primer Potion does a fine job in that department and I highly recommend it.
-
 Step 2
Time to electrify your eyelids with metallic hotness! Colour in your entire eyelid from lashline to crease with a shimmering bronze creme eye shadow pencil (I simply adore MAC Shadestick in Mangomix).
-
 Step 3
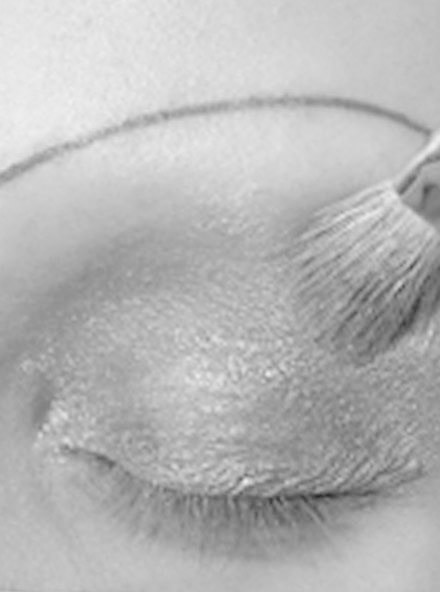
Take a brush with a tapered/rounded edge (the 239 brush by MAC works really well in this instance) and dip it into the sparkly lose copper pigment (I used Rushmetal by MAC).
Gently tap, DO NOT SWIPE, the pigment across your entire eyelid from lashine to crease. Tapping the pigment on gives the colour higher concentration.
Cover the entire area that you've previously filled in with your bronze creme eye shadow pencil. This will double up on the copper shade and guarantee to make your lids shimmer with the intensity of a thousand suns. -
 Step 4
Using a blending brush (I used the 217 brush by MAC) add some metallic orange based copper eyeshadow (I used MAC Coppering) to the outer crease of your eye and bring it down to your lashline on the outer corner of your eyelid.
Your creation should be in the shape of the letter "V".
If you shave and draw your brows on you can extend the shadow past your crease and onto the lower part of your browbone, since you obviously have more room to work with. -
 Step 5
Clean your blending brush. Starting at the inner crease of your eye swipe some frosted gold eyeshadow (I used MAC Amber Lights) outward toward where the metallic orange based copper eyeshadow sits.
If you're devoid of eyebrows, feel free to extend the shadow past your crease and onto the lower part of your browbone just like you did in Step 5.
When you're done, the outer part of your crease (and some of your browbone if you're eyebrowless) should be a bold orangey copper shade, while the inner part should be a frosty gold color.
Blend both shades into each other at their meeting point in the crease of your eye. Then blend both shades into the rich loose copper pigment that you added in Step 3. -
 Step 6
Clean that blending brush again and after you've done so, highlight your browbone with a healthy dose of pearly white eyeshadow (such as MAC Crystal Avalanche), which should be placed directly under your eyebrows (regardless if they're fake or natural).
Blend the pearly white eyeshadow into the two colors that you've blended into your crease in Step 5, the orangey copper and the frosted gold.Light shimmery shadows placed directly under the eyebrow's arch really help to bring your whole eye makeup together.
-
 Step 7
Chances are that if you're reading this you already have a favorite brand of black eyeliner, so it's time to grab your trusty black kohl and line your bottom lid starting from the outer corner of your eye, slowly making your way toward the inner corner.
Most of the color should be concentrated in the outer corner.
Personally, I prefer to put on eyeliner after eyeshadow and before mascara.
Curl your eyelashes with an eyelash curler and top off with 2 coats of black mascara (I used Barry M Extreme Black Waterproof Mascara). -
 Step 8
Suck in your cheeks, which will help you determine where your cheek bones are.
Place a small amount of pink blush (Too Faced Flushed Blush in Pretty in Pink is a brand that I enjoy using often) on your blush brush and gently swipe blush starting at the apple of your cheeks toward your temples.
Make sure to blend it well in order to avoid harsh lines which can make you look like you got punched in the face. -
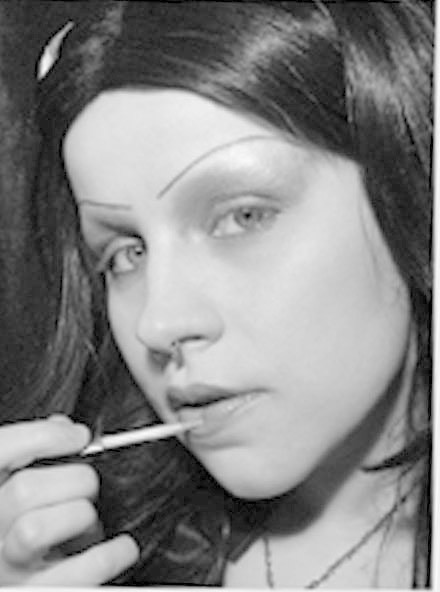
 Step 9
Shimmery copper toned lips will balance out your dramatic eye make up nicely without making your mouth feel underdressed.
Start off by choosing a lip liner that is close to your natural flesh tone (I chose Lancome Le Lipstique - Lip Colouring Stick with Brush in Natural Mauve).
Fill in your lips starting at the center of your natural lip line and moving toward the outer corners.
Filling in your entire lip area will make your lipgloss stay in place. -
 Step 10
A coat of shimmering copper lipgloss (such as Too Faced Status Gloss in Billionaire Boyfriend) applied to the center of your bottom lip causes your mouth to appeal fuller and more luscious.
-
 Step 11
Optional"
Smal strategically applied jewels, which will adhere to your face with just a hint of eyelash glue take this look to a whole new level of ultra glamour.
I applied two red stones which reminded me of a miniature blood rubies to the edges of my eyebrows and two golden yellow gems reminiscent of the topaz to the corners of my eyes.Break hearts!


Comments

 1
Mint & Trinket Tins »
Miniverse Trinket Boxes
1
Mint & Trinket Tins »
Miniverse Trinket Boxes
 2
Pouches, Purses & Wallets »
Water Bottle Pack
2
Pouches, Purses & Wallets »
Water Bottle Pack
 3
Christmas Decorations »
Christmas Table Centerpiece
3
Christmas Decorations »
Christmas Table Centerpiece
