


Poem Zine
Create an 8 page A4 poem zine with Georgie Watts.

There is something lovely about getting all your pens out, cutting up bits of things people don't want anymore and creating your very own magazine. I remember doing this when I was about 8 whilst also making cardboard badges for made up 'clubs' that my friends used to join in with. The clubs didn't last long but the passion for DIY publishing never went away and in 2008 I started making zines again proper. Here's how to make your very own poem zine:

You will need:
- Scissors
- Glue
- Sticky tape
- Magazines / newspapers / wrappers / packaging / scraps of fabric
- 8 sheets A4 paper
- Scrap paper
- Pencils
- Pens
- Access to a photocopier and copier paper (if you want to make copies)
- *** Imagination ***
Decide On A Theme
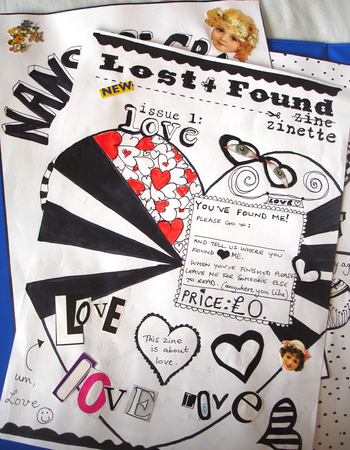
Zines ordinarily have content that draws from a decided theme. Start by having a think about what you want your zine to be about. You might want it to carry a serious message or you could make an entire zine based on a singular word. One of the first zines I made had the title 'Smelly' and so I filled each page with images to do with stuff that stank.

I found pictures of noses, food, animals, people and drew on that theme and made up suitably silly poems to go with it. Usually though, I like to write slushy poems about love and this is why my zines have this common theme running through them.
Gather Your Content

I find this part the most fun because it involves making a massive mess! Time to get your head in the recycling bin and sift through piles magazines, free papers, catalogues and packaging. When you have gathered all that you can carry, cut out individual lettering or whole words from interesting looking fonts that you find.
Whilst making this fantastic mess, make sure you put your individual letters and words in a separate lidded container so that the bits don't all fly about as soon as anyone creates a draft in the room by opening a door. Cut out pictures that capture your imagination and think about how these pictures might fit your decided theme.
Add Your Own Visual Content
At this point you might have had a few ideas and want to draw some pictures of your own. Do some drawings on separate scrap paper. You can cut these out and stick them in the zine later.
Writing A Poem Or Two

Thinking about your theme, try writing a few lines down on a scrap piece of paper that are in keeping with it. Some people like poems that rhyme, some don't. Sometimes you only have to add a few words next to a picture to create maximum impact, sometimes none. Go with you creative gut feeling and let your ideas flow.
If you do want to rhyme a word and you are seriously stuck, try going through the alphabet with that word until you find something that rhymes with it. Ideally this new word should make some sort of sense within your poem.

When it comes to making the zine, you can either write the poems in by hand or use cutout letters from your pot of cut out bits. You could even print out your own word processed poem and cut that out and stick it in the zine. It's up to you!
My own poems come from seeing or hearing something that inspires a creative lyrical idea. I used to write songs so I guess this probably helps in the process but as you'll see from my poems, they really doesn't have be too complicated.
Inspiration can strike at any time and lines can just seem to come out of nowhere. To avoid forgetting creative flashes of genius, get in the habit of having pen and paper with you wherever you go!
Putting Together Content
Start by taking one A4 sheet of paper and make that your title page. This is the page you want to stand out, so even if you are planning to only photocopy it in black and white, you need to make sure that the items you place on the page are striking.
You can use a mixture of all your mediums: illustration, cut-out pictures, hand lettering, cut-out text, patterned scraps of fabric. Glue or sticky tape these down and leave the page to dry and we'll call it page 1.

Once you are happy with your title page you need to begin your first content page, page 2.
This is the page where you can start placing the poems or pictures you want. You might find you are further inspired to write and draw at this stage, great! Just add these new bits of inspiration as you go. It's cut and stick, cut and stick, until you are pleased with what you have created. Leave this page to dry also.
Assembling The Zine

When page 1 and page 2 are dry, you need to put them back to back and stick them together. You can use glue and/or clear sticky tape for this whichever you think is most suitable.
Next sort the content for pages 3 and 4 and stick them back to back when they are dry.
Now you have pages 1 and 2 back to back and pages 3 and 4 back to back, you need to place page 2 face up and page 3 face up next to each other. Sticky tape these down the middle. You should have something that resembles a large greetings card, with page 1 on the front, pages 2 and 3 in the middle and page 4 on the back.
Create the content for pages 5, 6, 7 and 8 in the same way and then attach these to pages 1, 2, 3 and 4.
Making Copies
If you want to make copies of your zine to impress your family and friends with, then the best place to go would be your local library.
To print copies with pages in the same order as you created your zine, you need to select A3 double sided printing and open the zine out to photocopy. At this point you might have to ask the librarian as all photocopiers have different settings and it took me awhile to master my local library photocopying machine!
Basically you will end up with 2 double sided A3 sheets which you can then fold in the right order to make your 8 page A4 zine and secure with staples or leave loosely folded.
And that is your zine all made up looking pretty impressive!
Advancing on technique with zines

If you would like a more polished look to your zine, then you can create or manipulate digital visual content in Photoshop which you can then import into Word with your poems and then create high quality PDFs which can then be printed and assembled.
Of course if you have publishing software then you could use that, but where would you get all the fun of actual cutting and sticking from? :)
Have fun!
You can find out more about Georgie Watts and her zines on her website.


