


About
Let us make something special for your dearest: A pair of cute and totally unique figurines for yourself and your sweetheart, personalized with your own initials.
I will show you how to create a pair of personalized »You & Me« bronze statuettes.
I created the sculpture »You & Me« from the »Scrappies« figurine family. It represents love, affection and mutual commitment - emotions that everyone values and never lose their significance.
The »Scrappies« are inspired by everything you can find in a scrapyard: old nuts and bolts, tin cans, pipes, coils, parts of ball bearings, but they are actually manufactured in a totally different, novel »3D printing« process.
Tags
-
 Joy H. favorited »You & Me« Bronze Statuettes
01 Jun 19:32
Joy H. favorited »You & Me« Bronze Statuettes
01 Jun 19:32
-
 Angela W. favorited »You & Me« Bronze Statuettes
19 May 02:35
Angela W. favorited »You & Me« Bronze Statuettes
19 May 02:35
-
 CookieBird Lover commented on »You & Me« Bronze Statuettes
15 Oct 01:12
CookieBird Lover commented on »You & Me« Bronze Statuettes
15 Oct 01:12
-
faith m. added »You & Me« Bronze Statuettes to other
15 Feb 04:01
-
 martinaguitron11 favorited »You & Me« Bronze Statuettes
29 Jan 03:03
martinaguitron11 favorited »You & Me« Bronze Statuettes
29 Jan 03:03
-
 Bree favorited »You & Me« Bronze Statuettes
20 Dec 18:23
Bree favorited »You & Me« Bronze Statuettes
20 Dec 18:23
-
 Caitie M. added »You & Me« Bronze Statuettes to TO SHOW DAD
03 Oct 04:06
Caitie M. added »You & Me« Bronze Statuettes to TO SHOW DAD
03 Oct 04:06
-
 faith.saunders.11 favorited »You & Me« Bronze Statuettes
27 Aug 03:02
faith.saunders.11 favorited »You & Me« Bronze Statuettes
27 Aug 03:02
-
 Jed P. favorited »You & Me« Bronze Statuettes
04 Jul 16:46
Jed P. favorited »You & Me« Bronze Statuettes
04 Jul 16:46
-
 Step 1
For this project, you will need several pieces of free software:
(A) Download and install a copy of Google Sketchup from
• http://sketchup.google.com/download/
This is a relatively simple 3D design application.
(B) Download and install a copy of Meshlab from
• http://meshlab.sourceforge.net/
This utility program will be used for a file format conversion.
(C) Download and install a copy of Netfabb Studio from
• http://www.netfabb.com/download.php
This is another utility program which we will use to prepare the model fro 3D printing. -
 Step 2
In this step, you will work in Google Sketchup to personalize the base model with your initials.
Download and open the model file from
• http://sketchup.google.com/3dwarehouse/details?mid=eb546db845a53579afd3d1af2f3ec608
Click Edit - Unhide - All
Two green helper planes will appear. These planes will make it easy to position the initials that you will be adding now.
Click Tools - 3D Text to open the 3D text dialog. Type your initial into the large input field and set the remaining parameters:
Font: Lucida Handwriting (or any other font of your choice)
Align: Center
Height: 12.0"
Extruded: 3.0"
Click [Place] and move the mouse cursor to a spot on the green helper plane, but do not try to position the letter directly on the body. Click to lock the letter on the green plane.
Click the letter and use the mouse to move it to the desired spot on the body. Click again to lock it in its new position.
Repeat the steps with the second initial on the other plane and body.
When satisfied with the positions of the initials, click the black arrow on the toolbar, followed by a click on one of the green planes. They are no longer needed. Press the [Delete] key to remove them.
Save your model file. -
 Step 3
In this step, you will convert the Google Sketchup file into the proper file format and size for printing.
While still in Google Sketchup, click File - Export and save the file in the "COLLADA / .DAE" format. You may now close Sketchup.
Open Meshlab, click File - Import Mesh and open the previously saved .DAE file.
Click Export Mesh As ... and resave the file in the "Alias Wavefront Object (*.obj)" format. You may now close Meshlab.
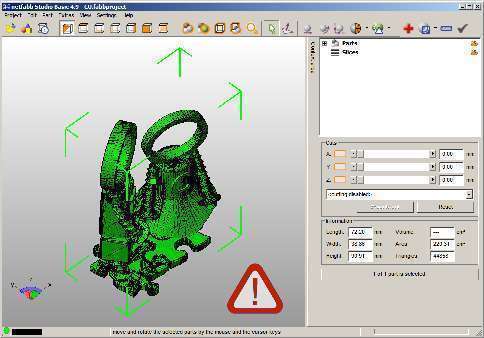
Open Netfabb Studio, click Project - Open and open the previously saved .OBJ file.
The file is not ready for printing, yet. Click the red cross on the toolbar, followed by [Automatic Repair], followed by [Apply Repair].
Click Part - Export part - as STL. Another repair dialog may come up. Click [Repair] again, followed by [Export]. You may now close Netfabb Studio.
Now you have a 3D model in the STL file format, ready to be submitted to a 3D printing service provider. -
 Step 4
The STL file from the previous step can now be uploaded to a 3D printing provider. I am currently aware of these three providers of metal printing:
• i.materialise http://i.materialise.com
• Shapeways http://www.shapeways.com
• Ponoko http://www.ponoko.com
The upload procedures vary slightly by provider, but should be easy enough to handle.
All providers use essentially the same process for creating a metal object from digital files at slightly different rates. -
Step 5
Concluding remarks
When you upload your file to one of the service providers, you will immediately recognize that 3D metal printing is not cheap at all. Your model will likely also be more expensive than what I am offering at my campaign.
Before ordering your model from one of the service providers, please recognize that the article was written for educational purposes only. In that context, the file size and resolution of the downloadable 3D model has been starkly reduced.
As a consequence, triangular artifacts (three-dimensional "pixels") will be visible on all statuettes printed from the downloaded 3D file. If you want a high-quality model without visible artifacts, please consider contributing to my funding campaign where I show and offer the same statuettes in a considerably higher resolution.


Comments

 1
Watercolor Art »
Watercolor Paints Made From Make Up
1
Watercolor Art »
Watercolor Paints Made From Make Up

