


About
How to work with Tracing Paper & Transfer Pens
Here's a visual step-by-step on how to use the tracing paper with the transfer pens! This tracing paper (also called vellum) is heavier than what you usually find, which makes it ideal for making your own embroidery patterns or tracing designs. It will stand up longer to repeated tracings when used with carbon transfer paper, and can also withstand a hot iron*. Cool, huh? I'm sure you're smart enough to figure this out on your own, but hey -sometimes pictures help.
*not magma hot
Let's do this!
-
 mmotse03 favorited Tracing Paper & Transfer Pens
11 Oct 11:04
mmotse03 favorited Tracing Paper & Transfer Pens
11 Oct 11:04
-
 silentband favorited Tracing Paper & Transfer Pens
20 Jul 21:01
silentband favorited Tracing Paper & Transfer Pens
20 Jul 21:01
-
 tiberius.r.augustus favorited Tracing Paper & Transfer Pens
20 Jul 19:23
tiberius.r.augustus favorited Tracing Paper & Transfer Pens
20 Jul 19:23
-
 Step 1
A piece of vellum on the left (not the whole sheet), pens on the right!
"Vellum"? This is another term for tracing paper -usually heavier tracing paper. In ye olden days, vellum was made from animals skins but not this stuff. It is 100% animal-free!
-
 Step 2
Pick a pattern you want to trace, something that doesn't already imprint. I'm using one of the designs from my Cute Little Heads as an example. We'll pretend its stamping days are over. Your design can be anything you want (but don't want to trace ink onto directly).
-
 Step 3
Here's what it looks like under the tracing paper. See? It's really clear. You don't hafta use a lightbox, or tape it to a window or nuthin'!
-
 Step 4
Test the transfer pen on a scrap sheet of paper (to make sure the ink is flowing) before you begin tracing. You'll press the nib to get it started. You want a nice, fine line. No globs.
-
 Step 5
With your design under the tracing paper, simply trace along the lines.
Notice that I used the red pen to outline her mouth instead of black. Check out this next smooth move...
REMEMBER! If your design has letters, they will need to be reversed before this step. -
 Step 6
I continued to use different colors for different lines so I'll have a color guide to follow as I stitch!
It's true, I don't really want to give her yellow skin when I stitch this up, but that will serve as a reminder to change floss colors when I come to that line. You know, I'll be all zoned out stitching...So, whatever design you are making, even if the colored pens don't exactly match the floss you want to use, employing different colors can remind you when you need to make the switch. This is especially helpful when stitching more complicated designs. -
 Step 7
Ta daa! I now have a color version of the pattern on vellum. It can be transferred onto wood, heavy paper, or fabric. Want to see what it will look like? Fire up the iron...
-
 Step 8
If you choose fabric, pre-heat it first to smooth out wrinkles and warm it up. The ink will transfer more easily to pre-warmed fabric. Make sure your iron is on HOT and the steam is turned OFF! Tracing paper + steam = disaster.
-
 Step 9
Position the pattern where you want it, ink-side down. (Did you remember to reverse your lettering? Okay, okay...just asking.)
-
 Step 10
Pass the iron firmly over the design -and don't shift it! It should take only 3-4 passes, but you can check for darkness and continue if you need to.
-
 Step 11
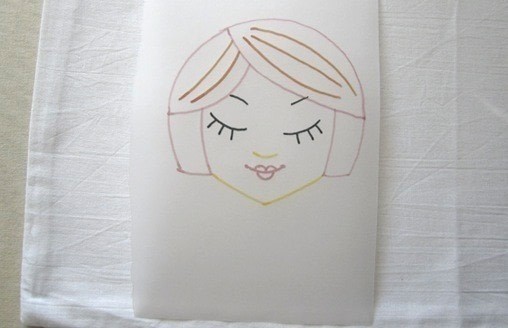
Look! It worked! I'm always so excited when something like this happens. It's like magic. Yes, I was a bit sloppy with my lines, but yours will be perfect, I'm sure. Oh, and -keep your pattern! You can imprint it again later for another project!
If you want to do this yourself, I have heavy-duty tracing paper and colored transfer pens right here, dear.
Enjoy making your own designs! Hey...wanna learn some basic embroidery stitches now?


 1
Watercolor Art »
Watercolor Paints Made From Make Up
1
Watercolor Art »
Watercolor Paints Made From Make Up
 2
Paper Book Covers »
Shoe Inspired Spiral Notebook
2
Paper Book Covers »
Shoe Inspired Spiral Notebook


CO + K User