


About
An easy-peasy, shrinky dink ring!
I found some time to do a tutorial! Yay! It's quite straight forward, but if you need some help don't hesitate to message me.
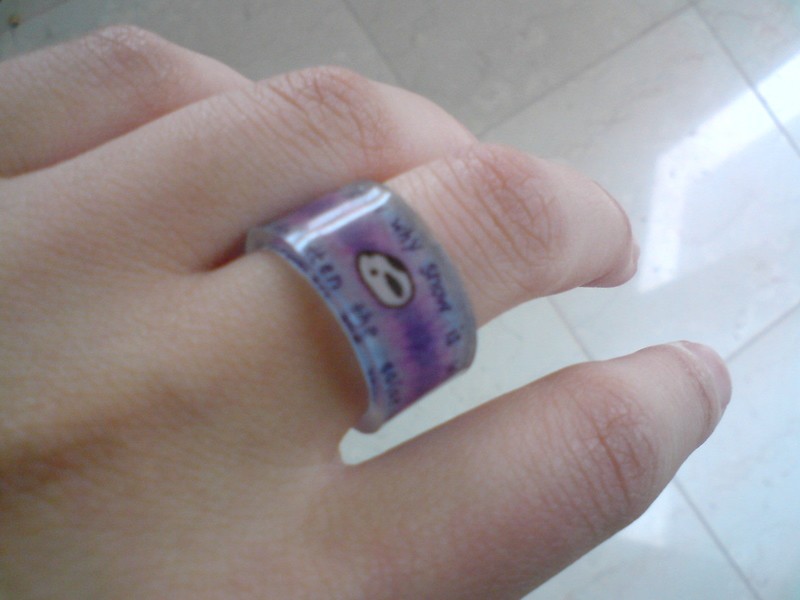
If you're wondering what the writing says on the ring:
Do you know why snow is white? It's because it's forgotten the color it once was. -C.C (from the anime CODE GEASS)
***UPDATE***
OMG, much thanks to CO+K for featuring my dinky little project! I never would have thought I would get featured and yet here it is! I am so very honored! Thanks to all who have faved it and viewed it! :)
-
 Kinhime Dragon added Shrinky Dink Ring Tutorial to things to make
30 May 15:01
Kinhime Dragon added Shrinky Dink Ring Tutorial to things to make
30 May 15:01
-
Kinhime Dragon favorited Shrinky Dink Ring Tutorial
30 May 15:01
-
 Sandra C. added Shrinky Dink Ring Tutorial to Anells
07 Sep 21:05
Sandra C. added Shrinky Dink Ring Tutorial to Anells
07 Sep 21:05
-
 Valerie B. favorited Shrinky Dink Ring Tutorial
20 Jan 02:50
Valerie B. favorited Shrinky Dink Ring Tutorial
20 Jan 02:50
-
 Sherri B. commented on Shrinky Dink Ring Tutorial
13 Jun 15:58
Sherri B. commented on Shrinky Dink Ring Tutorial
13 Jun 15:58
-
Sherri B. added Shrinky Dink Ring Tutorial to Things I wanna try
13 Jun 15:57
-
 Anja R. favorited Shrinky Dink Ring Tutorial
25 May 04:15
Anja R. favorited Shrinky Dink Ring Tutorial
25 May 04:15
-
 Katie P. added Shrinky Dink Ring Tutorial to Try it!
20 Mar 17:50
Katie P. added Shrinky Dink Ring Tutorial to Try it!
20 Mar 17:50
-
 PetiteElefant favorited Shrinky Dink Ring Tutorial
02 Jan 21:30
PetiteElefant favorited Shrinky Dink Ring Tutorial
02 Jan 21:30
-
 arcadethumbs favorited Shrinky Dink Ring Tutorial
02 Jan 08:47
arcadethumbs favorited Shrinky Dink Ring Tutorial
02 Jan 08:47
-
 Step 1
First, you need to measure your finger to find its circumference.
-
 Step 2
Different brands of shrink plastic have different shrink rates, sorry I don't really know how to put it. XD
Plastics could shrink to either 1/2 or 1/3 of its starting size. I recommend baking a guinea pig piece of plastic first to find out how much it shrinks.
If it shrinks to 1/2 its size, use two lengths the circumference of your finger. If it shrinks to 1/3 use three lengths.
You can decide how wide you want it.
-
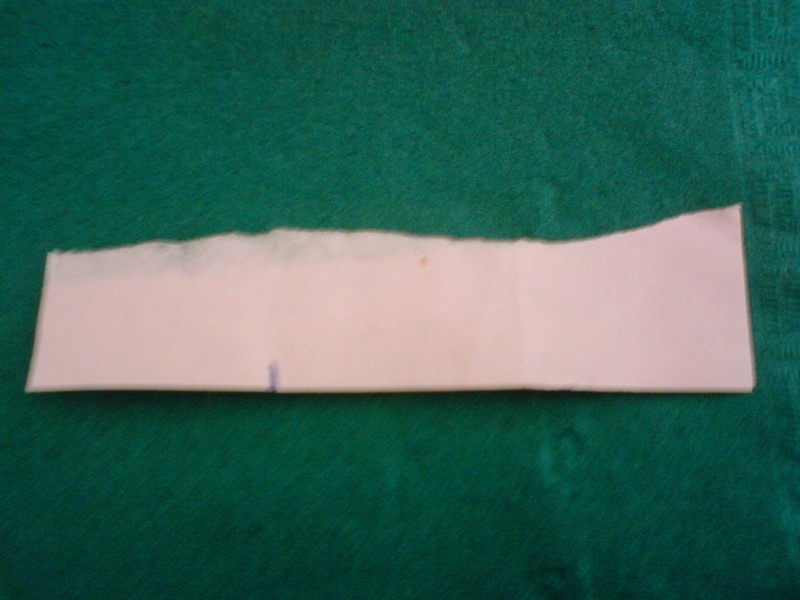
 Step 3
You should out your design on a piece of paper before hand. You don't want random pencil line on your ring.
***IMPORTANT***
Don't use oil-based paints or crayons; they will catch fire! D: Sharpies, colored pencils, and acrylic paints are all good! :) -
 Step 4
Then, just copy your design onto the frosted side of the shrink plastic.
***IMPORTANT***
If you're gonna have words on it, just remember to write the words and letters backwards so that it appears the right way on the finished ring. -
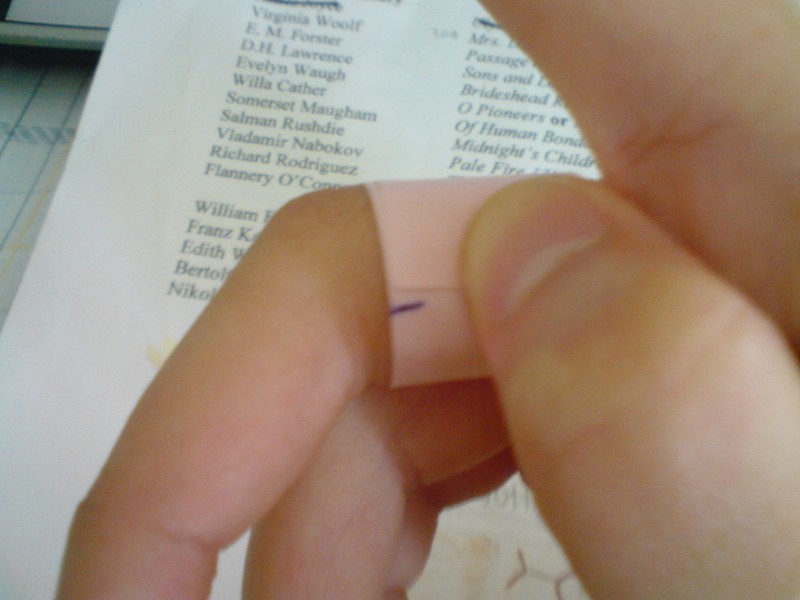
 Step 5
Carefully cut out the strip of plastic.
***IMPORTANT***
When you cut, remember to round out the corners. If you leave them sharp then they will be pointy and could hurt you after you bake them. -
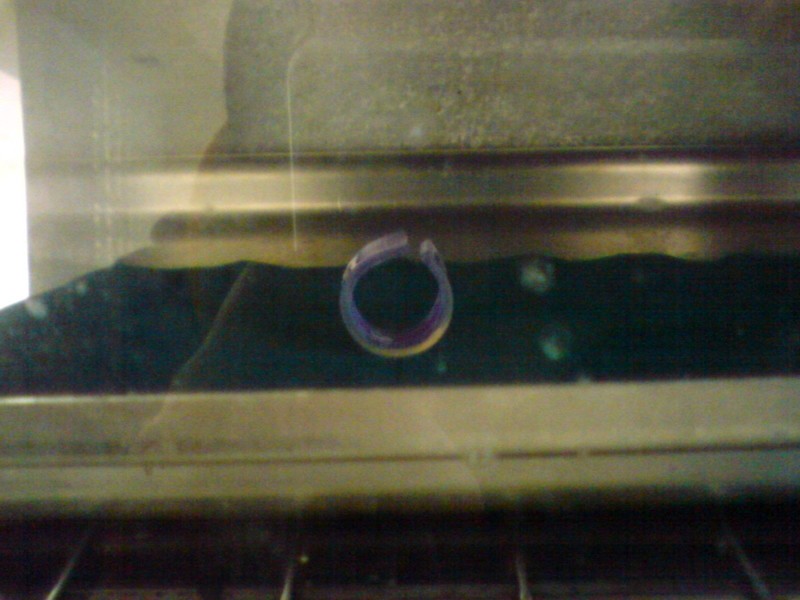
 Step 6
Now, time to bake! Set your oven at about 350 F/177 C. I suggest that you bake on a napkin of sorts. It will come in handy in the next steps.
***IMPORTANT***
Make sure you watch the plastic the whole time! I will not be responsible for any fires! D: -
 Step 7
For this step, YOU MUST WORK QUICKLY!
Once it flattens, take it out of the oven and wrap it around an object that is about the circumference of your finger. Wrap it so that the shiny side is facing up AKA facing you.**TIP**
If you have baked on a napkin, you can use it to help you wrap the plastic. It will prevent you from burning your fingers -
 Step 8
If you make a mistake, no problem! Just pop it back into the oven, wait for it to flatten and re-wrap!
-
 Step 9
After it cools, TADA! You have an awesome new ring!
Good Luck! :)


 1
Watercolor Art »
Watercolor Paints Made From Make Up
1
Watercolor Art »
Watercolor Paints Made From Make Up

Know what to do with. Now I can try making a variety
Of rings. Maybe bracelets! I'm a crafty person but I'm
Glad there's always others that are better than me so I can
Learn new and awesome things. Thanks again!
like your design still and congreatulations of the futering of your featuring !!!!!!
It's not sold in my town as I have looked for it. Are there any brand that you recommend as I will probably have to ebay it?