

About
Don't be scared of the markings on sewing patterns!
This tutorial will help you understand fourteen of the most common markings on sewing patterns. Fully photographed and illustrated, you'll feel a lot more confident about mastering patterns after reading this guide!
-
 Susie F. favorited Sewcabulary: Fourteen Key Terms For Understanding Sewing Patterns
15 Jan 23:55
Susie F. favorited Sewcabulary: Fourteen Key Terms For Understanding Sewing Patterns
15 Jan 23:55
-
 Treesa M. commented on Sewcabulary: Fourteen Key Terms For Understanding Sewing Patterns
27 Nov 15:39
Treesa M. commented on Sewcabulary: Fourteen Key Terms For Understanding Sewing Patterns
27 Nov 15:39
-
 Kimberly M. favorited Sewcabulary: Fourteen Key Terms For Understanding Sewing Patterns
06 Apr 01:44
Kimberly M. favorited Sewcabulary: Fourteen Key Terms For Understanding Sewing Patterns
06 Apr 01:44
-
 Key West Witch added Sewcabulary: Fourteen Key Terms For Understanding Sewing Patterns to Sewing
20 Mar 21:47
Key West Witch added Sewcabulary: Fourteen Key Terms For Understanding Sewing Patterns to Sewing
20 Mar 21:47
-
 Sarah Sylvia S. favorited Sewcabulary: Fourteen Key Terms For Understanding Sewing Patterns
18 Jul 04:48
Sarah Sylvia S. favorited Sewcabulary: Fourteen Key Terms For Understanding Sewing Patterns
18 Jul 04:48
-
 Jane K. favorited Sewcabulary: Fourteen Key Terms For Understanding Sewing Patterns
22 Jan 16:21
Jane K. favorited Sewcabulary: Fourteen Key Terms For Understanding Sewing Patterns
22 Jan 16:21
-
 Shelly S. added Sewcabulary: Fourteen Key Terms For Understanding Sewing Patterns to refashion
23 Aug 03:39
Shelly S. added Sewcabulary: Fourteen Key Terms For Understanding Sewing Patterns to refashion
23 Aug 03:39
-
Shelly S. favorited Sewcabulary: Fourteen Key Terms For Understanding Sewing Patterns
23 Aug 03:39
-
 Michelle H. favorited Sewcabulary: Fourteen Key Terms For Understanding Sewing Patterns
31 Jul 13:37
Michelle H. favorited Sewcabulary: Fourteen Key Terms For Understanding Sewing Patterns
31 Jul 13:37
-
 HylianWriter534 favorited Sewcabulary: Fourteen Key Terms For Understanding Sewing Patterns
09 Jun 05:53
HylianWriter534 favorited Sewcabulary: Fourteen Key Terms For Understanding Sewing Patterns
09 Jun 05:53
You Will Need
-
 Step 1
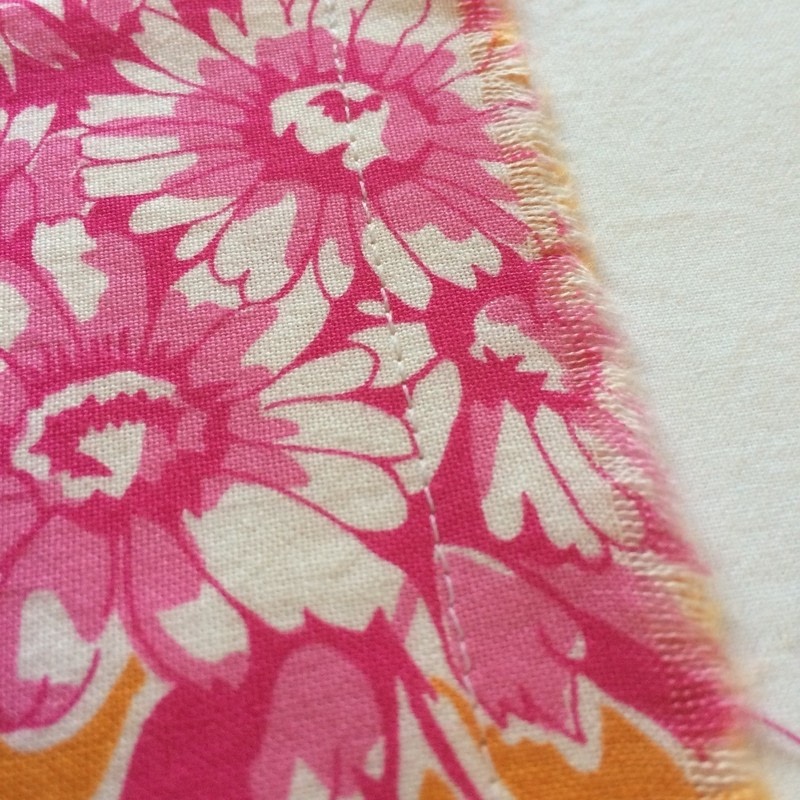
Seam Allowance: Seam allowance is the amount of fabric between the seam and the raw, or finished, edge of the fabric. In the picture below, the seam allowance is to the right of the seam. Seam allowance will be listed on the instructions for all sewing patterns. For clothing patterns from the 1960's to now, seam allowance is typically 5/8 of an inch. For clothing patterns from the 1950's and older, seam allowance can differ in size. Quilting patterns are almost always 1/4 inch, and craft patterns will vary in size.
-
 Step 2
Here is the seam allowance marking on your pattern piece.
-
 Step 3
Selvedge: In woven fabrics, the selvedge is formed where the weft threads loop around the warp threads at the end of the loom to create a finished edge that won't fray. Selvedges run along each lengthwise edge.
-
 Step 4
Raw Edge: Raw edges are formed perpendicular to the selvedge. This edge, unlike the selvedge, will fray.
-
 Step 5
Straight Grain: Read number 2. The straight grain runs parallel to the selvedge. Straight grain is crucial in making sure pattern pieces are cut out...well, straight.
-
 Step 6
In these pictures, notice how I measure from the very edge of the selvedge to the straight grain line on both ends of the line. The measurement must be the same on both ends of the line for your pattern piece to be placed correctly.
-
 Step 7
...
-
 Step 8
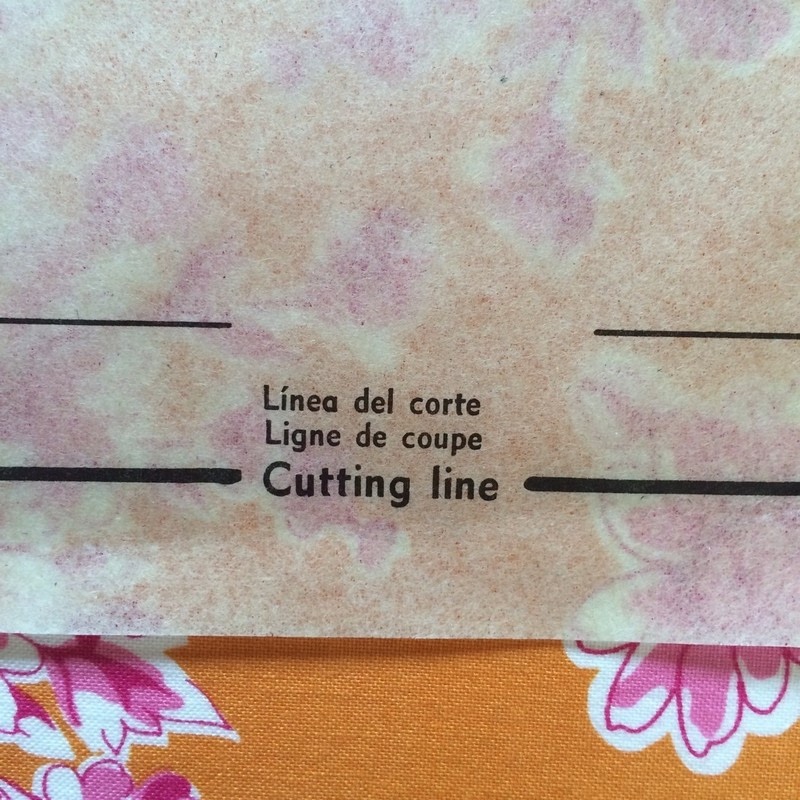
Cutting Line: This is the line that you will follow to cut your fabric. For brand new patterns, you will cut through the pattern paper and the fabric. For used patterns, you will cut along the edge of the paper and through the fabric.
-
 Step 9
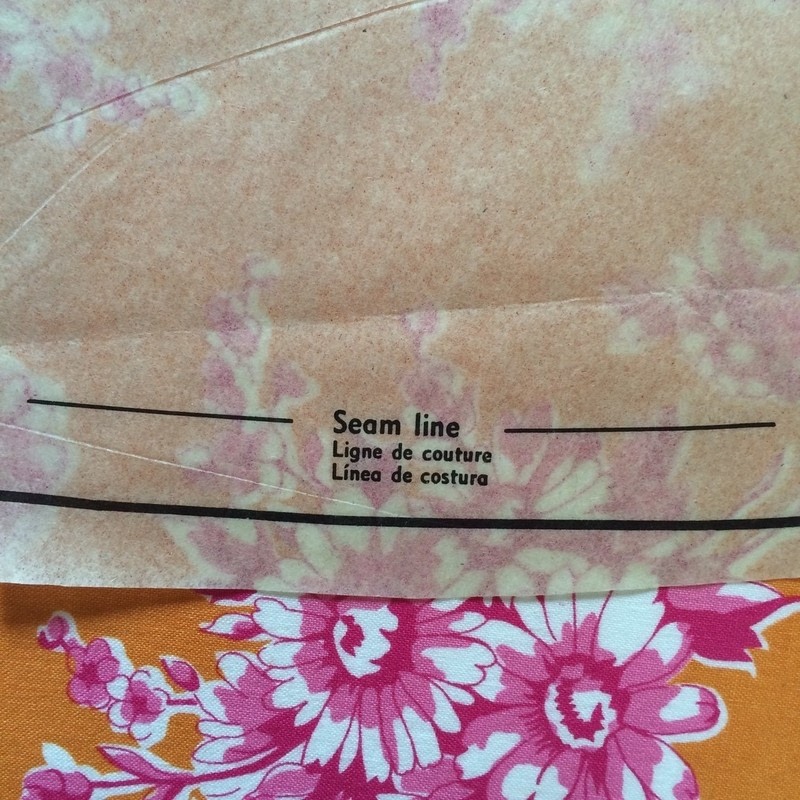
Seam Line (Stitching Line): This is the line you will follow when you sew your pieces together. This line will not be transferred onto your fabric, which means that once you remove your pattern pieces, this pattern marking is not helpful. This line is typically the seam allowance's distance from the cutting line. For example, if your seam allowance is 5/8", your seam line will be 5/8" from the edge of the piece you cut from the fabric. Beginning sewists, you will use your needle plate (AKA the throat plate) to measure stay 5/8" from the edge of your fabric piece. (Post coming up about sewing machine parts & pieces, and where to find your throat plate. I'll link it here when it's done!)
-
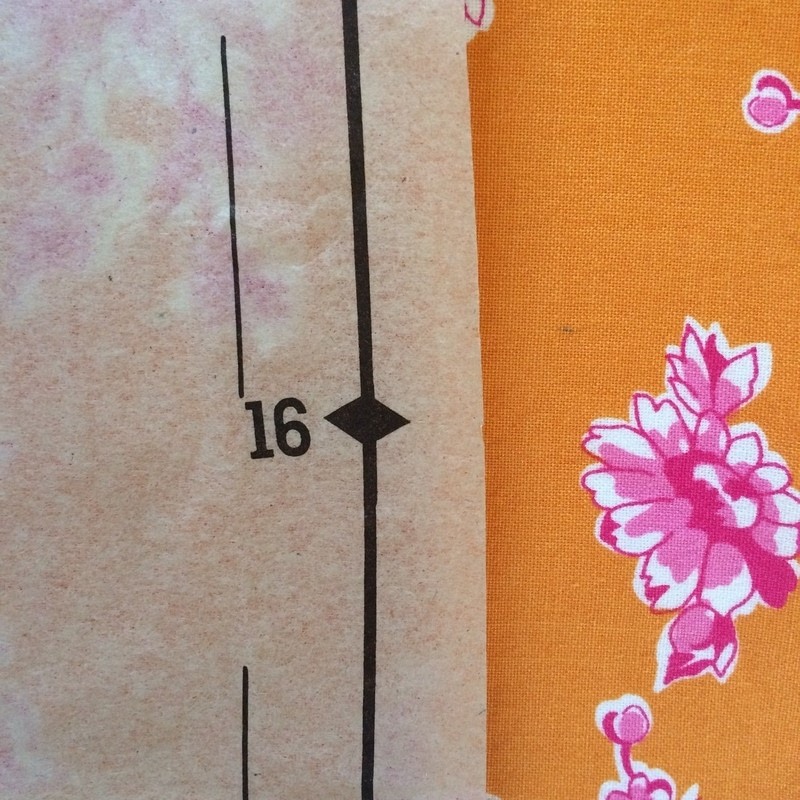
 Step 10
Notches: These little diamond shapes are the keys to helping you piece together your fabric pieces. Each notch is numbered and has a coordinating notch with the same number. For example, this picture is a notch on a 'skirt back' pattern piece and there is another notch numbered 16, on the 'skirt front' pattern piece where I will sew them together.
-
 Step 11
Notches may be singular, or can come in groups of two or three. Two notches will always match to two notches, and three notches will always match to three, etc.
-
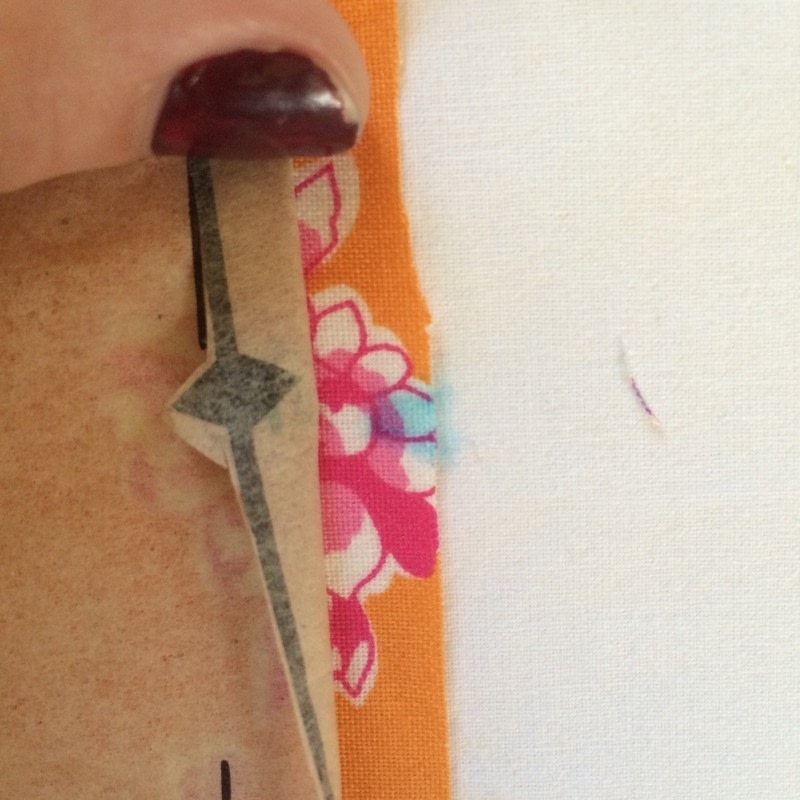
 Step 12
I recommend marking notches with a marking pen.
-
 Step 13
Some sewists prefer to cut the notches outward, to create triangular shapes off the edge of the fabric.
-
 Step 14
I don't recommend cutting notches inward. This creates the possibility of cutting too far into the fabric, which could result in a hole in your seam.
-
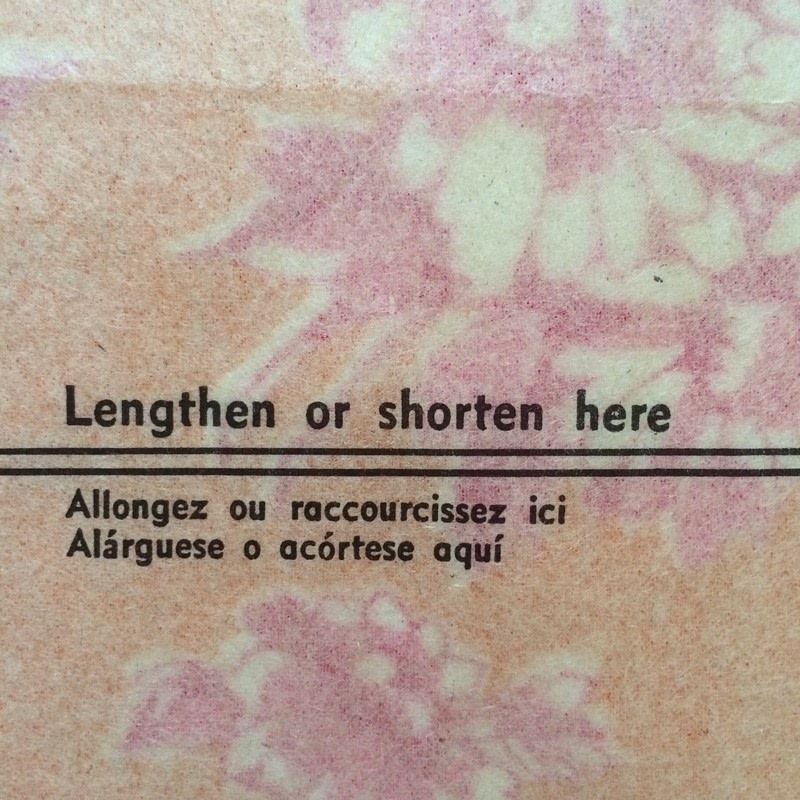
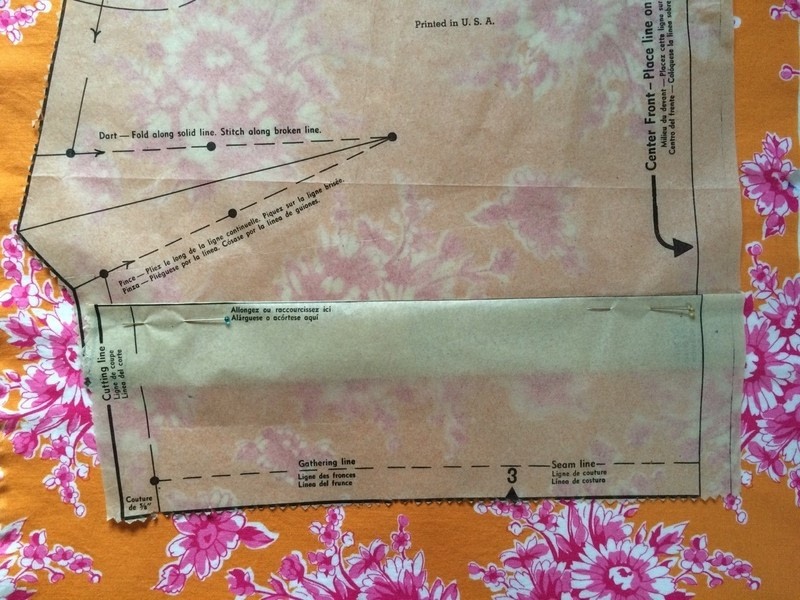
 Step 15
Lengthen or Shorten Here: Listen up sewists with long or short torsos! This line is your friend. These are typically on bodice (could be a blouse, jacket, top half of a dress), pant (could be shorts, capris, etc.) and sleeve pattern pieces.
-
 Step 16
...
-
 Step 17
To add length: Cut along the line, and insert whatever amount of extra length you need. Don't forget to add the same amount to both the front and the back pattern pieces.
-
 Step 18
To shorten: Fold along this line and take up the desired amount. Don't forget to subtract the same amount to both the front and the back pattern pieces.
-
 Step 19
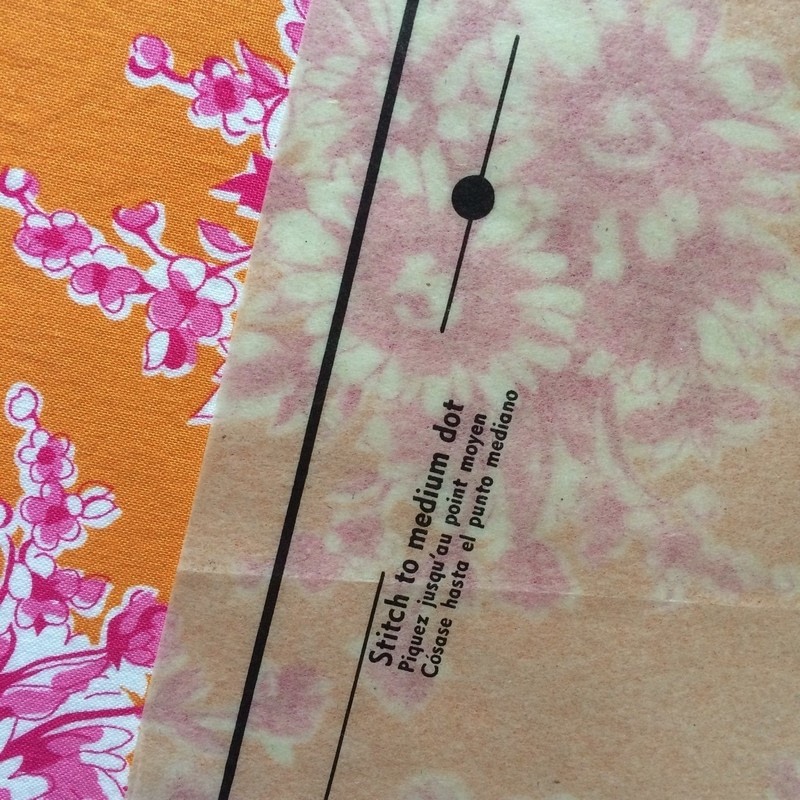
Small, Medium or Large Dots: Much like notches, these dots help you to piece your pattern together properly, and sew seams in the correct places. These dots are common for sleeve placement, collar placement, and to match the bottom of zipper placement, to name a few. You will mark these on your fabric using chalk or a marking pen.
-
 Step 20
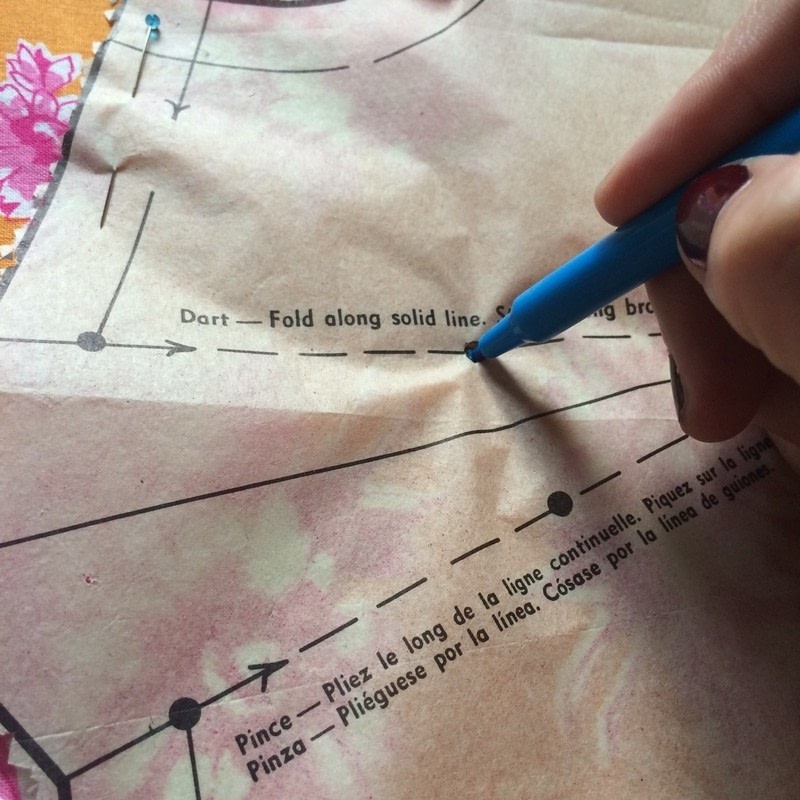
Darts: Darts are structural elements that allow the fabric to conform to body contours and curves. Darts are most common at the bust, but may also be found at the waist, hips, and elbows.
-
 Step 21
Firstly (below) mark the dots along the dart lines, being sure that your marking pen bleeds through to the backside of the fabric, or if you're using chalk, mark on both sides of the fabric.
-
 Step 22
Then, fold the fabric right sides together, iron, and pin through the dots.
-
 Step 23
Lastly, 'connect the dots', forming a sharp point at the end of the dart. Mark and sew along the line you draw.
-
 Step 24
Below: a finished dart from the outside.
-
 Step 25
Here is a dart finished dart from the inside, with dart pressed, and not pressed.
-
 Step 26
Ease: Ease is the difference between the actual finished garment measurements, and the standard body measurements on the back of a pattern envelope. This 'extra room' allows you to move around in your finished garment. For example, a blouse pattern envelope may say that the bust measurement for a size 6 is 32", but when you make the pattern, the blouse bust will measure 34". I could write a two-page post on ease, how it has become out-of-control on new patterns, and how to correct it (and maybe I will...) but for now, I'm going to recommend you to this sewists's blog for more help with correcting and calculating ease.
-
 Step 27
Ease is also sometimes denoted by a circle with two perpendicular lines through it. These markings are found at the bust, waist, hip, and bicep to name a few. Below the marking are the sizes, followed by the finished garment measurements. The below picture shows the ease at the bicep placement on a sleeve pattern piece. Size 6 measures 10 7/8", size 8 measures 11 1/8, etc.
-
 Step 28
Place on Fold: Typically denoted by a curved line with arrows at the end, the "place on fold". The "fold" being the edge of the fabric, opposite from the selvedges, where you have folded it in half. When a pattern piece is cut out on the fold of the fabric, it creates a mirrored fabric piece (see third photo down for an example). Be sure not to cut the fold line!
-
 Step 29
...
-
 Step 30
Here is a piece cut on the fold, unfolded to show the result. Note that the fabric is not cut at the fold line, and should not be cut there.


Comments


 1
Watercolor Art »
Watercolor Paints Made From Make Up
1
Watercolor Art »
Watercolor Paints Made From Make Up
 2
Paper Book Covers »
Shoe Inspired Spiral Notebook
2
Paper Book Covers »
Shoe Inspired Spiral Notebook

