

About
sewing,fabric scraps,quilting
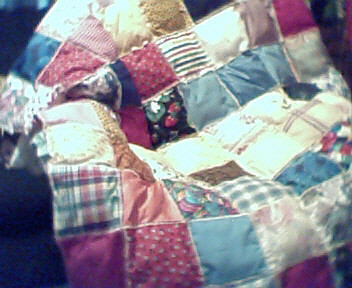
I have made several of these quilts. It's a great way to use up all those fabric scraps you have bagged up and don't know what to do with them. A lady friend taught me how to make these. Here's what you do, it's so easy.
-
 Kati H. favorited Scrap Pillow Quilt
05 Jan 02:48
Kati H. favorited Scrap Pillow Quilt
05 Jan 02:48
-
 Kay T. favorited Scrap Pillow Quilt
11 Nov 08:35
Kay T. favorited Scrap Pillow Quilt
11 Nov 08:35
-
 Calah L. added Scrap Pillow Quilt to HOME
18 Jan 18:26
Calah L. added Scrap Pillow Quilt to HOME
18 Jan 18:26
-
 PinkWeeds added Scrap Pillow Quilt to Labyrinth-Bedroom
17 Jul 17:53
PinkWeeds added Scrap Pillow Quilt to Labyrinth-Bedroom
17 Jul 17:53
-
 vermilia c. favorited Scrap Pillow Quilt
17 May 19:53
vermilia c. favorited Scrap Pillow Quilt
17 May 19:53
-
sherri k. favorited Scrap Pillow Quilt
28 Oct 13:49
-
 silentband favorited Scrap Pillow Quilt
28 Jul 06:46
silentband favorited Scrap Pillow Quilt
28 Jul 06:46
-
 Recycled Miracles favorited Scrap Pillow Quilt
18 Jul 04:32
Recycled Miracles favorited Scrap Pillow Quilt
18 Jul 04:32
-
 Jessa K. favorited Scrap Pillow Quilt
10 Jun 17:27
Jessa K. favorited Scrap Pillow Quilt
10 Jun 17:27
-
 wild flower favorited Scrap Pillow Quilt
26 Nov 03:47
wild flower favorited Scrap Pillow Quilt
26 Nov 03:47
You Will Need
-
Step 1
-
Step 2
Cut out some squares (I used 5" but you can make them any size). Make a whole bunch.
-
Step 3
Place 2 squares together RIGHT SIDES together, serge or zig zag three sides, leaving one side open.
-
Step 4
Stuff very lightly with fiber fill (I used some old pillows I cut open, took out the stuffing and sprayed it with Febreeze).
-
Step 5
Serge up the remaining end. Do as many as you like to get started.
-
Step 6
When you get enough for a strip, lay one edge of one square on the edge of another square and zig zag it together. Take the next square and add to that one you just did. Do this until you get a strip as long as you want it. I measured mine on my bed.
-
Step 7
Then start another strip. When you get that one done, just lay the two strips together, laying one on the edge of the other and zig zag all the way down. Do this until you get the size quilt you want.
These quilts are lightweight and very warm. I didn't add a border but you can if you like.
I hope you like this project and happy sewing!
 1
Watercolor Art »
Watercolor Paints Made From Make Up
1
Watercolor Art »
Watercolor Paints Made From Make Up

They make great baby quilts too.I made some and put wide binding around the edges.
Thanks for the comment and good luck!
do we turn them inside out before stuffing?
cute idea by the way
do we turn them inside out before stuffing?
cute idea by the way
do we turn them inside out before stuffing?
cute idea by the way