


About
Amigurumi + Origami = a fun pattern to create one adorable bird!
The design for this amigurumi parrot was inspired by origami, the art of using intricate folds to turn a two-dimensional surface into a three-dimensional object. Instructions will walk you through crocheting a flat square motif known as a Granny square. By starting at the corner, you use a simple colorwork technique to create the beak, face, and wings. The belly is made from a separate single-colored square, worked in the round like a traditional Granny square. To create the eyes for your amigurumi parrot, check out the tutorial "Simple Eyes with Felt and French Knots" here on Cut Out + Keep.
Tags
-
 Skyliva favorited Parrot Origami-Inspired Amigurumi
23 Apr 21:50
Skyliva favorited Parrot Origami-Inspired Amigurumi
23 Apr 21:50
-
 Chudames favorited Parrot Origami-Inspired Amigurumi
02 Feb 18:56
Chudames favorited Parrot Origami-Inspired Amigurumi
02 Feb 18:56
-
 Jennifer Olivarez published her project Parrot Origami-Inspired Amigurumi
02 Feb 09:00
Jennifer Olivarez published her project Parrot Origami-Inspired Amigurumi
02 Feb 09:00
-
 Step 1
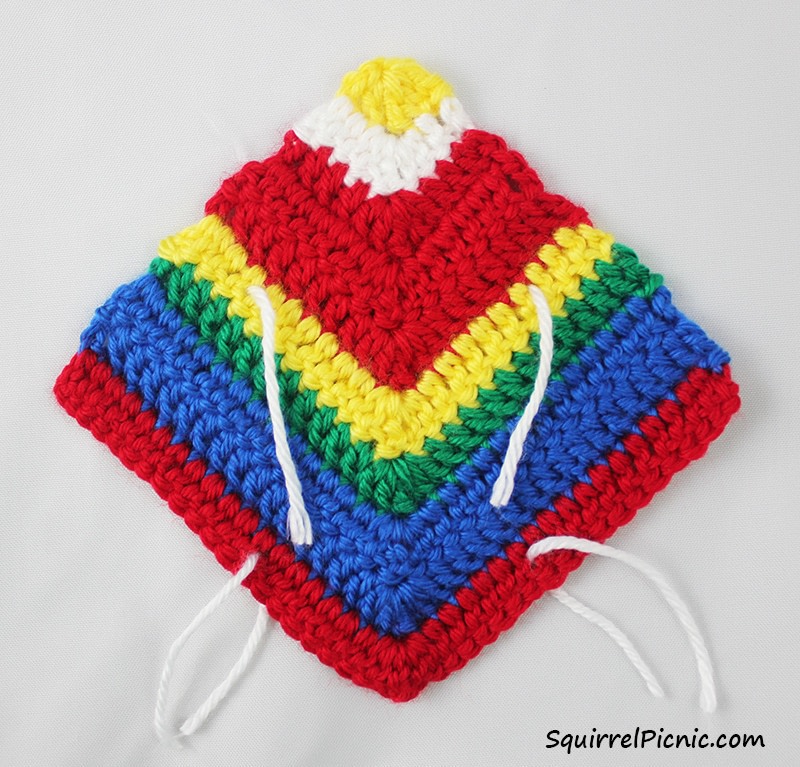
Back, Wings, and Tail in One Piece (Large Square)
Note: The 3-ch at the beginning of each row counts as a dc.
With yellow, begin with a magic loop.
Row 1: Ch 3, dc, tr, 2 dc into the magic loop. Pull tight to close. Break yarn. Turn. (5)
Row 2: With white, ch 3, dc in next dc, (2 dc, tr, 2 dc) in tr, dc in next 2 dc. Break yarn. Turn. (9)
Row 3: With red, ch 3, dc in next 3 dc, (2 dc, tr, 2 dc) in tr, dc in next 4 dc. Turn. (13)
Row 4: Ch 3, dc in next 5 dc, (2 dc, tr, 2 dc) in tr, dc in next 6 dc. Turn. (17)
Row 5: Ch 3, dc in next 7 dc, (2 dc, tr, 2 dc) in tr, dc in next 8 dc. Break yarn. Turn. (21)
Row 6: With yellow, ch 3, dc in next 3 dc, PM, dc in next 6 dc, (2 dc, tr, 2 dc) in tr, dc in next 6 dc, PM, dc in next 4 dc. Break yarn. Turn. (25)
Row 7: With green, ch 3, dc in next 11 dc, (2 dc, tr, 2 dc) in tr, dc in next 12 dc. Break yarn. Turn. (29)
Row 8: With blue, ch 3, dc in next 13 dc, (2 dc, tr, 2 dc) in tr, dc in next 14 dc. Turn. (33)
Row 9: Ch 3, dc in next 15 dc, (2 dc, tr, 2 dc) in tr, dc in next 16 dc. Break yarn. Turn. (37)
Row 10: With red, ch 3, dc in next 11 dc, PM, dc in the next 6 dc, (2 dc, tr, 2 dc) in tr, dc in next6 dc, PM, dc in next 12 dc. FO and weave in ends. (41)
You might use this opportunity to close any spaces between stitches (particularly between 3-chs and the next stitches) by sewing them together as you weave in your ends. -
 Step 2
Belly (Small Square)
Note: The 3-ch at the beginning of each row counts as a dc.
With red, create a magic loop.
Rnd 1: Ch 3, into the magic loop: 2 dc, tr, * 3 dc, tr, rep from * 2 more times. Pull magic loop closed. Join with slst to the top of the 3-ch. (16)
Rnd 2: Ch 3, dc in next 2 dc, (2 dc, tr, 2 dc) in next tr, * dc in next 3 dc, (2 dc, tr, 2 dc) in next tr, rep from * 2 more times. Join with slst to the top of the 3-ch. (32)
Rnd 3: Ch 3, dc in next 4 dc, (2 dc, tr, 2 dc) in next tr, * dc in next 7 dc, (2 dc, tr, 2 dc) in next tr, rep from * 2 more times. Dc in the next 2 dc. Join with slst to the top of the 3-ch. (48)
FO, leaving a long tail (at least 36 inches long) for sewing. Weave in other end. -
 Step 3
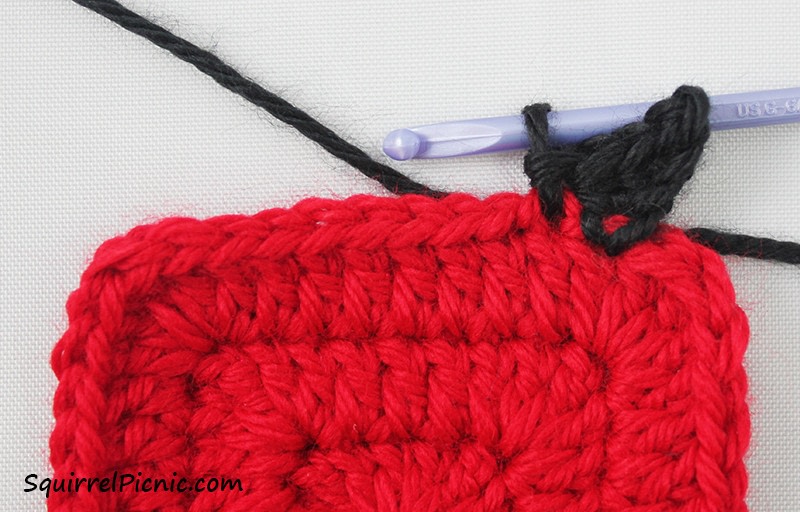
Feet
Hold the Body (small square) with the long tail at the bottom and RS facing up. Join black in the second dc after the tr in the right corner (see photo below). * Ch 4, working back down the chain: slst, sc, hdc. Slst in next dc **, rep from * to ** 2 more times. FO. Sk 1 dc and join black again in next dc. Rep from * to ** 3 times. FO. -
 Step 4
Weave in ends.
-
 Step 5
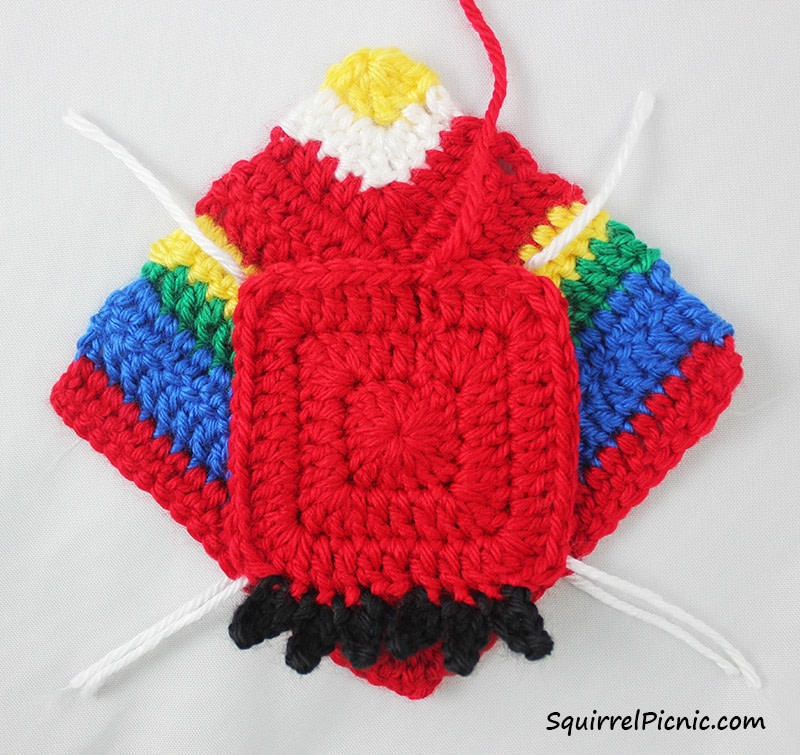
Assembly
For these instructions, the RS is whichever side you like best. (In other words, WS is the side you want to show the least of.)
Lay the large square (head, back, wings) with WS facing up, so that the beak is pointing away from you. Lay the small square (body) with RS facing up on top of the large square. Line up the corners of the small square with the PMs on the large square. The feet should be closest to you. -
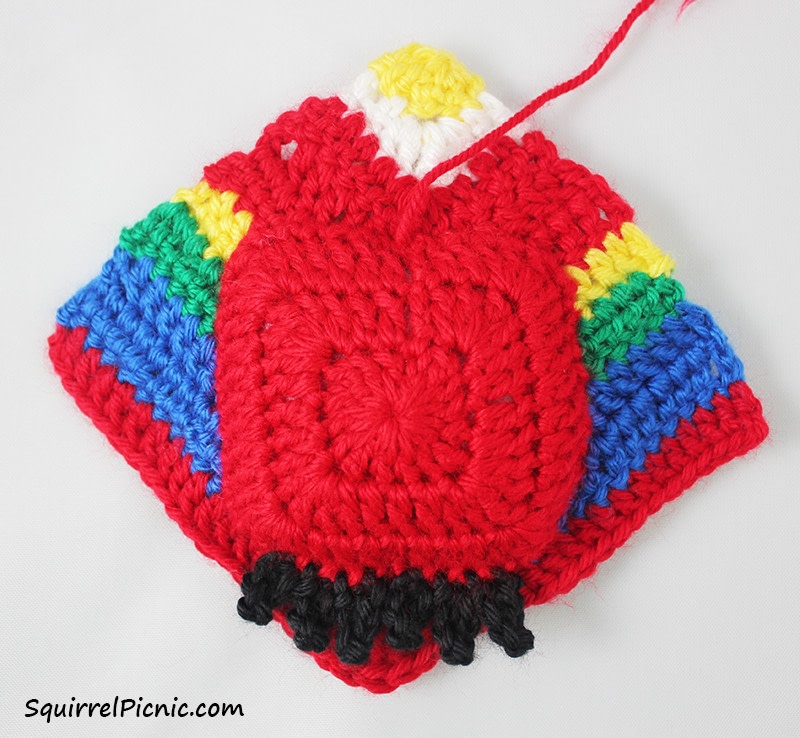
 Step 6
Thread open stitch marker through the stitch marked by the PM and the tr at the corner of the small square. Repeat for the other three corners to hold the small square in place.
-
 Step 7
Using the long tail on the small square, sew the small square to the large square.
-
 Step 8
Once you’ve gotten about 3/4 of the way around, stuff firmly with polyester stuffing.
-
 Step 9
Fold the beak down and, using the tail of yarn, tack this down to the top of the small square (the bird’s chest).
-
 Step 10
Fold each wing in and tack each down as well.
-
 Step 11
Eyes
Make the eyes for your bird using the Simple Eyes with Felt and French Knots tutorial found here on Cut Out + Keep.


 1
Watercolor Art »
Watercolor Paints Made From Make Up
1
Watercolor Art »
Watercolor Paints Made From Make Up


