Nerdy T Shirt Skirt
Extract from Generation T: 108 Ways to Transform a T-Shirt • By Megan Nicolay • Published by Workman


About
Use some of your old t-shirts to make a uniquely-you themed skirt!
I was thinking of doing something like this, and then saw the project in the Generation T book. I have all these t-shirts from conferences and marine labs that I never wear... I just don't wear t-shirts unless I'm gonna get dirty. But the shirts had such pretty designs. So this is what I did.
-
 jennavieve added Nerdy T Shirt Skirt to clothing
26 Jan 19:07
jennavieve added Nerdy T Shirt Skirt to clothing
26 Jan 19:07
-
jennavieve favorited Nerdy T Shirt Skirt
26 Jan 19:07
-
 meredith.p.martin.9 favorited Nerdy T Shirt Skirt
27 Nov 00:27
meredith.p.martin.9 favorited Nerdy T Shirt Skirt
27 Nov 00:27
-
 Kristen K. favorited Nerdy T Shirt Skirt
26 May 13:45
Kristen K. favorited Nerdy T Shirt Skirt
26 May 13:45
-
 Krystal B. added Nerdy T Shirt Skirt to Favourites
23 Sep 04:26
Krystal B. added Nerdy T Shirt Skirt to Favourites
23 Sep 04:26
-
 Woolninja favorited Nerdy T Shirt Skirt
02 Aug 03:15
Woolninja favorited Nerdy T Shirt Skirt
02 Aug 03:15
-
 natasha macgregor silva favorited Nerdy T Shirt Skirt
20 Mar 21:37
natasha macgregor silva favorited Nerdy T Shirt Skirt
20 Mar 21:37
-
 LaAlex added Nerdy T Shirt Skirt to Clothing
26 Feb 01:38
LaAlex added Nerdy T Shirt Skirt to Clothing
26 Feb 01:38
-
LaAlex favorited Nerdy T Shirt Skirt
26 Feb 01:38
-
 Amanda B. favorited Nerdy T Shirt Skirt
09 Oct 04:41
Amanda B. favorited Nerdy T Shirt Skirt
09 Oct 04:41
You Will Need
-
 Step 1
Sorry, I didn't take any photos along the way, its pretty simple though.
First figure out how many t-shirts you have to cut up.. and how big you want each piece to be. If the t-shirts have wide designs - you probably want the pieces to be bigger so you can get more of the graphic.
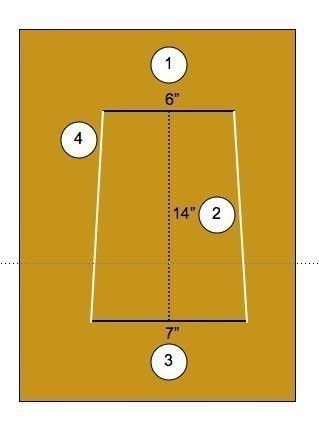
I used 6 panels. I measured my 'low hips' = 30". For 6 panels, that would make each one 5" at the top (plus 1" each for seams = 6"). I didn't want the skirt to flare out too much, so I made the bottom, just a little bigger than the waist, so 6"+1"=7" for each panel. And each panel was 14" long.
-
 Step 2
If you're worried about getting the shape of the panel right, you can make a quick pattern:
Get a paper bag or wrapping paper or something similar.
1) Draw a straight line 6" long (or whatever your measurement is) with a ruler.
2) In the very center of this line, draw a line straight down, 14" long (dashed line).
3) At the end of this line, draw a 7" line perpendicular to it, so that the very center of your 7" line hits the 14" one.
4) Connect the ends of the 6" line to the ends of the 7" line (white lines) -
 Step 3
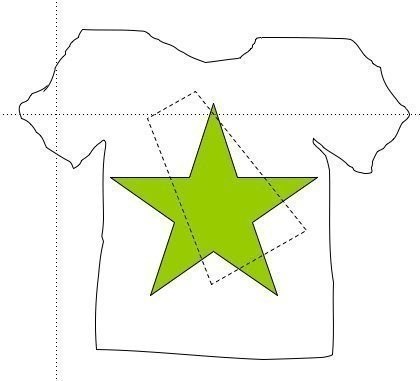
Position your pattern piece over the design in your t-shirt. I sort of angled mine so that I could capture as much of the design as possible. And I changed the position of the pattern piece on each t-shirt for variability.
Cut out your 6 panels.
Pin 2 panels together, right sides (side the design is on) facing, pin & sew.Continue doing this - pinning the next panel onto the previous & sew.
Once you have them all in a line, just take the 2 panels on the end, pin them together (right sides facing), & sew.
-
Step 4
Cut out a long strip from the bottom of one of the t-shirts - the same length as your 'low hip' measurement (30" here) + 1" = 31". This strip should be ~2" wide (or however wide you want the waistband).
The t-shirt book says to use this strip as-is. But I found it too stretchy... as t-shirts are. So I would suggest interfacing it, or threading elastic through, which is what I did.
So fold this strip over the waistband, pin, & sew. HOWEVER, leave a little spot open if you're going to thread elastic through.Threading elastic is pretty easy: Clip a med-lg safety pin to the end of your elastic. Push it through the tube/waitstband (enter in through the little gap you left when you sewed the waistband onto the panels) until you get all the way around.
Try on your skirt and pull the elastic until its the desired fit. Pin & sew the ends of the elastic together.
Close the gap in the waistband & you're basically done!For a little extra - I sewed strips of bias tape (this is just pre-folded fabric you can buy in packs - comes in lots of colors & widths) along the seams of the panels. I meant to do something with the bottom - to hem it or put bias tape around it, but I couldn't be bothered :)
Good luck!!