


About
It's time to carve!
You've spent days waiting for your form to dry and now you need to decide on your face. Just like when making a real jack o lantern, you will carve this one as well. I like to sketch different faces and decide which one best suits my shape. After I decide on a face, I either make paper templates or draw directly on the pumpkin. The paper templates are nice because I can cut them out and try different arrangements on the form. If I draw directly on the pumpkin, I like to use chalk so I can wipe it away if I mess up. Once that is decided, get out the sharp blades and cut away.
-
 Tierra T. favorited Making A Pumpkin Mask, Pt.3 Carving The Face!
16 Nov 19:24
Tierra T. favorited Making A Pumpkin Mask, Pt.3 Carving The Face!
16 Nov 19:24
-
 LizzyLovesSatan favorited Making A Pumpkin Mask, Pt.3 Carving The Face!
20 Jul 23:59
LizzyLovesSatan favorited Making A Pumpkin Mask, Pt.3 Carving The Face!
20 Jul 23:59
-
 brooke M. published her project Making A Pumpkin Mask, Pt.3 Carving The Face!
23 Apr 08:07
brooke M. published her project Making A Pumpkin Mask, Pt.3 Carving The Face!
23 Apr 08:07
-
 Step 1
When I get ready to carve the face of my pumpkin, I like to draw some options first. I make multiple expressions and then do a process of elimination to determine which one I want to use. Sometimes I combine different parts of drawings to get the face I want. I also like to make templates out of paper to figure out spacing on the form. Sometimes I like to add 3D elements by attaching cardboard shapes and layering paper over them. In the photo you can see some of my face sketches and some test noses.
-
 Step 2
Here are examples of the paper templates I use to make the faces. I tack them on with small pieces of scotch tape or painters tape so I don't damage the form.
-
 Step 3
In this photo, you can see that I made my first lines with chalk and when I decided which lines I would keep, I went over them with marker. It's easier to start with chalk so you can wipe away any mistakes. I'm also testing nose shapes here.
-
 Step 4
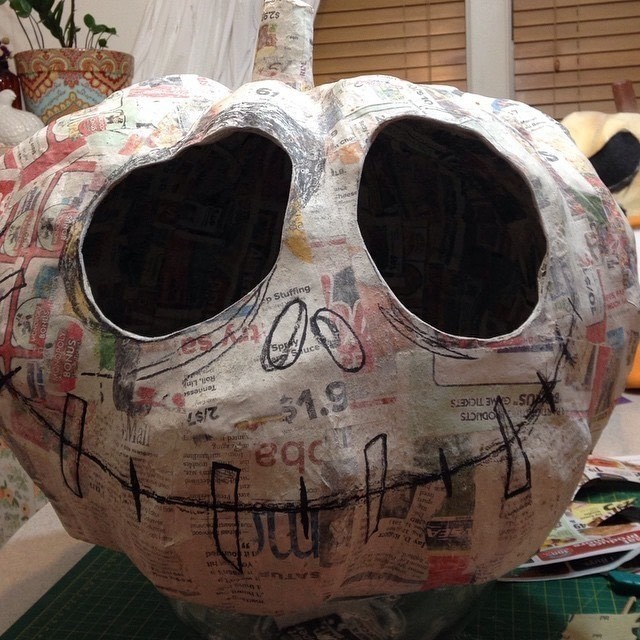
After you've chosen all of your parts and made all of your lines, remove any 3D pieces you plan to add. Those get in the way during carving so just leave them off until after. Use whatever cutting tool you are most comfortable with, an exacto knife or utility knife, etc. Go slow and follow your lines carefully. Make sure your pumpkin form is secure and will not move. I usually end up curled up with my form in my lap. It should take several passes on each line to break through the form. Make sure your blade is sharp and that you are not pressing too hard. Going slow and using a sharp blade will give you the cleanest cut.
-
 Step 5
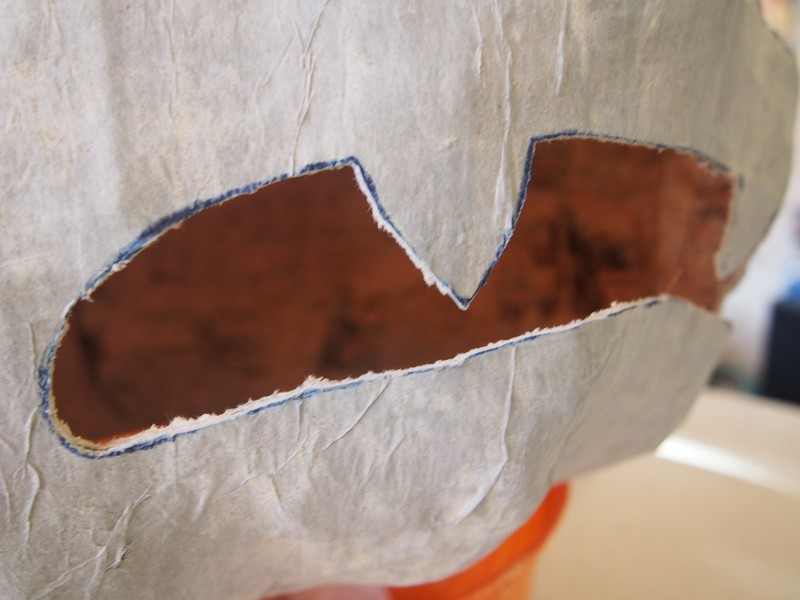
In the photo above you can see that the finished cut is still a bit rough. You can fix this and tweak the shape by using a fine grit sandpaper (220 is good). Once all of the openings are cut, go over each edge and lightly sand.
-
 Step 6
Alright! It's full of holes! Now it's time to add the nose. Take the cardboard piece that you've chosen and glue it in place. I like to use hot glue because it's quick and the strength comes from the paper and paste anyway. Once it is attached, cover it with paper the way you did to make the form. At this time, I also reinforce all of the edges. I apply small strips of newspaper with the flour paste and then I go over those with tissue paper.
-
 Step 7
Make sure to reinforce the bottom (head hole) too. Now let it dry. Everything must be completely dry before you move on to the next step. There are only two more parts to this process; painting and adding the final mask pieces. It's so close!!


 1
Watercolor Art »
Watercolor Paints Made From Make Up
1
Watercolor Art »
Watercolor Paints Made From Make Up
 2
Paper Book Covers »
Shoe Inspired Spiral Notebook
2
Paper Book Covers »
Shoe Inspired Spiral Notebook

