


About
You know THAT Giles Deacon handbag? Make a snazzy version for yourself.
After lusting after the Giles Deacon dinosaur bag four a couple of years and failing to raise the ££££ I decided to make myself a gold version.
-
 Becky favorited Diy Dinosaur Handbag
17 May 05:56
Becky favorited Diy Dinosaur Handbag
17 May 05:56
-
 Kyara S. favorited Diy Dinosaur Handbag
04 Oct 13:28
Kyara S. favorited Diy Dinosaur Handbag
04 Oct 13:28
-
 Summer O. favorited Diy Dinosaur Handbag
13 Jul 06:30
Summer O. favorited Diy Dinosaur Handbag
13 Jul 06:30
-
 Tierra T. favorited Diy Dinosaur Handbag
08 Nov 03:22
Tierra T. favorited Diy Dinosaur Handbag
08 Nov 03:22
-
karla a. favorited Diy Dinosaur Handbag
04 Oct 10:55
-
 Abbey S. favorited Diy Dinosaur Handbag
01 Oct 14:30
Abbey S. favorited Diy Dinosaur Handbag
01 Oct 14:30
-
Nathasha F. added Diy Dinosaur Handbag to Make yourself handbag
28 Jul 07:41
-
Nathasha F. favorited Diy Dinosaur Handbag
28 Jul 07:41
-
 Xirimpi favorited Diy Dinosaur Handbag
31 May 17:06
Xirimpi favorited Diy Dinosaur Handbag
31 May 17:06
-
 artpanda18 favorited Diy Dinosaur Handbag
05 Mar 23:47
artpanda18 favorited Diy Dinosaur Handbag
05 Mar 23:47
-
 Step 1
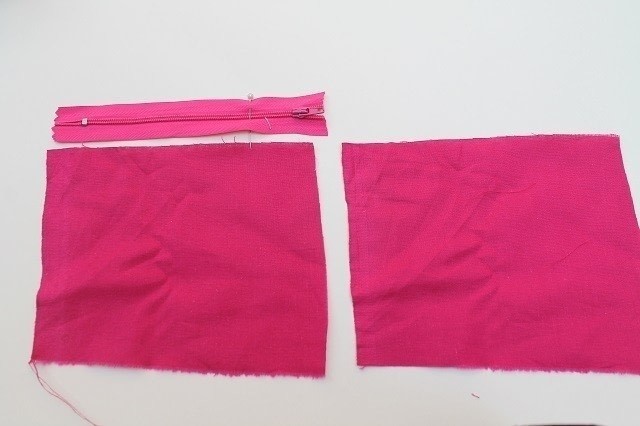
To make the pocket that goes in your dinosaur you will need two squares of fabric and a zip. To measure you fabric measure along the top of your dinosaur and judge how wide your pocket can be and then make this the width of the fabric and zip.
-
 Step 2
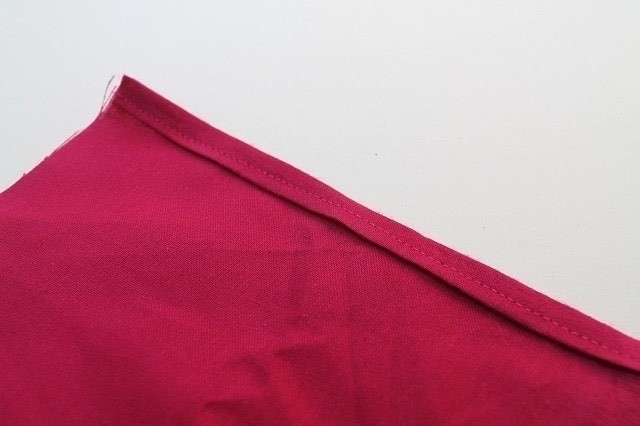
Fold the top edge of your fabric over and press and then fold it over again and press so the raw edge is enclosed. Sew this secure and then repeat on the other square.
-
 Step 3
Now take both of your squares and line them up together with the turned over edges facing out. Sew the square together at the top edge.
-
 Step 4
Open out your squares and press your seam open.
-
 Step 5
Now pin your zip straight on top of the opened out seam.
-
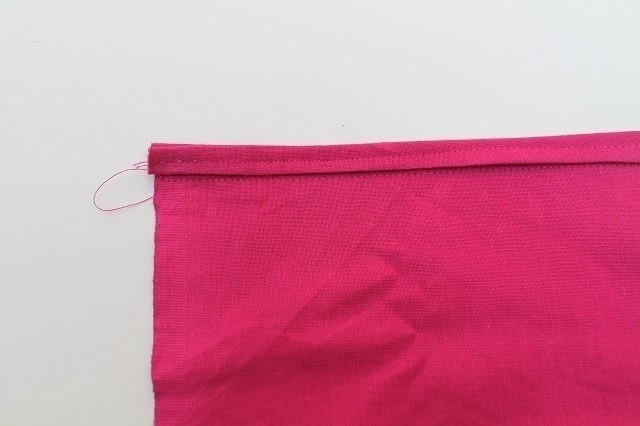
 Step 6
Simply sew your zip onto where you have pinned it and turn over and your should hve something a little bit like this.
-
 Step 7
Using an xacto knife or a seam ripper carefully open up the stitched enclosed within your zip area and ta-da! You have a perfect little zip.
-
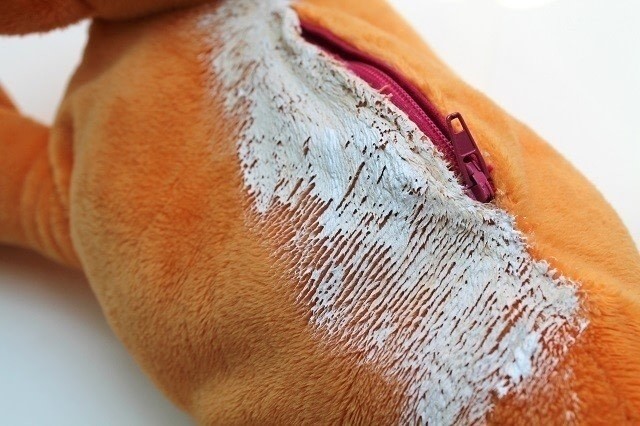
 Step 8
Now fold your fabric into the pouch shape it will be and sew the edges up. Remember! The neat edges of your pouch need to be on the inside of your pouch as you won't see the outside so keep your raw edges on the outside as shown.
-
 Step 9
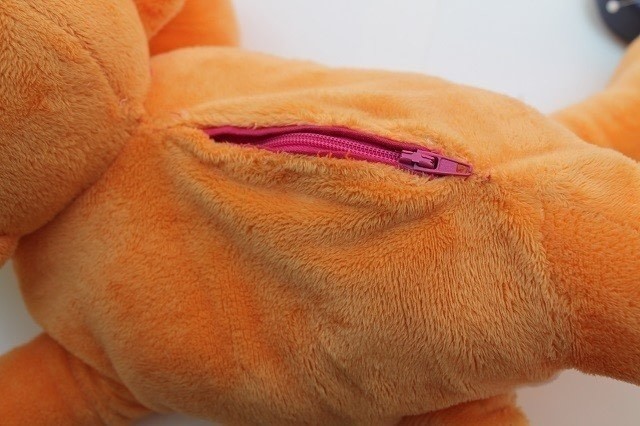
Now take your dinosaur and lay him out on your surface. Mark how far the pocket will extend so you don't cut any more than you have to.
Using an xacto knife very carefully cut the seam open along the back.
-
 Step 10
Take out a little stuffing and push your pocket down into the dinosaur.
-
 Step 11
Pin your pocket in place.
-
 Step 12
Using a needle and thread carefully sew your pocket in. It helps to open the zip at this point just so you have access to both sides.
-
 Step 13
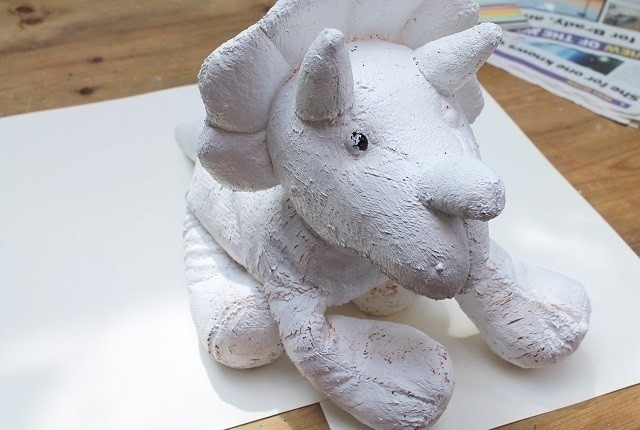
Now you must paint your dinosaur. If you spray a fluffy toy the paint doesn't sick properly because there's all that fuzz to contend with so you need to create a new surface which is easier to adhere to. Acrylic paint if built up can leave a good vinyl-ey finish which is perfect for painting and actually ends up kind of looking like leather when finished. To apply work with the grain of your fabric and coat it so the fibres lay flat and there is a smooth finish.
-
 Step 14
Keep layering up your paint. This was the most time consuming part of the bag but don't be tempted to rush or you won't get that gorgeous metallic finish. When your dinosaur is finished he should feel reasonably smooth and plasticy but still be able to move (that's why it is important to use fabric paint as it has more moveability).
-
 Step 15
Spray that gorgeous prehistoric beast!
-
 Step 16
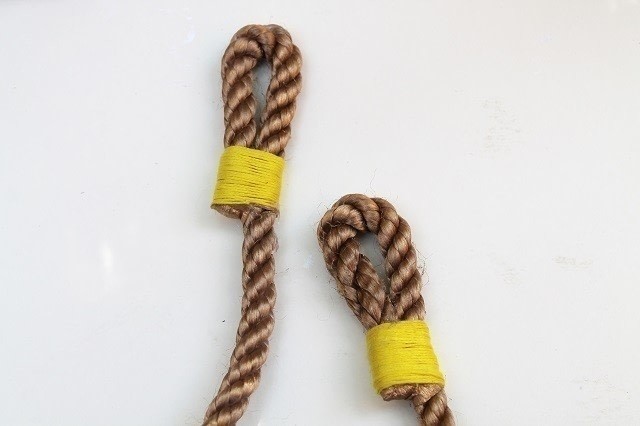
Now time to make the handle. Cut your rope to the size that you want your handle and enclose the ends with masking tape to stop them fraying.
-
 Step 17
Give the rope a preliminary spray and then wrap the rope back on itself at each end creating a loop. Secure the loop with more masking tape.
-
 Step 18
Masking tape isn't that pretty so we need to cover it. Cover your tape with glue and then wrap embroidery thread around the join until covered.
-
 Step 19
Now give everything a final spray.
-
 Step 20
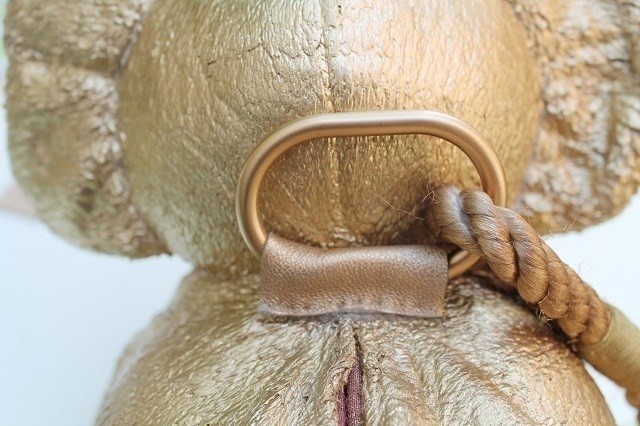
To join the rope to your dinosaur take a small square of leather (sprayed gold of course) and sew one edge to your dinosaur (where you wish the handle to start).
-
 Step 21
Now take a shower ring (sprayed gold) and thread it onto your loop.
-
 Step 22
Wrap your piece of leather back on itself contain the shower ring and sew into place. Do this for the other side of your rope handle and you are totally done!


Comments


