
Cath Kidston Luggage Tag
Extract from Cath Kidston Sewing Book • By Cath Kidston • Published by Quadrille


About
Cath Kidston Sewing Book
Level: Easy
We've all tried to find our bag in that great sea of suitcases. A bright fabric tag is a great way to identify your luggage. It’s quick to make and, as long as you fold all the corners neatly and accurately, the finished look is surprisingly professional.
SIZE
Approx. 14.5 x 7.5cm
CUTTING GUIDE
From interfacing
Two complete tag shapes
One window
FABRIC CHOICE
We used a mini floral print as it complements the large-scale flowers of the holdall, but the brighter the print, the better, to make your bag more distinctive.
Tags
Downloads
- 113162_2F2016-01-27-100024-Luggage+Tag+Template.jpg 94.6 KB [ Download ]
-
 Luna D. favorited Cath Kidston Luggage Tag
25 Apr 05:44
Luna D. favorited Cath Kidston Luggage Tag
25 Apr 05:44
-
C.J. M. added Cath Kidston Luggage Tag to Sew
20 Apr 13:37
-
C.J. M. favorited Cath Kidston Luggage Tag
17 Apr 20:03
-
Alecia B. favorited Cath Kidston Luggage Tag
24 May 08:04
-
 Sofia favorited Cath Kidston Luggage Tag
12 Mar 14:21
Sofia favorited Cath Kidston Luggage Tag
12 Mar 14:21
-
 paola m. added Cath Kidston Luggage Tag to cuci
23 Feb 19:26
paola m. added Cath Kidston Luggage Tag to cuci
23 Feb 19:26
-
 Pam favorited Cath Kidston Luggage Tag
22 Feb 00:01
Pam favorited Cath Kidston Luggage Tag
22 Feb 00:01
-
Alissa B. favorited Cath Kidston Luggage Tag
21 Feb 08:18
-
 Quadrille published her project Cath Kidston Luggage Tag
17 Feb 09:00
Quadrille published her project Cath Kidston Luggage Tag
17 Feb 09:00
-
Step 1
TO MAKE THE LUGGAGE TAG
PREPARE THE INTERFACING
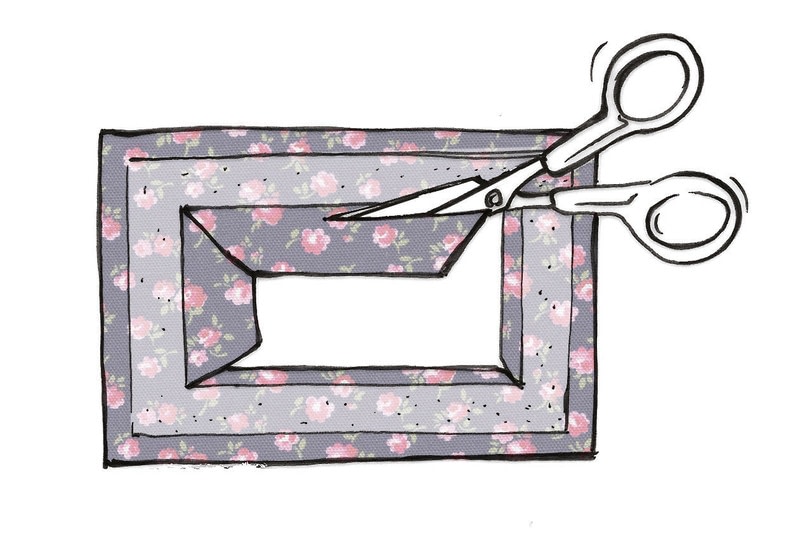
Photocopy or trace the template onto a sheet of paper and then cut it out. Using a sharp, soft pencil or fading fabric marker pen, draw around the outside edge twice on the non-adhesive side of the interfacing. Now cut out the rectangular window section of the template and draw around it once.
Cut out all three shapes from interfacing, carefully following the outlines. -
 Step 2
MAKE UP THE WINDOW
Place the interfacing window shape on the wrong side of your fabric, lining the edges up along the grain. Press it in place, following the manufacturer’s instructions, then cut out, leaving a 6–8mm turning all around the outside edge. Snip into the centre of the window, then cut diagonally up to each corner of the window. Trim the surplus fabric inside the window back to 6–8mm.
-
 Step 3
Fold back and tack down the surplus fabric on the inside and outside of the window.
-
 Step 4
Fit a thick needle to your machine and topstitch 3mm from the inside and outside edges of the window. Using narrow strips of double-sided tape, fix the clear plastic to the wrong side.
-
 Step 5
ASSEMBLE THE TAG
Press the two interfacing tag shapes, adhesive side down, onto the back of the remaining fabric, leaving a 1cm border around each one. Cut them out, then trim the surplus fabric to 6–8mm. Fold this spare fabric over to the interfacing side of the tags and tack it down.
-
 Step 6
Pin the two tag shapes wrong sides together, carefully matching up the corners. Now pin the window (right side up) to the lower front and tack through all three layers, making sure that they don’t shift. Topstitch slowly and carefully all the way round the outside edge, working a few reverse stitches at each corner to reinforce the join.
-
Step 7
Fix a metal eyelet to the centre top, 1cm in from the edge. Fold the cord in half and push the loop through the eyelet from front to back. Thread the ends through the loop and pull up tightly.
TIP... the clear window at the front of the tag is cut from an old document binder, but you can use any similar clear, flexible plastic. -
 Step 8
TAKE IT FURTHER
Writing a message on your luggage label will turn it into a personal gift to tie onto a special parcel. You could scale down the template and use a finer-weight fabric for a different look.


 1
Watercolor Art »
Watercolor Paints Made From Make Up
1
Watercolor Art »
Watercolor Paints Made From Make Up
 2
Paper Book Covers »
Shoe Inspired Spiral Notebook
2
Paper Book Covers »
Shoe Inspired Spiral Notebook


