About
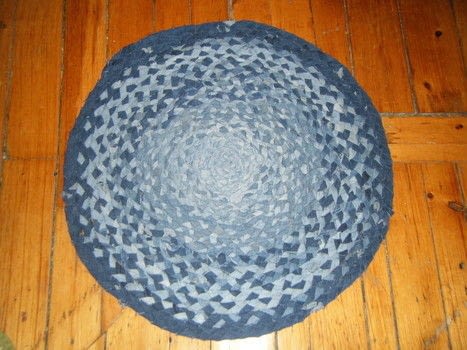
Raggedy jeans won't go to waste!
My husband decided to toss some old jeans. They were too shredded at the heels to donate.
I know there's another rag rug how-to, but this is my take. With denim. The other version is great, too. :)
-
 Key West Witch favorited Braided Denim Rag Rug
26 Jun 09:52
-
 Debbe M. commented on Braided Denim Rag Rug
07 Nov 22:12
-
 Carrie Alice added Braided Denim Rag Rug to Crafty
12 Aug 09:44
-
 Yolonda G. favorited Braided Denim Rag Rug
29 Jan 02:06
-
 avasko favorited Braided Denim Rag Rug
20 Mar 04:54
-
 forbunnie favorited Braided Denim Rag Rug
06 Mar 13:13
-
 BerthaAOG favorited Braided Denim Rag Rug
24 Apr 15:37
-
 kylie.hannan favorited Braided Denim Rag Rug
04 Nov 18:05
-
 mr.nawaabfuzzumspompom favorited Braided Denim Rag Rug
07 Jun 17:48
-
 Pam E. favorited Braided Denim Rag Rug
31 May 01:00
-
 Step 1
Find some old jeans and start cutting!
Don't bother using a seam ripper. I tried it with my first pair but it takes a lot of time and muscle and you barely get any extra fabric. What you do get is barely usable. I'm normally all about using every last possible scrap, but in this case it's not worth the effort.
Trim the legs around the seams. Cut into 1-2 inch strips (cut the legs lengthwise - top to bottom - for longer strips). -
 Step 2
Sew three strips together tightly. You can do this by hand or machine.
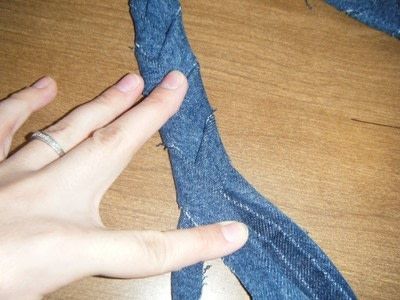
Start braiding! Don't rush this step. Seriously, can you see the difference on my rug from the middle to the outer edge? I rushed the middle. Fold the strips so the nice side of the denim faces out. Arrange the strips so that the folded edge faces the outer-upper edges. This will look nice and neat. When you braid, keep the braid flat. This is important. Carefully fold each strip over another as you go along. Don't just bend it into place, fold it nice and neat. -
 Step 3
When you have enough length, pin the ends of your strands together and try forming a spiral/circle. Or try an oval if that's the shape of the rug you want! Sorry I don't have any pictures of this.
At first, I just sewed crazy stitches anywhere I could jam the needle. This was wrong. It made a big lumpy mess. I also thought I had to sew on the reverse side. This was wrong. To do this I tried using pins to hold it into place. This was wrong. These are my mistakes, try not to make them.
So, the rules:
1. you CAN sew on the front/top
2. I recommend needle-nose pliers to help maneuver the needle.
3. I also recommend 4 strands of thread for strength.Now let's sew.
-
 Step 9
When you've stitched up the braids you've made so far, go back to braiding!
I don't have any photos demonstrating how to connect your strands of denim. You could sew them together, that would certainly look best. The downside to that is you would have to be near your sewing machine because you would have to stop quite often to go and sew on another length. I would absolutely recommend against sewing together large strands and balling them up. You are braiding, remember, and the longer they are the more tangled they will get. For my project I used a slit-knotting. It made fairly chunky knots, but the loose ends can be tied down when stitching.
Here's how to do it:
On the end of your braid's strip, fold it in half and cut a slit. On your new strip, do the same. Line up the slits and pull your new strand through the slits. I recommend lining up your new strip on the bottom and pulling it through the top. I know this is hard to explain, I'll try to find some scraps and take pictures to demonstrate.So anyway, keep going until you're out of denim! At the end I taped my strips a bit and stitched them together and slightly underneath the rug.
For this project I used 3 pairs of my husband's jeans. It came out about 31" across.
Versions
Comments


 1
Paper Art »
How To Fix A Smoking Toilet
 2
Bracelets »
Gifts From The Village Of Shadows Bracelet
 3
Charms »
Akuma No Otto Pendant
 4
Gadgets »
Kitchen Hook
 5
Trays »
Trays For Breakfast
