


About
Plush and slouchy hat with a huge pompom
Whether you love Alaska or stargazing, this Big Dipper hat will keep you cozy and warm all winter long.
Tags
-
 ZombieUnicorn favorited Big Dipper Hat
14 Jan 21:43
ZombieUnicorn favorited Big Dipper Hat
14 Jan 21:43
-
 Elodie L. favorited Big Dipper Hat
28 Nov 18:17
Elodie L. favorited Big Dipper Hat
28 Nov 18:17
-
 natashaprice published her project Big Dipper Hat
27 Nov 06:00
natashaprice published her project Big Dipper Hat
27 Nov 06:00
You Will Need
-
Step 1
Abbreviations:
CO – cast on
K2, P2 – knit 2, purl 2
st st – stockinette stitch
K2tog – knit two stitches together -
Step 2
CO 72 st. Join in the round, being sure not to twist stitches.
K2, P2 ribbing for 13 rounds. Place marker. -
Step 3
Switch to blue and knit in st st for 36 rounds or until piece measures 8 inches total length.
-
Step 4
Begin decreasing as follows:
*K2tog, k6*, repeat till end of round.
K 1 round
*K2tog, k5*, repeat till end of round.
K 1 round
*K2tog, k4*, repeat till end of round.
K 1 round. While doing this, transfer to the double points as you go so there are about 11 stitches on each needle (four in all).
*K2tog, k3*, repeat till end of round.
K 1 round
*K2tog, k2*, repeat till end of round.
K 1 round
*K2tog, k1*, repeat till end of round.
*K2tog*, repeat till end of round. Cut yarn leaving an 8-inch tail. Weave in all ends. -
 Step 5
Big Dipper Motif:
Stitching motifs as I knit is hard for me because I end up pulling the yarn too tightly behind the work. Instead, you’ll be top-stitching the design. It’s super simple to learn. I was a bit disappointed that I didn’t learn this technique sooner as it’s much easier than fair isle or intarsia when it comes to non-repeating motifs. I recommend the tutorial from Wool and the Gang.
-
Step 6
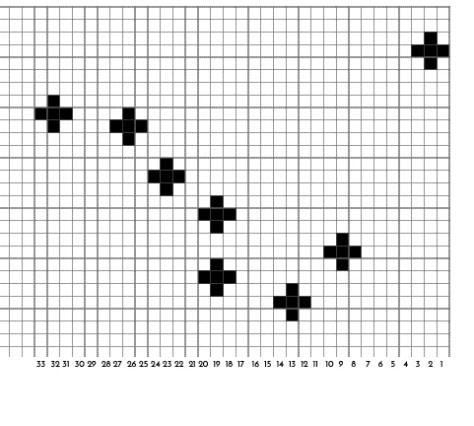
I made this chart by layering the actual constellation on top of graph paper. Yay science! That being said, you can rough it a little if you feel as though the spacing isn’t quite right. I ended up shifting the front star slightly. This is really a guideline.
I started with the lowest star on the dipper. It really doesn’t matter where you start the motif, but I eyeballed it so that beginning of the round was in the back. Some of the stars I did individually, gently double-knotting the ends as I went. But for the handle of the dipper I was able to continue without breaking the yarn. Triple knot the ends on the inside of the hat and trim.
-
Step 7
Giant pom pom:
I used a small book to make the pom pom. Wrap yellow yarn around the book several times till it’s borderline too bulky to handle. Be sure not to wrap it too tightly so that you are able to slide it off the book easily. Gently remove the book. Take a 24-inch piece of yellow yarn and double it over. Tie this around the middle of the loops as tightly as possible. Double knot it. Use fabric scissors to trim pom pom to your liking, but be sure not to trim the long pieces you used to tie it together. Use these long pieces to sew the pom pom to the hat using the darning needle. Tie ends on the inside of the hat and trim.
 1
Watercolor Art »
Watercolor Paints Made From Make Up
1
Watercolor Art »
Watercolor Paints Made From Make Up


