


About
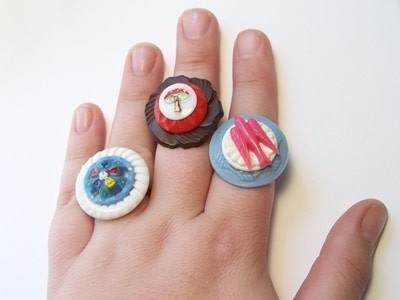
Easy Button Ring Tutorial
You can purchase the adjustable ring bases online. Try doing a search on eBay or Etsy. I purchased mine from Jan's Jewelry Supplies.
I got most of these buttons on eBay. You can buy them in lots, just search for something like "vintage plastic buttons." Just don't bid against me!
I also purchased some of these from Miss Vicky's store (Miss Vicky is a local crafter and IndieSacramento vendor:
Funny Pharm
30 North Main Street
Downtown Colfax
-
 Key West Witch added Bead Rings to Rings
30 Jun 07:46
Key West Witch added Bead Rings to Rings
30 Jun 07:46
-
 Emma H. favorited Bead Rings
27 Jun 22:40
Emma H. favorited Bead Rings
27 Jun 22:40
-
 Susanna Q. added Bead Rings to Accessories
08 Apr 23:30
Susanna Q. added Bead Rings to Accessories
08 Apr 23:30
-
 Sarah W. favorited Bead Rings
19 Jan 13:21
Sarah W. favorited Bead Rings
19 Jan 13:21
-
Verlaine R. favorited Bead Rings
12 Oct 13:07
-
 Conner W. added Bead Rings to gift ideas
13 Jul 01:53
Conner W. added Bead Rings to gift ideas
13 Jul 01:53
-
Conner W. added Bead Rings to craft ideas
13 Jul 01:53
-
Conner W. added Bead Rings to fashion
13 Jul 01:53
-
Conner W. favorited Bead Rings
13 Jul 01:53
-
 Wendy D. added Bead Rings to DIY Jewelry...
29 Jun 05:26
Wendy D. added Bead Rings to DIY Jewelry...
29 Jun 05:26
-
 Step 1
Play around with the buttons to see what combinations you like. Think carefully about color combination and textures. You may also want to combine different button shapes or use a special button as the centerpiece
-
 Step 2
If you are using buttons with shanks, you'll want to cut these off so the buttons will lie flat. this may not work with glass buttons but it will definitely work with plastic! You can get the shank cutter at your local fabric store.
-
 Step 3
Here's what the button looks like after you cut off the shank. Now it can lay flat on top of another button.
-
 Step 4
E6000 is kind of gooey and it can come out in globs. To avoid globs of excess glue, try spreading the glue on with a toothpick.
-
 Step 5
After spreading glue on the back of the button, carefully place it on top of your base button. Let dry for an hour or two.
-
 Step 6
Once you have your buttons stacked, glued, and after the glue has dried, you can glue on the ring base. Spread some E6000 on with a toothpick. Use enough glue so that the ring base will stay attached, but not so much that it oozes all over when you press it onto the back of your buttons.
-
 Step 7
After putting glue on the pad of the ring base, glue it carefully to the back of your button stack. Try to keep it centered and press it down so there isn't a lot of "air" in between the button and the base. It should be pressed flat against the button. Let it dry overnight. It should be nice and dry after 12 hours or so and will be safe for wear.
-
 Step 8
Here are the backs of the rings.
-
 Step 9
Ta-da! You're done!
-
 Step 10
Now they are ready to wear (or to give as a gift).


thanks!!! <3
Where can you but ring bases?
Thanks x