
16 Triangles
Extract from Mind-Blowing Modular Origami • By Byriah Loper • Published by Tuttle Publishing

About
Modular Origami
I chose this model to be the first in the Wire Frame section because it is relatively easy, though it appears complicated. When I first designed it, I set out to make an eight-triangle compound by combining two different compounds of four triangles that each had tetrahedral symmetry. When I finished, I realized more triangles could be added, and thus increased the model from eight to sixteen triangles. This model has the fewest units of any Wire Frame in this book. It is also the only octahedral symmetry model in the book.
The paper proportions are 1:4. Ripping the paper from 6" squares makes a ~7" model.
-
 Gibran Isaacs favorited 16 Triangles
16 Jun 06:14
Gibran Isaacs favorited 16 Triangles
16 Jun 06:14
-
 Kai' K. favorited 16 Triangles
13 Jan 23:28
Kai' K. favorited 16 Triangles
13 Jan 23:28
-
 amalia.syamra commented on 16 Triangles
01 Dec 08:01
amalia.syamra commented on 16 Triangles
01 Dec 08:01
-
amalia.syamra favorited 16 Triangles
01 Dec 08:00
-
 Tuttle Publishing published her project 16 Triangles
23 Nov 12:18
Tuttle Publishing published her project 16 Triangles
23 Nov 12:18
You Will Need
-
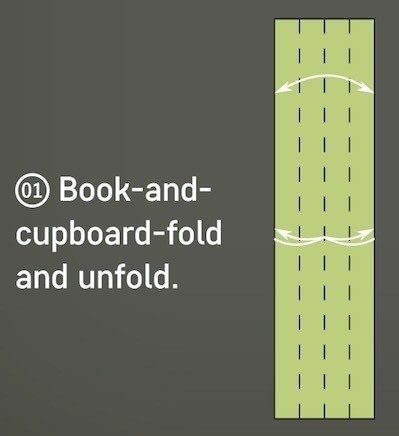
 Step 1
Book-and-cupboard-fold and unfold.
-
 Step 2
Pivoting along the center crease, join the circled areas, folding where shown.
-
 Step 3
Swivel-squash-fold along the left cupboard fold line.
-
 Step 4
The result. Repeat on the top right side.
-
 Step 5
Tuck the pockets under the top layer.
-
 Step 6
Fold and unfold the tabs on both sides.
-
 Step 7
Mountain-fold along the center line, and unfold partially.
-
 Step 8
The completed unit.
-
 Step 9
Assembly
To assemble the units, slide the tab of one unit into the pocket of a second unit until the line made in Step 6 aligns with the edge of the pocket. Carefully flatten the central ridges of both units. -
 Step 10
Fold the opposite tab down and slide it into the other pocket. Be sure that the center crease of the top unit is flat where circled.
-
 Step 11
Making sure that both tabs stay in place, carefully apply pressure where shown, recreasing the central ridges.
-
 Step 12
Once the two units are firmly locked, add another in the same fashion to complete the triangle.
-
 Step 13
One completed triangle. Make 15 more.
-
 Step 14
Weaving Instructions
The first four frames will be the basic structure on which additional frames can be added. This set of four frames has tetrahedral symmetry. The upper right photo shows the two-fold symmetry, while the upper left shows the three-fold symmetry. Each triangle represents one face of a tetrahedron. It will be unstable at this point, so frame holders can be used as shown. Note where a three-fold axis appears in the picture on the left. -
 Step 15
There will be four of those as well, following the vertices of a tetrahedron. The two-fold axes, three of which are annotated on the right, will appear six times, aligning with the edges of a tetrahedron. By determining the symmetry of the shape, and its axes, you can begin to “intuit” the weaving in less visible areas, which will prove essential in many of the more complicated models presented later on in this volume.
-
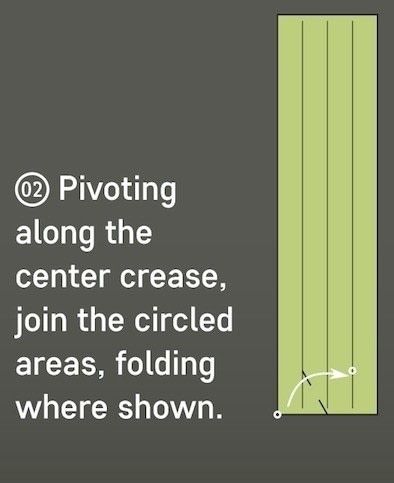
 Step 16
Shown above are eight frames. Four have been added, changing the symmetry from tetrahedral to octahedral. Each triangle now represents one face of an octahedron. There are six four-fold axes, as shown above left, and eight three-fold axes, as shown above right.
-
 Step 17
Note that each triangle has the same in-and-out weaving relationship with every other triangle except its opposite on the three-fold axis. An example of one such pair is the yellow and dark blue, as circled in the lower right picture on the opposite page. These two have the relationship shown in the below left diagram with every other triangle except each other. As the symmetry of the shape becomes apparent, you should be able to guess where the three- and four-fold axes are on the other side of the model, using the octahedra below for guidance.
-
 Step 18
Adding the next set of four triangles, as shown in the images, requires a slightly greater understanding to weave correctly. At this point, the model has octahedral plus tetrahedral symmetry. Again, the set of four triangles is tetrahedral, and has four three-fold axes, which represent the vertices of a tetrahedron.
-
 Step 19
New three-fold axes should appear inside of four of the eight existing three-fold axes. The circled frames are the new ones, the right picture showing one of the new three-fold axes, and the left showing the view from the exact opposite three-fold.
-
 Step 20
Although this can be a confusing step at first, the model should now be relatively sturdy if assembled correctly, and should be easier to work with.
-
 Step 21
Assembling the last four triangles is probably the easiest part of the weaving process. The previous four triangles represented a tetrahedron poking through four faces of an octahedron; the remaining four represent another tetrahedron which will fill the remaining four three-fold axes, as shown on the bottom left.
-
 Step 22
There are four sets of four parallel triangles, as circled on the right. The weaving process for every frame should follow an in-and-out weaving relationship—except for between any four parallel frames, as shown above. When in doubt about the weaving, you can use this rule to check.
-
 Step 23
When finished, confirm that everything is correct. If you see bending or other distortion, there is probably an error somewhere. The schematic as shown below shouldn’t really be necessary; it is included simply to illustrate the underlying geometrical connection.


Comments

 1
Watercolor Art »
Watercolor Paints Made From Make Up
1
Watercolor Art »
Watercolor Paints Made From Make Up

