


About
All you need is some chalk paint and a brush!
I think these painted chalk labels are a cool way of organizing all those glass jars in the kitchen and are so quick and easy to do, it’s ridiculous! They make a huge difference in kitchen organization, especially if your someone like me that has no labels on any of my glass jars! The old game of guessing which flour is in which jar no longer needs to be played at my house since I painted chalk labels on all mine! No more baking mishaps thank goodness!!
-
 Key West Witch favorited Painted Chalk Labels For Your Glass Jars
29 Sep 15:13
Key West Witch favorited Painted Chalk Labels For Your Glass Jars
29 Sep 15:13
-
 Caden Kaslik favorited Painted Chalk Labels For Your Glass Jars
25 May 20:59
Caden Kaslik favorited Painted Chalk Labels For Your Glass Jars
25 May 20:59
-
 Laura L. added Painted Chalk Labels For Your Glass Jars to Home
29 Oct 13:30
Laura L. added Painted Chalk Labels For Your Glass Jars to Home
29 Oct 13:30
-
 paola m. added Painted Chalk Labels For Your Glass Jars to craft
23 Feb 19:28
paola m. added Painted Chalk Labels For Your Glass Jars to craft
23 Feb 19:28
-
Alissa B. favorited Painted Chalk Labels For Your Glass Jars
08 Feb 23:54
-
 Alana S. published their project Painted Chalk Labels For Your Glass Jars
06 Feb 09:00
Alana S. published their project Painted Chalk Labels For Your Glass Jars
06 Feb 09:00
You Will Need
-
 Step 1
Step 1| Clean jars
First things first, you need a bunch of jars. Second hand stores are a great place to find cheap ones, but new ones are perfect too. Give the jars a good clean and dry.
-
 Step 2
Step 2 | Painters tape
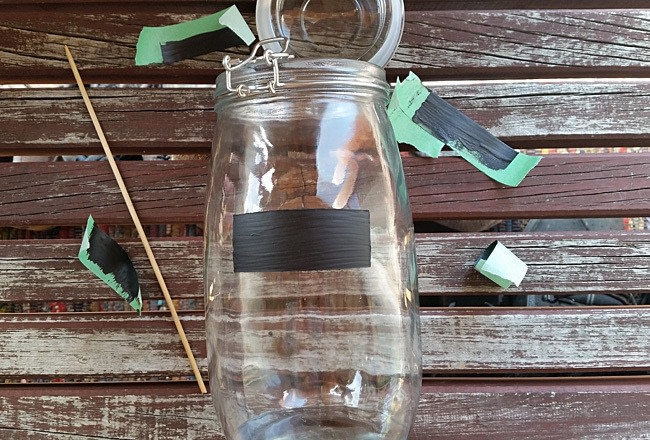
Place 4 strips of painters tape on the glass jar to form a rectangle. Inside the tape is where the chalk paint will go, so the tape works as a guide to get straight lines and as a barrier to prevent the paint going anywhere else.
-
 Step 3
Step 3 | Steel wool
Using the pot scourer, rub over the glass rectangle. This works to scratch up the surface of the glass a little so the in paint will adhere better. That’s the theory anyway.
-
 Step 4
Step 4 | Paint
Give the chalk paint a good shake before opening and then a good stir. Paint the chalk paint in the rectangle. Let it dry, then apply another coat, repeat coats until there is good paint coverage. Then leave to dry for the final time.
-
 Step 5
Step 5 | Remove tape
Once completely dry, carefully remove the painters tape one strip at a time. This is an easy job if you’ve used painters tape, which doesn’t leave residue.
-
 Step 6
Step 6 | Tidy edges
You may need to use a skewer or something similar to scratch off any paint over run if any. Then the final step is to get the chalk pen out and start labeling and then your all done!!


 1
Watercolor Art »
Watercolor Paints Made From Make Up
1
Watercolor Art »
Watercolor Paints Made From Make Up
 2
Paper Book Covers »
Shoe Inspired Spiral Notebook
2
Paper Book Covers »
Shoe Inspired Spiral Notebook
