

Monogrammed Stocking
Extract from Stitched in Time: Memory-Keeping Projects to Sew and Share from the Creator of Posie Gets Cozy • By Alicia Paulson • Published by Potter Craft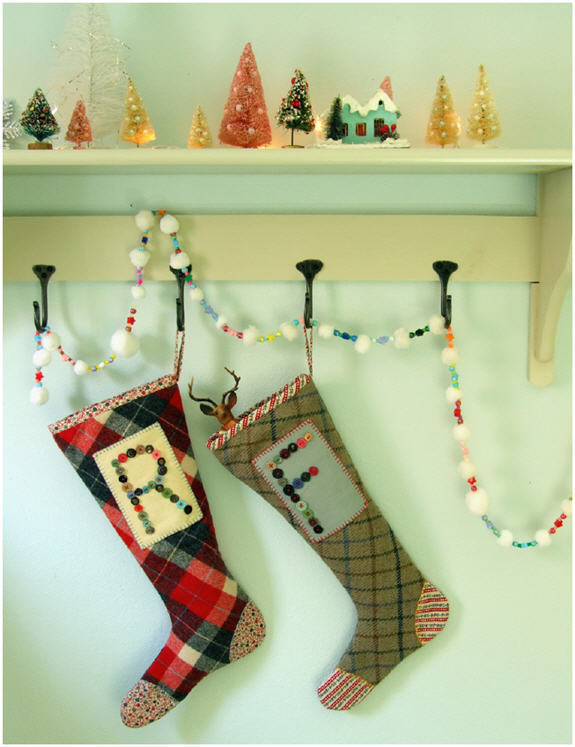

About
Christmas stockings are one of those things that bring back memories every time you pull them out of the box
Christmas stockings are one of those things that bring back memories every time you pull them out of the box. Even though you can't pack as much into them, I prefer the ones that look like they just slipped off someone's foot- you really have to dig deep to pull out the smallest treasures stuffed into the toe. These monogrammed beauties combine rustic wools with homey details like buttons, blanket stitches, and calicos for a hodepodge of Dickensian charm, perfect for a traditional of whimsical Christmas mantel, and sure to be used year after year.
Finished size:
About 18" (45.5cm) long x 12" (30.5) wide
Seam allowance:
1/4" (6mm), unless otherwise noted
Tips:
- Plaid woolens look interesting when cut on the bias, so I've allowed for that extra fabric in the materials list. If you're using tweed or a solid-colored wool, you'll only need 1/2 yd (30.5cm).
- I like to lay out all the buttons I'll be using on the printed paper copy of the monogram. I play with the arrangement to get the buttons nicely spaced and the colors evenly balanced. To sew the buttons to the felt patch, pick them up one at a time and stitch.
Tags
Downloads
- StitchedInTime_p4_lg.jpg 23.3 KB [ Download ]
-
 Chudames favorited Monogrammed Stocking
05 Dec 00:29
Chudames favorited Monogrammed Stocking
05 Dec 00:29
-
 Julie K. favorited Monogrammed Stocking
26 Oct 13:04
Julie K. favorited Monogrammed Stocking
26 Oct 13:04
-
 Crafterella added Monogrammed Stocking to Stocking Stuffers
05 Dec 19:51
Crafterella added Monogrammed Stocking to Stocking Stuffers
05 Dec 19:51
-
 Alecia B. favorited Monogrammed Stocking
01 Aug 16:47
Alecia B. favorited Monogrammed Stocking
01 Aug 16:47
-
 Michelle S. added Monogrammed Stocking to Around The Home
11 May 03:18
Michelle S. added Monogrammed Stocking to Around The Home
11 May 03:18
-
maria w. favorited Monogrammed Stocking
23 Dec 19:53
You Will Need
-
Step 1
Enlarge the Stocking template to the percentage specified. Place the template right side up on the wool fabric, aligning grain as desired. Trace and cut 2 stocking pieces, 2 stabilizer pieces, and 2 lining pieces (lining fabric does not have to be cut on the bias). Following the manufacturer's instructions, iron the stabilizer pieces onto the wrong sides of the stocking pieces. Set aside.
-
Step 2
To make the monogram patch, user your computer to print out a simple letter sized to about 4" (10cm) tall (I used Andale Mono at 430-point size). Trace the letter onto the felt patch using dressmaker's carbon paper. Stitch small buttons along the outline of the letter. Place the patch on the front of the stocking about 2" (5cm) below the top. Blanket stitch the patch to the stocking front, using 3 strands of embroidery floss.
-
Step 3
To make the toe and heel patches, cut 2 toe pieces and 2 heel pieces and baste each patch to the stocking around all edges. Decorate the inside curves of the patches using 3 strands of embroidery foll and a blanket stitch. Place the front and back stocking pieces right sides together, and stitch around the stocking, leaving the top open and catching the toe and heel patches smoothly in the seam. Clip the curves, and turn the stocking right side out. Remove basting stitches on the toe and heel patches.
-
Step 4
To make the lining, put the right sides of the 2 lining pieces together and stitch around the stocking lining, leaving the top open. Trim the seam to 1/8" (3mm). Leaving the wrong side out, insert the lining into the stocking, matching the top edges evenly. Baste around the top.
-
 Step 5
To make the stocking hanger (loop), cut a 7" (18cm) length of the tape and fold in half lengthwise. Edge stitch down each long edge, and set the hanger aside. Attach the binding to the top of the stocking, folding the hanger in half and slipping the ends under the binding at the side seam before machine-sewing.

 1
Watercolor Art »
Watercolor Paints Made From Make Up
1
Watercolor Art »
Watercolor Paints Made From Make Up
 2
Paper Book Covers »
Shoe Inspired Spiral Notebook
2
Paper Book Covers »
Shoe Inspired Spiral Notebook
