


About
10 shibori techniques to try out and build on
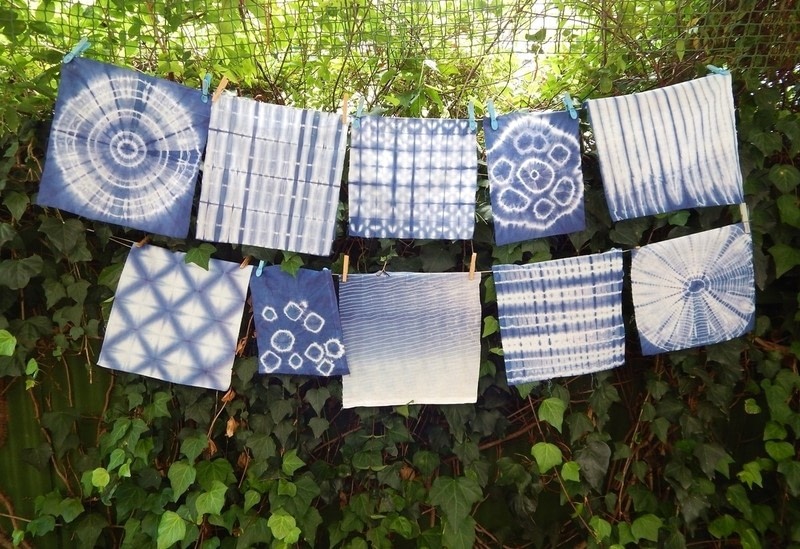
I've been looking at shibori (a Japanese form of dyeing fabric using indigo dye and done by tying knots twisting and wrapping the fabric) for ages and I finally had some free time to try it out. These are my first attempts and I love them!
I just cut up scrap fabric that I had into squares to try out a few different techniques.
You can honestly make anything, scarves, blankets, bibs, tshirts, wall art, cushions, sarongs, rugs, quilts; the list is as long as your imagination!
Tags
-
 Katherine C. favorited 10 Shibori Swatches
13 Aug 02:51
Katherine C. favorited 10 Shibori Swatches
13 Aug 02:51
-
CHRISTINE M. favorited 10 Shibori Swatches
24 Aug 15:30
-
 Gail B. commented on 10 Shibori Swatches
21 Jul 14:21
Gail B. commented on 10 Shibori Swatches
21 Jul 14:21
-
Gail B. favorited 10 Shibori Swatches
21 Jul 14:19
-
 Tam C. commented on 10 Shibori Swatches
15 May 12:19
Tam C. commented on 10 Shibori Swatches
15 May 12:19
-
 VillainousNinja favorited 10 Shibori Swatches
23 May 01:42
VillainousNinja favorited 10 Shibori Swatches
23 May 01:42
-
 Sarah Sylvia S. favorited 10 Shibori Swatches
18 Jul 04:22
Sarah Sylvia S. favorited 10 Shibori Swatches
18 Jul 04:22
-
 Elin H. favorited 10 Shibori Swatches
03 Jul 10:22
Elin H. favorited 10 Shibori Swatches
03 Jul 10:22
-
 mmotse03 favorited 10 Shibori Swatches
21 May 07:12
mmotse03 favorited 10 Shibori Swatches
21 May 07:12
-
 Tara Gypsy Apples replied to a comment on their project 10 Shibori Swatches
20 Mar 12:27
Tara Gypsy Apples replied to a comment on their project 10 Shibori Swatches
20 Mar 12:27
You Will Need
-
 Step 1
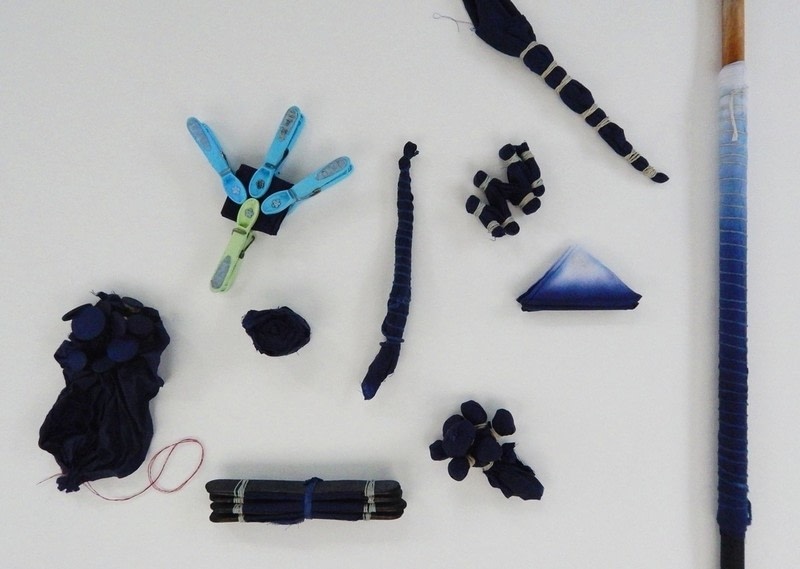
Gather your supplies, you can literally use anything you have lying around the house.
I used tongue depressors, stones, string, pegs, coins and elastic bandsI would suggest checking out Pinterest for inspiration so you get an idea of what sort of pattern you'd like to end up with. There are lots of DIYs as well.
-
 Step 2
This one was done with coins and 2 rows of embroidered stitches
(steps to follow) -
 Step 3
For the above design, I wrapped different sized coins on one half of the fabric, and did 2 rows of stitching on the other side
COIN INSTRUCTIONS:
-Start by placing a coin flat on your fabric
-gather the fabric around the coin
-secure it tightly with an elastic band or string
you can make a random pattern or a neat, repeat pattern
use different sized coins for different sized circles
NOTE: make sure you use coins with no rust on them otherwise they will stain your fabric - like I didEMBROIDERY INSTRUCTIONS:
-tie a knot in the end of your thread
-make a row of stitches all the way across your fabric
-cut off your thread leaving enough to tie a knot later
-stitch as many rows as you want ( I just did 2 to see the effect, more than 2 would look much better. You could use this all the way around as a border or double up your fabric and sew through more than one layer)
-once you're happy with the number of rows you've done, pull on the long piece of string at the end of each row to bunch up the fabric as you can see in the picture
-tie a knot in the string as close to the fabric as you can get it to keep it tight -
 Step 4
This one was done using ice-cream sticks(tongue depressors)
(steps to follow) -
 Step 5
-fold your fabric in half vertically
-fold it in half vertically again so you end up with a long strip (if you look at the vertical dark lines on the finished design above, you should be able to see what I mean)
-now fold the strip in half horizontally
-lay 1 ice cream stick on a flat surface then lay the fabric on top of it,then lay another stick on top of that and secure it on the ends with elastic bands or string (look at the picture to see what I mean)
-do as many "sandwiches" as your fabric will allow, you can space them out more or do them at an angle
-once all your ice cream sticks are in place,fold up your fabric like an accordion - as in fold one way then the other so that you end up with a zig-zag/accordion effect and not a roll... I hope that makes sense (if you do it a different way, you'll simply end up with a different pattern - there's no wrong or right)
-I added an extra elastic band around the middle to hold it all tightly together - you can even add more bands for a finer pattern -
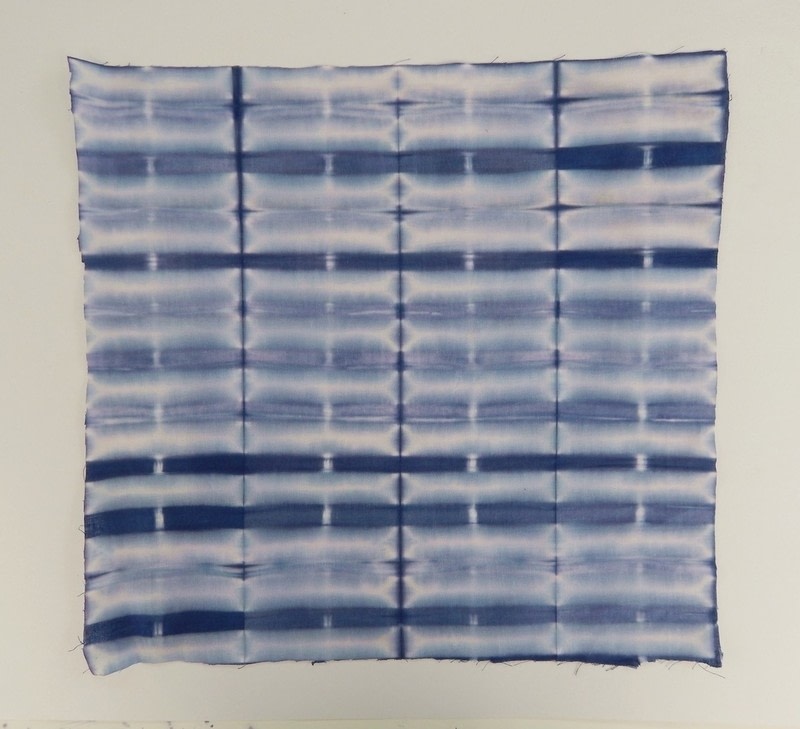
 Step 6
These spiral ones are my favourite, and they are some of the easiest too
-
 Step 7
1. start with a square of fabric
2. fold it in half horizontally
3. fold it in half again vertically
4. fold it diagonally (opposite corners together) press hard along this fold so it leaves a crease when you unfold it
5. unfold it and make sure you can see the crease (it is a guidline for your next fold)
6. fold so that the outer edge touches the middle crease that you just made
7 & 8. do the same with the other side
9. flip over your fabric
10. fold so that the outer edges touche the middle crease like you did in steps 6 - 8
11. fold the "arrow head shape" in halfnow that you have the folds you can tie string or elastic bands tightly at even intervals
-
 Step 8
For this method I used pegs
-
 Step 9
-Fold your fabric like an accordion until you have a long strip
-Now do an accordion fold the other way until you have a small square
-Place pegs on each edge or each corner -
 Step 10
This is another of my favourites, and it's a really easy one
-
 Step 11
All you do is accordion fold a piece of fabric til you have a long strip, then roll it up into a spiral and secure it tightly with an elastic band or string.
If you added more elastics you would get a different pattern too -
 Step 12
This is very similar to number 6, the only difference is in the way I tied it up
-
 Step 13
Follow all the same steps as instruction 7 but this time, wind string tightly around the fabric and leave smaller gaps between wraps
-
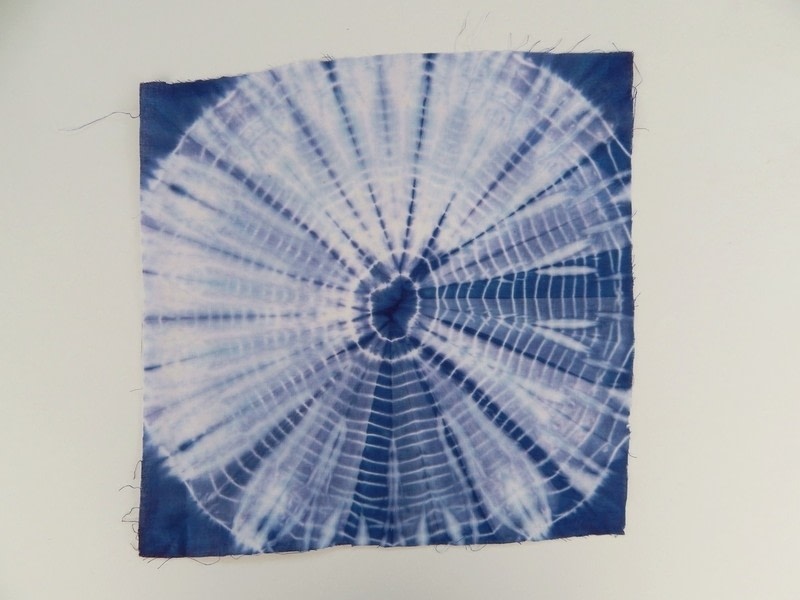
 Step 14
This is the one I was most excited to unwrap.
For this one you need a long circular object; I used a wooden stick from the garden -
 Step 15
-tightly wrap the fabric around your stick
-tightly wrap it with string or elastics
-that's it! -
 Step 16
This reminds me of jelly fish :P
I used stones for this one -
 Step 17
-lay your fabric flat
-pinch a tiny piece right in the center and tie it tightly with a piece of string
-now,place a small stone on the inside of the bit you just tied of
-wrap the fabric tightly around the stone and secure it with an elastic band (this is your center circle)
-place a few smaller stones in a circle around the center stone one at a time and secure them the same way as you did the first one
-now gather all the fabric together under the circle of stones to form a "tail" and secure it tightly with an elastic band or 2 (this will be the big circle around the smaller circles in the final design) -
 Step 18
I was so excited to see this one unfold!
-
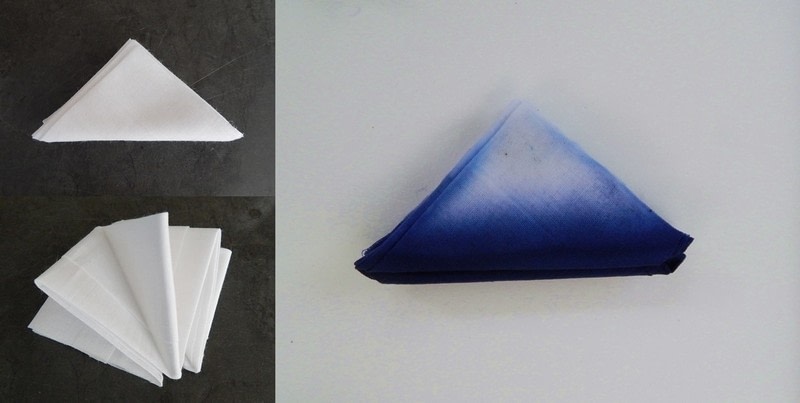
 Step 19
-accordion fold your fabric until you have a long strip
-starting with the bottom left corner, fold it up so that the bottom edge of your strip lines up with the right side of the strip to form our first triangle (I hope this makes sense)
-keep folding it up until you end up with one small triangle
- when you dye this one(to get the pattern I did) Only let the bottom edge touch the dye -
 Step 20
All you need for this one is string or elastic bands
-
 Step 21
-do a thin accordion fold
-then make folds evenly spaced and tie them tightly with elastic bands -
 Step 22
now the hard part: waiting for them to dry
I prefer not to remove the strings/elastics.etc until the fabric is dry otherwise the wet dye might still smudge and ruin your pattern
-
 Step 23
When they are dry, carefully cut off the elastics and string to reveal your patterns!!!
Now you can make cushion covers/ quilts/ scarves/ blankets/ bibs/etc.etc.etc !Have fun and remember there is no right or wrong,just millions of different patterns to discover along the way


Comments


 1
Watercolor Art »
Watercolor Paints Made From Make Up
1
Watercolor Art »
Watercolor Paints Made From Make Up
 2
Paper Book Covers »
Shoe Inspired Spiral Notebook
2
Paper Book Covers »
Shoe Inspired Spiral Notebook
