

Maps & Flowers Table
Extract from Beginner's Guide to Mod Podge • By Plaid Enterprises Inc • Published by GMC Publications

About
Beginner's Guide to Mod Podge
-
 Katie E. added Maps & Flowers Table to Macrame
28 May 22:04
Katie E. added Maps & Flowers Table to Macrame
28 May 22:04
-
 Lisa S. added Maps & Flowers Table to Dream Room
16 Oct 00:25
Lisa S. added Maps & Flowers Table to Dream Room
16 Oct 00:25
-
 Perfectly DeStressed added Maps & Flowers Table to Jane Austen's Bedroom
12 Aug 23:01
Perfectly DeStressed added Maps & Flowers Table to Jane Austen's Bedroom
12 Aug 23:01
-
 Beth E. added Maps & Flowers Table to You've Got Mail Inspired Room
24 Feb 22:23
Beth E. added Maps & Flowers Table to You've Got Mail Inspired Room
24 Feb 22:23
-
 Maya Kuzman favorited Maps & Flowers Table
21 Jan 15:52
Maya Kuzman favorited Maps & Flowers Table
21 Jan 15:52
-
 KakesKaty added Maps & Flowers Table to Mrs Potts parlour
19 Jan 11:17
KakesKaty added Maps & Flowers Table to Mrs Potts parlour
19 Jan 11:17
-
 Taylor K. favorited Maps & Flowers Table
28 Oct 23:44
Taylor K. favorited Maps & Flowers Table
28 Oct 23:44
-
 RavenQuinzel added Maps & Flowers Table to Ideas to try
24 Jul 15:51
RavenQuinzel added Maps & Flowers Table to Ideas to try
24 Jul 15:51
-
 Ellinor E. favorited Maps & Flowers Table
04 Jul 11:18
Ellinor E. favorited Maps & Flowers Table
04 Jul 11:18
-
 Marie B. favorited Maps & Flowers Table
05 Jun 20:54
Marie B. favorited Maps & Flowers Table
05 Jun 20:54
-
Step 1
To make the Table:
Always allow paint and Mod Podge to dry completely between applications.Paint the entire table with Willow Mist. Paint the entire table with Castle. When dry, lightly sand the table to allow some Willow Mist to show through for a distressed look.
-
Step 2
Measure your table top and piecing if needed, cut your background papers to fit (we used the map-themed and polka dot papers for the background). Cut the desired motifs from accent paper (we used the floral for the accents).
-
 Step 3
Apply Mod Podge to the wrong side of the background paper and the table top. Position the background paper on the table top. Use
the squeegee or brayer to smooth the paper. -
 Step 4
Use Mod Podge to adhere the motifs to the table top.
-
Step 5
Apply 2-3 topcoats of Mod Podge to the entire table top.
-
 Step 6
Mod Podge® Products
Decoupage is simply the art of cut-and-paste, used with paper or fabric cut-outs to decorate virtually any surface. Decoupage was all the rage in the 60’s, but quite tedious, requiring layers of varnish and sanding. In 1967, decoupage devotee Jan Wetstone invented a fast and easy alternative: Mod Podge, a takeoff on modern decoupage. It’s ideal for: home décor, gifts, upcycling, kids’ crafts, mixed media, and more.
Mod Podge is a brushable medium that works beautifully when adhering paper and/or fabric to almost any surface. It also works as a sealer and finish. As it is brushed over a project surface it appears milky white when wet, yet dries quickly to a clear, durable finish that seals and protects. The time-tested waterbase, non-toxic formula is manufactured near Atlanta, GA by Plaid Enterprises, Inc., a leading manufacturer of craft and home décor products.
BASICS
Basic Tools
Mod Podge Silicone Craft Mat • scissors • craft knife pencil • ruler • tape measure • squeegee • brayer assorted sizes of bristle and foam brushes • brush basin sandpaper • paper towels • tack clothPreparing the Surface to Be Decoupaged
Almost any surface can be decoupaged with Mod Podge; the prep work is simple.Wood: Lightly sand and wipe away the sanding dust with a slightly damp paper towel or tack cloth. If directed, apply 2 coats of acrylic paint, allowing to dry and sand between coats.
Glass: Wash in warm soapy water; rinse with warm water and dry. Wipe with rubbing alcohol to remove any soap residue or skin oils.
Papier-Mâché: Wipe with a slightly damp paper towel.
Fabric: Wash and dry the fabrics; do not use fabric softener, dryer sheets, or spray starch. Press the fabrics smooth.
Metal: Wash in warm soapy water; rinse with warm water and dry. Wipe with white vinegar.
Plastic: Wash in warm soapy water; rinse with warm water and dry. Mod Podge may not adhere to all plastics; be sure to test for good adhesion on a small area.
Applying Mod Podge
Always work on a covered work surface for fast clean-up and to protect the work surface.Paper to Wood:
• Cut the paper(s) to the exact size to fit the project. It is easier to cut it now than later.• If paper is thin, such as photocopy/printer paper, let the ink
dry for 10 minutes after printing. Apply several light coats of
Mod Podge Clear Acrylic Sealer to both sides of the paper.• If paper is thick, such as scrapbook paper or cardstock, or was printed on a laser printer, no preparation is necessary.
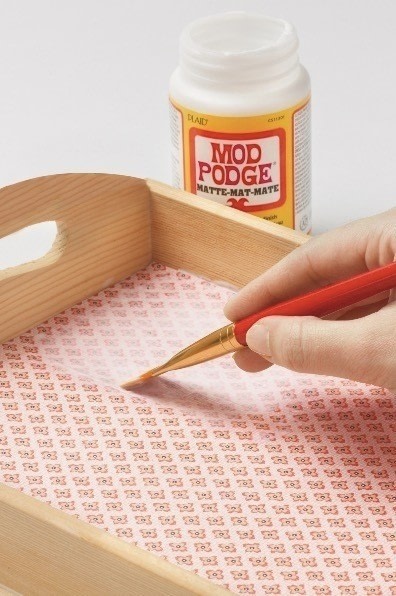
• Apply a medium coat (the product is white and visible on the surface) of Mod Podge to the wood surface (Photo 1) and the back of the paper. Too little glue will cause wrinkles; you can always wipe away any excess glue.
• Place the paper on the wood and smooth with a brayer or squeegee from the center towards the edges (Photo 2). Remove excess with a slightly damp paper towel. Keep smoothing with the tool until the paper is smooth.
• Let Mod Podge dry for 15-20 minutes. Apply 2-3 light protective coats of Mod Podge to the entire surface, allowing to dry between each coat (Photo 3).• Glossy finishes may remain tacky after drying. Spray the surface with Mod Podge Acrylic Sealer.
Paper to Glass:
• Follow the same application instructions as for Paper to Wood, page 4.Paper to Paper (including Papier-Mâché)
• Follow the same application instructions as for Paper to Wood, page 4.Fabric to Fabric:
• Apply a thin coat of Mod Podge to the wrong side of the fabrics that will be cut and decoupaged. Allow to dry. This gives the fabrics body and prevents fraying. Once dry, cut the fabrics as instructed.• Apply a light coat of Mod Podge to the wrong side of the fabric piece to be decoupaged. Place the fabric appliqué on the fabric background and smooth with a brayer or squeegee. Keep smoothing with the tool until the fabric is smooth.
• Let the Mod Podge dry for 20-30 minutes. Apply 2-3 light protective coats of Mod Podge to the surface, allowing to dry between each coat.
Paper to Metal:
• Follow the same application instructions as for Paper to Wood, page 4.TIPS
Here are a few tips to make crafting with Mod Podge even more fun.
• A 1-inch flat paintbrush is great for applying Mod Podge. Be sure to wash the brush immediately after use. When applying the protective topcoats of Mod Podge, you may wish to use a 1-inch foam brush with light pressure to minimize the appearance of brushstrokes.
• Dip your brush in clean water then blot the excess before you dip it in the Mod Podge for the first time. This softens the brush and allows the Mod Podge to flow smoothly.• A brayer or squeegee tool is essential for smoothing the paper or fabric on your project. A squeegee works for those tight corners and other small areas/spaces.


 1
Watercolor Art »
Watercolor Paints Made From Make Up
1
Watercolor Art »
Watercolor Paints Made From Make Up
 2
Paper Book Covers »
Shoe Inspired Spiral Notebook
2
Paper Book Covers »
Shoe Inspired Spiral Notebook

