https://www.cutoutandkeep.net/projects/nigiri-zushi-finger-sushi • Posted by Sushi with Style
These three forms of sushi are all formed into ovals or balls and then topped with an ingredient. While traditionally they are made by hand, a mold can be used for a few of them as well.


These three forms of sushi are all formed into ovals or balls and then topped with an ingredient. While traditionally they are made by hand, a mold can be used for a few of them as well. Project from the book Sushi with Style by Ellen Brown. Read our review.
<b>Preliminary Setup</b> Begin by getting yourself organized with a bowl of sushi rice covered with a damp towel, a bowl of tepid water into which you have poured rice vinegar at a ratio of 5 parts water to 1 part vinegar so you can clean your hands between pieces, and another damp towel on which you will dab your fingers after the dip into the bowl. If you dip your hands between pieces of sushi, the rice will not stick to them. Next assemble all your other ingredients, including a small dish of wasabi, and you will be working like a well-oiled sushi machine in a matter of minutes. It actually takes far longer to slice and dice the toppings and fillings than it does to make the sushi. If the sushi does not contain raw fish or other very perishable items, it can sit loosely covered with plastic wrap for up to a few hours before ser ving. But never refrigerate sushi; it will ruin the texture and flavor of the rice. And there’s nothing like practice to increase your speed. The first time I made a “battleship” it was hardly one I wanted to share with guests. But after about a dozen they started looking great. So for your first forays into sushi making, it is a good idea to have only close friends around. Then pick up 11⁄2 to 2 tablespoons of seasoned rice, and press it gently into the back of the topping, forming it into an oval. Be careful to not break the rice; if your sushi rice has the proper consistency, it should stay together without firm pressure. The last step is to press gently on the bottom of the finger so it will appear to have a slight hump when you set the topping up on the plate. Then turn the piece upside down with the topping now on top, and place it on a plate.

<b>Molding the Fingers</b> While sushi chefs would never consider using the convenience of a mold to create fingers, it really makes perfect nigiri foolproof if you do so, and you can make a number at a time. The molds are made from plastic, and most create 5 pieces at a time. When using a mold, however, the method will be the reverse because you will create the fingers and then drape the topping over them. Cut a sheet of plastic wrap about twice the size of your mold, drape it over the mold, and press the plastic wrap into the indentations. Then take rice and press it into the indentations gently up to the top of the mold, rewetting your fingers between indentations as necessary. Fold the plastic wrap over the top of the mold, and press on the cover. Remove the lid, and fold back the plastic wrap. Then turn the mold over onto a plate, remove the mold, and pull up on the sides of the plastic wrap. Continue in this fashion until you have formed the number you want, keeping the completed sushi loosely covered with plastic wrap and not touching each other to prevent them from sticking together. You can allow them to sit at room temperature for a few hours, but do not refrigerate them. Just prior to serving, rub your topping with wasabi, if desired, and drape the toppings over the fingers, pressing them on gently.

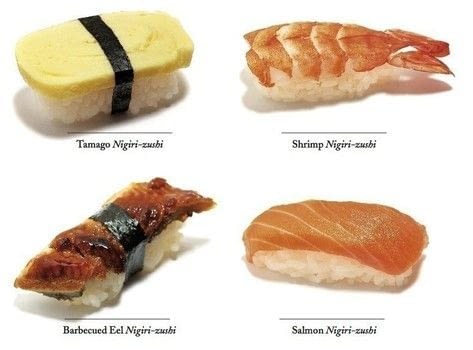
It is this form of sushi, developed in the nineteenth century, which created the modern genre as we know it today, so we will begin here. In Japanese, nigiri literally means “to gently squeeze,” and that is what you’ ll be doing to form these fingers of seasoned rice, which serve as edible pedestals for a wide range of toppings called neta. It is important that the topping is supple so that it drapes well on top of the rice; a slice of raw carrot would not be a good candidate, while the same thin slice of carrot blanched works extremely well. You will form nigiri from the top down, and then turn it over. Pick up a piece of topping, and rub one side with a dab of wasabi if desired. This dab traditionally is used for all forms of raw and cooked fish and seafood, but it certainly is optional if you are going to top the finger with a slice of tamago omelet.

<b>Good Choices to Top Nigiri-zushi:</b> Slices of any raw fish, shrimp, roasted red bell pepper, grilled shiitake mushrooms, slices of tamago omelet tied with a 1⁄4 inch strip of nori, or barbecued eel tied with a 1⁄4 inch strip of nori.