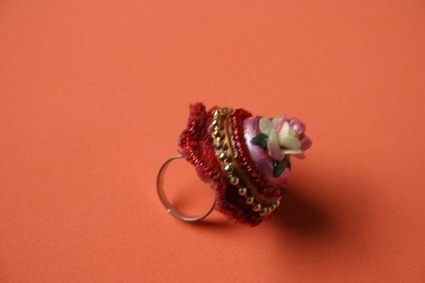
Kitschy Ring Made Of Recyling Materials.
kitschy ring made of recyling materials and scraps
Posted by Jet H.
About
Because my friend Sheila was almost having her birthday and i hadn't still not a birthday present, so i thought
i will asked her if she likes to have one of my kitschy ring designs of recyling materials.
it's made of a lid of a med tube.
we both have meals from our meds we must taken so i thought this is such a joke.LOL
I didn't had a fitting ringbox for it so i have wrapped him later on in a med box.LOL
so it was a really fitting birthday gift for her.LOL
they weren't the right ones so i had do more work to reshape him to become the one i would like to have.
I made this design for my performances on stage with our tear yearking choire
but later on some friends loved them too much so i sold some of them to them.
it's not sooo difficult to make , so don't worry.
my friend would loved to have the how to she has asked for it much times so here it comes.LOL
Hope you like this tute and give it a try as well, be just creative and thank you very much for hopping by;-D
Share
You Will Need (26 things)
- Stick(s)
- Componented Glue
- Ring Base
- Cup(s)
- Hot Glue Gun And Glue Sticks
- Notions: Thread , Scissors, Pins, Sewing Machine
- Ironing Board
- Pearl Shell Acrylic Paint
- Paverpol (water resistant textile stifner)
- Foam Rubber
- Flat Iron
- Pencil(s)
- Fusible Webbing
- Tricot Velvet Fabric
- Ruler
- Scraps Of Caron Boxes
- Matte Mod Podge
- Small Vase
- Water
- Clear Nail Polish
- Brush
- Paper Clay
- Fake Pearls Or Golden Bead(s)
- Masking Tape
- Acrylic Paint
- Knife
Steps (19 steps, 300 minutes)
-
 1
1you need one of those med tubes. I use them for killing my chronicle pain.
they are effervescent tablets. So if you have effervescent tablet for something else they havve the same kind of small lids.
You need only the lids. -
 2
2We must reshape the lids as first.
Cut carefully the wirelooking shape of the lid , watch the picture;-D -
3
Now you can cut off the top of the lid.
After all you have a lid with 2 circles, watch the picture -
4
Now take your light weitghed air drying clay.
I used this brand, I showing you this so you can see how it looks like to find your brand in your country. -
5
Fill the empty spaces of the lids. Let it dry.
then paint the bigest ring of the lid with gold acrylic paint.
let it dry as well. -
6
Pick up the tiny paper roses and pull carefulling the undersite leafes free from the flower
-
7
with mode podge you must cover the whole rose up.
Let it dry standing in a small vase . -
8
Making the fabric underground.:
Make a circle of 1,5 inches. or 3,5 cm on a piece of carton.
Cut it out. -
9
Iron a piece of fuseable webbing on the wrong side of the velvet an on that you must draw your two circles.
Cut them out.
Cut a smaller circle of some foam rubber. -
10
Pin the circles and the foam rubber in between to each other.
-
11
with the zigzag stich you will sew this together,
make 2 rounds . -
12
Whit paperpol add a layer on the behind side of the round.
Mayby you must add one or two layers as well , till it's feeling smoothly.
Note
Paverpol has a long harding out time needing (4 weeks)!!!! -
13
With pearl shell acrylic paint , paint the upside of your lid.
let it dry.
mayby add some more layers on it.
when it's totally dried, you can glue the flower rose on the top of it. -
14
thread red glas seads bead on yarn for the top layer of the top circle.
-
15
glue the string of beads with some glue on the top circle.
-
16
and glue some pearl beads sting or fake golden string on the fabric around the lid.
-
17
pick your ring basis and the "stone lid"
-
18
make the glue ready
put an a small cup that you can throw away, a tiny bit glue .
with the stick stir the glue together. -
19
Add the glue on the ring basis and press the 'stone' on the basis .
do this for some minutes.
and with some tape over the whole ring secure it when it dries for 24 hours more.and then you're ready to weare the ring or giving it away like i did.;-D
thank you for stoppin by;-D


