https://www.cutoutandkeep.net/projects/embroidered-felt-peacock • Posted by Search Press
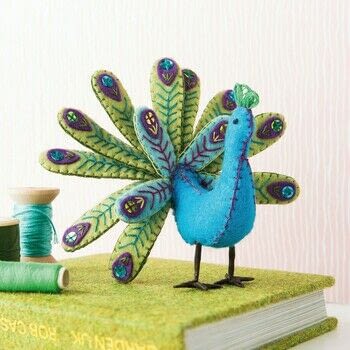
Without a doubt one of the loveliest and most majestic of birds, the peacock is a symbol of pride and beauty. I wanted to keep a folky, naïve look to mine but I knew I wanted him to have a gorgeous open tail in full display. I even gave him a little sparkle with a few sequins, but feel free to add more. Templates • The peacock templates are in the attachments. You will need: - 2 bodies in peacock blue - 1 gusset in peacock blue - 1 tail piece in dark green - 14 eye spots in purple - 10 long feathers in light green and 10 in dark green - 4 short feathers in soft turquoise and 4 in dark green

Without a doubt one of the loveliest and most majestic of birds, the peacock is a symbol of pride and beauty. I wanted to keep a folky, naïve look to mine but I knew I wanted him to have a gorgeous open tail in full display. I even gave him a little sparkle with a few sequins, but feel free to add more. Templates • The peacock templates are in the attachments. You will need: - 2 bodies in peacock blue - 1 gusset in peacock blue - 1 tail piece in dark green - 14 eye spots in purple - 10 long feathers in light green and 10 in dark green - 4 short feathers in soft turquoise and 4 in dark green
Cut out the templates and transfer to the felt.

Start by embroidering the light green and turquoise tail feathers in the following way (see figure 1): attach a purple eye spot at the top, on the rounded edge of the feather, by working three stitches in a V-shape, using green thread. Add a sequin above it, then embroider a long line of fly stitches just below the eye spot using turquoise thread for the long green feathers and fuchsia pink thread for the short turquoise ones. As an easier alternative, you could simply make a line of backstitch and add small straight stitches on either side to resemble fly stitch. Keep the dark green feathers plain.
Place a dark green feather on the back of each embroidered one and blanket stitch them together using green thread.

Place all ten long feathers, embroidery side up, in a fan shape with the base on top of the dark green tail piece. Secure with a few small stitches. You might find it easier to start with five feathers spread out and then add the other five in the gaps. Stitch the back all the way around the tail piece (see figure 2).

When you are happy with the long feathers, add the small ones on top and hold the base with small stitches going into the tail piece.
Embroider one eye on the face of each body piece by working a French knot in black thread.

To make the crest, simply wrap embroidery cotton (full thickness) around a pencil about five times. Remove from the pencil but hold the base firmly and wrap the thread around it to hold securely. Tie a knot as shown (see figure 4).
You can now assemble the bird. Place both bodies together and, starting from the tail, sew along the back using blanket stitch and fuchsia pink thread.
Insert the crest on top of the head, between the two body pieces and stitch through it to secure. Carry on stitching to point A at the base of the neck. Add a little toy filling to the head.
Open the tail at the end of the body parts you have just sewn and flatten it. Place on top of the feathered tail from step 4, with all embroidery facing forward. Hold with a pin and sew the blue felt around the tail with a few small stitches.

Place the gusset on the bird, matching point A on the pointed end to the neck opening, and the rounded end to the back of the tail (dark green side). Sew all the way around using blanket stitch and fill the body before closing completely (see figure 5).
Add the wire legs. They need to be about 2cm (3⁄4in) long.